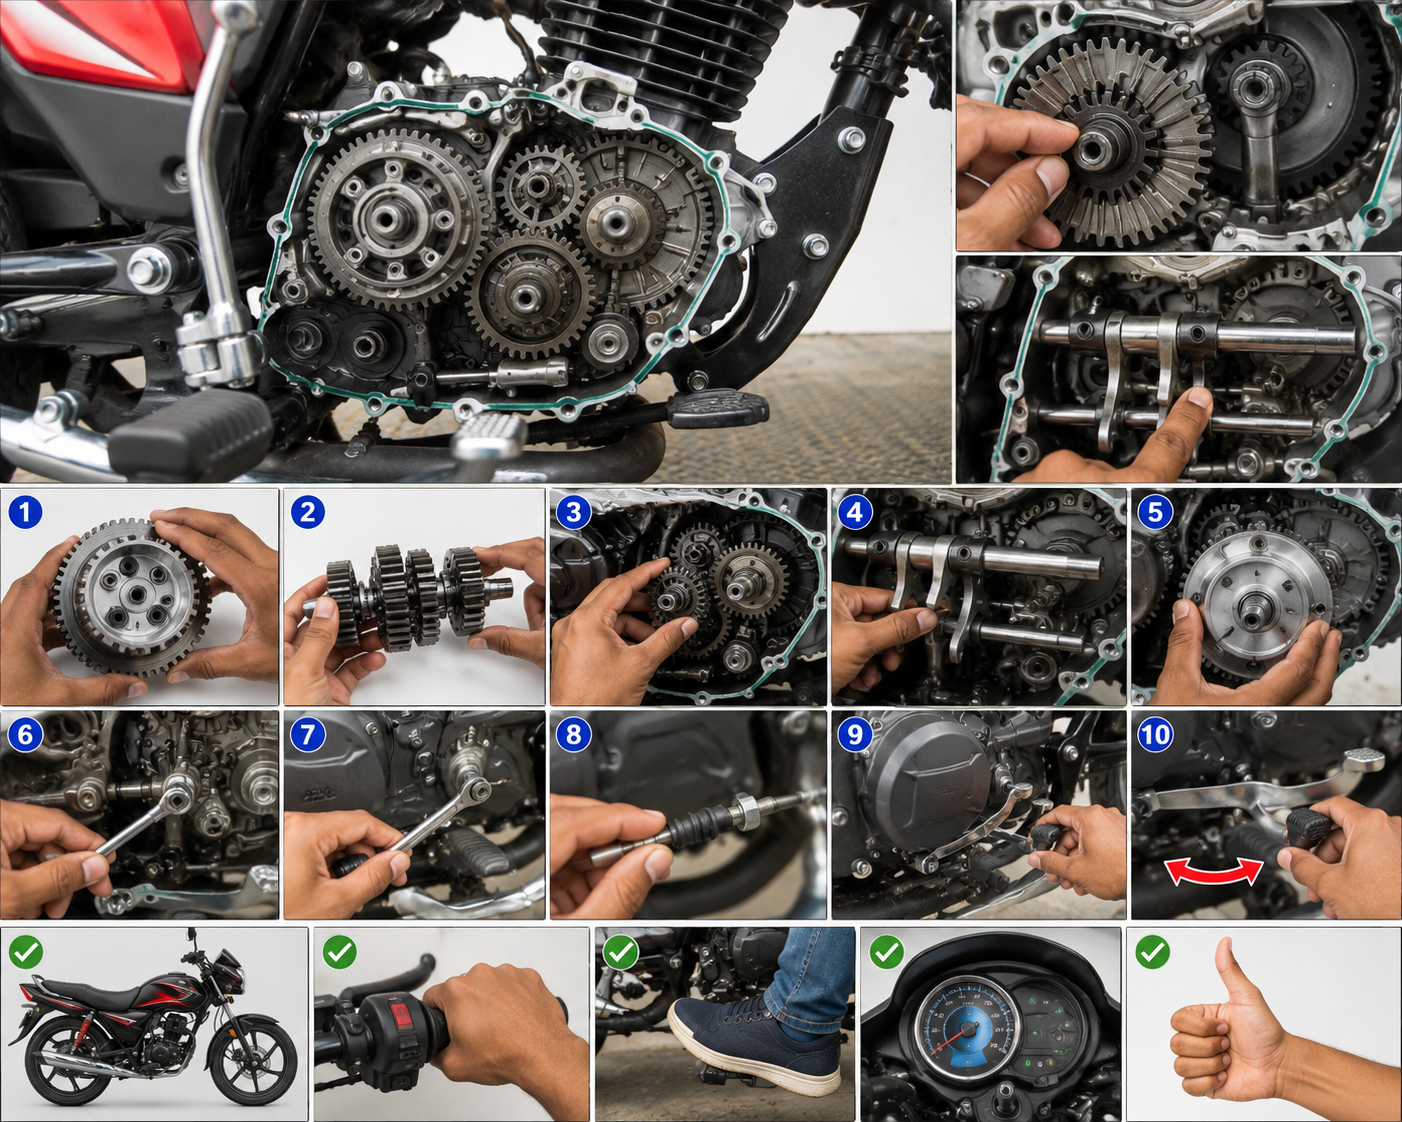
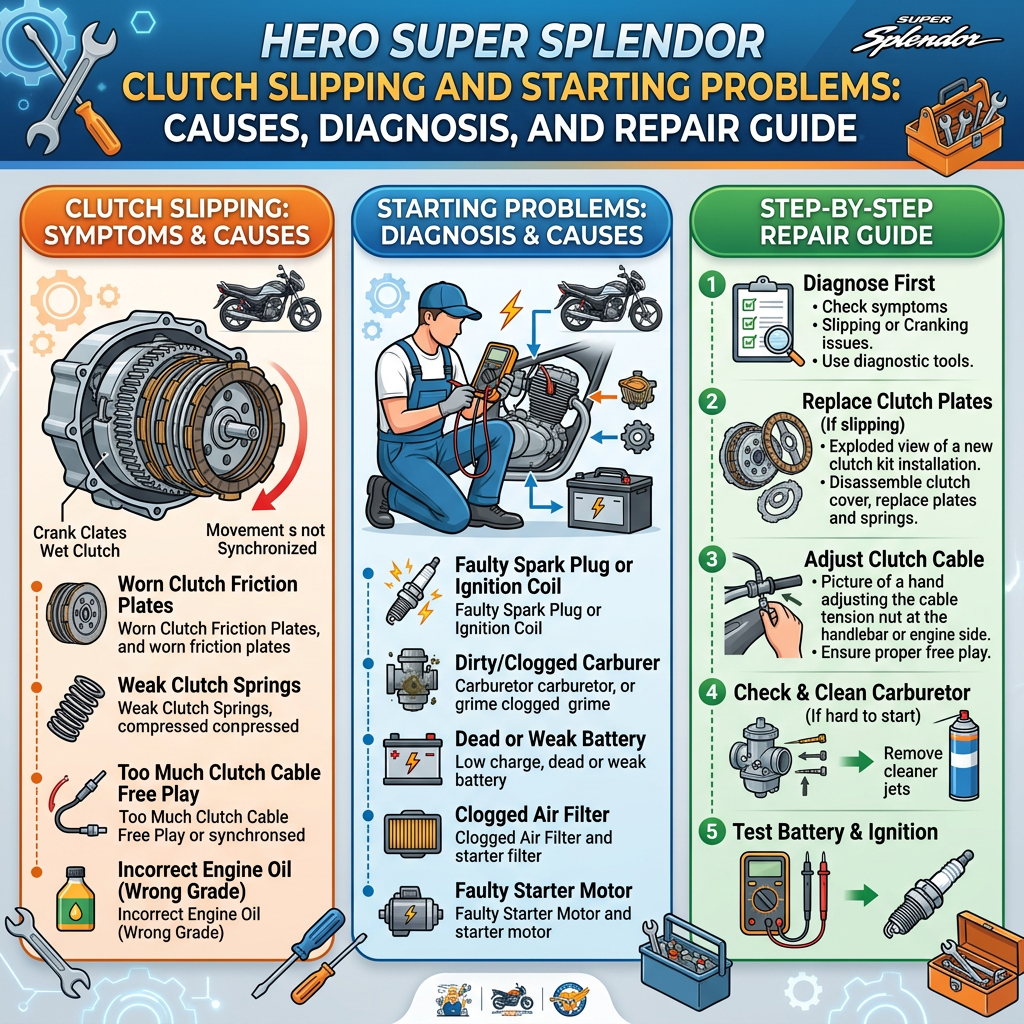
Hero Super Splendor Clutch Slipping and Starting Problems: Causes, Diagnosis, and Repair Guide

Guide to motorcycle clutch slipping, starting problems, diagnosis, and repairs

VIntroduction

The Hero Super Splendor is a popular commuter motorcycle known for its fuel efficiency, practical design, and everyday usability. However, like any motorcycle, it can develop mechanical problems over time. Two common complaints are clutch slipping while riding and difficulty starting the engine.

These problems can reduce performance, waste fuel, and make daily commuting difficult. The good news is that many causes can be identified through systematic inspection and proper maintenance.

In this guide, we will explain the symptoms, possible causes, troubleshooting methods, and repair procedures for Hero Super Splendor clutch slipping and starting problems.

1. Understanding Clutch Slipping in Hero Super Splendor

A motorcycle clutch connects and disconnects the engine from the transmission. When the clutch lever is released, the clutch should engage properly and transfer engine power to the rear wheel.

Clutch slipping occurs when the clutch cannot transfer engine power effectively. The engine RPM may increase, but the motorcycle does not accelerate as expected.

Common Symptoms of Clutch Slipping

Watch for these warning signs:

  • Engine RPM increases without a matching increase in road speed.
  • Acceleration becomes weak, particularly when climbing a hill.
  • The motorcycle struggles when carrying additional weight.
  • The clutch engagement point changes or feels unusual.
  • A burning smell develops after repeated slipping.
  • Fuel consumption may increase because the engine is working inefficiently.

If these symptoms appear, inspect the clutch system instead of immediately replacing parts.

2. Main Causes of Clutch Slipping

A. Incorrect Clutch Lever Free Play

Incorrect clutch cable adjustment is one possible cause of clutch slipping.

If the cable is too tight, the clutch may remain partially disengaged even when the lever is released. This prevents the clutch plates from gripping properly.

How to check:

  1. Switch off the motorcycle and park it securely.
  2. Inspect the clutch lever and cable.
  3. Check the free play against the specification in the owner’s manual.
  4. Adjust the cable using the appropriate adjuster.
  5. Operate the lever several times and confirm that it moves smoothly.

Do not guess the free-play measurement. Specifications can vary by model year and version.

B. Worn Clutch Friction Plates

Clutch friction plates gradually wear with use. Excessive wear can reduce their ability to transfer engine power.

Possible symptoms:

  • Poor acceleration under load.
  • Engine RPM rising without sufficient road-speed increase.
  • Slipping that continues despite correct cable adjustment.

Repair procedure:

  1. Confirm that cable adjustment is correct.
  2. Check for external clutch operating problems.
  3. If slipping continues, inspect the clutch assembly according to the service manual.
  4. Measure friction plate thickness and inspect the plates for glazing, damage, or wear.
  5. Replace components that are outside the manufacturer’s specifications.

Use the correct replacement parts for the exact Super Splendor model and year.

C. Weak Clutch Springs

Clutch springs provide the pressure needed to keep the clutch plates engaged.

If the springs become weak or fall outside the specified service limits, the clutch may slip under load.

During clutch servicing, inspect the springs for damage and measure their free length according to the service manual. Replace them if they do not meet the specified limits.

D. Incorrect Engine Oil

The wrong engine oil can contribute to clutch problems on motorcycles that use a wet clutch.

Oil that does not meet the motorcycle manufacturer’s requirements may affect clutch operation.

Always use the recommended oil grade and specification listed in the owner’s manual. Do not assume that every engine oil suitable for a car is suitable for a motorcycle with a wet clutch.

E. Damaged or Warped Clutch Plates

Clutch plates can become glazed, overheated, or distorted.

Damaged plates may cause slipping, poor engagement, or inconsistent clutch operation.

A qualified mechanic should inspect the plates for discoloration, warping, and wear. Replace damaged components rather than attempting an unreliable repair.

3. Hero Super Splendor Starting Problems

Starting problems can have several causes. The correct diagnosis depends on whether the engine fails to crank, cranks without starting, or starts and then stops.

A. Weak or Discharged Battery

On electric-start versions, a weak battery can cause slow cranking, clicking sounds, or no response when the starter button is pressed.

How to troubleshoot:

  1. Check whether the headlight and instrument lights behave normally.
  2. Inspect the battery terminals for looseness or corrosion.
  3. Confirm that the battery connections are secure.
  4. Have the battery tested if the starter turns slowly.
  5. Check the charging system if the battery repeatedly becomes discharged.

Never short the battery terminals with a tool. Incorrect handling can cause sparks, burns, or battery damage.

B. Faulty Starter Motor or Starter Circuit

If the battery is charged but the starter does not operate correctly, the problem may involve the starter motor, relay, wiring, switch, or a related electrical connection.

Listen carefully when pressing the starter button.

  • A single click may indicate a battery, relay, connection, or starter-motor problem.
  • Repeated clicking often suggests insufficient battery power or a poor connection.
  • No sound may indicate a switch, wiring, relay, or other electrical fault.

These symptoms are clues, not definitive diagnoses. Test the electrical system before replacing parts.

C. Spark Plug Problems

The spark plug ignites the air-fuel mixture inside the engine. A worn, fouled, damaged, or incorrectly gapped spark plug can make starting difficult.

Inspection steps:

  1. Switch off the engine and allow it to cool.
  2. Remove the spark plug using the correct tool.
  3. Inspect the electrode for excessive deposits, wear, or damage.
  4. Check the gap against the specification for your model.
  5. Clean or replace the plug as appropriate.

If the new or serviced spark plug does not solve the problem, inspect the ignition system rather than repeatedly replacing plugs.

Avoid touching ignition components while the engine is being cranked.

D. Fuel Supply Problems

A motorcycle may crank normally but fail to start if fuel is not reaching the engine correctly.

Possible causes include stale fuel, a restricted fuel passage, a clogged filter where fitted, or a malfunctioning fuel-delivery component.

Check the fuel level and use fresh fuel. If the motorcycle has been unused for a long time, have the fuel system inspected.

Fuel-system procedures differ between carbureted and fuel-injected versions. Follow the correct service instructions for the specific model.

E. Air Filter Restriction

A dirty or blocked air filter can disturb the air supply needed for combustion.

Possible symptoms include difficult starting, poor acceleration, and irregular engine operation.

Inspect the air filter according to the maintenance schedule. Clean or replace it using the manufacturer’s recommended procedure. Do not wash a filter unless its design specifically permits washing.

F. Incorrect Valve Clearance

Valve clearance that is outside the specified range can affect engine performance and make starting difficult, particularly on an engine that has developed a mechanical fault.

Checking valve clearance requires the correct procedure, engine temperature conditions, and measurement specifications.

If the motorcycle remains difficult to start despite basic checks, ask a qualified mechanic to inspect the valve clearance and compression.

G. Carburetor or Fuel-Injection Problems

Depending on the motorcycle’s model year and configuration, fuel delivery may involve a carburetor or a fuel-injection system.

On carbureted versions, a blocked pilot circuit, incorrect adjustment, or fuel contamination may cause difficult starting or unstable idling.

On fuel-injected versions, possible causes include an electrical supply problem, a sensor fault, or a fuel-delivery issue.

Do not adjust the carburetor or replace injection components without identifying the actual fault.

4. Step-by-Step Troubleshooting Guide

Follow this order to avoid unnecessary repairs.

Step 1: Identify the starting symptom

Determine whether the engine does not crank, cranks but fails to start, or starts and then stops.

Step 2: Check the battery and connections

Inspect the battery condition and terminals on electric-start versions. Test the battery if necessary.

Step 3: Check the fuel supply

Confirm that sufficient fresh fuel is available and that there are no obvious fuel-delivery problems.

Step 4: Inspect the spark plug

Check its condition and the specified gap. Investigate the ignition system if the problem continues.

Step 5: Inspect the air filter

A restricted filter can affect combustion and engine performance.

Step 6: Check clutch cable adjustment

If the motorcycle starts normally but engine RPM rises without corresponding acceleration, verify clutch free play.

Step 7: Inspect internal components if necessary

Persistent clutch slipping may require clutch plate and spring inspection. Continued starting problems may require compression, valve-clearance, or electrical testing.

5. Can Clutch Slipping Cause Starting Problems?

Clutch slipping and engine starting problems are generally separate faults.

A slipping clutch usually affects power transfer after the engine starts. A weak battery, ignition fault, fuel-delivery issue, or mechanical engine problem is more likely to cause difficulty starting.

However, two faults can occur at the same time, especially on an older or poorly maintained motorcycle.

Diagnose each symptom separately rather than assuming that one repair will solve both problems.

6. Maintenance Tips to Prevent These Problems

Regular maintenance can reduce the risk of unexpected breakdowns.

  • Follow the recommended engine oil grade and replacement interval.
  • Check clutch lever free play during routine inspections.
  • Maintain the battery and keep electrical connections secure.
  • Inspect the spark plug at the scheduled service interval.
  • Clean or replace the air filter according to its service requirements.
  • Use fresh fuel and avoid leaving fuel in an unused motorcycle for extended periods.
  • Inspect the drive chain and maintain the correct tension and lubrication.
  • Investigate unusual engine noises, burning smells, or changes in acceleration promptly.
  • Keep a record of repairs and scheduled maintenance.

Good maintenance cannot prevent every failure, but it can help identify wear before it causes a more serious problem.

7. When Should You Visit a Mechanic?

Seek professional inspection if:

  • The clutch continues slipping after correct adjustment.
  • The clutch housing produces unusual noises.
  • The starter motor turns but the engine will not start after basic checks.
  • The engine repeatedly stalls or loses power.
  • Fuel leaks or damaged electrical wiring are present.
  • Compression or valve-clearance problems are suspected.

Stop riding if the clutch cannot transfer power reliably, the engine behaves unpredictably, or a fuel leak is present. Continuing to ride may create a dangerous situation.Read also ford-f-150-engine-problems-common-causes-diagnosis-and-repair-guide

Conclusion

Hero Super Splendor clutch slipping and starting problems can result from several different faults. Incorrect clutch free play, worn friction plates, weak springs, or unsuitable engine oil may contribute to clutch slipping. Starting difficulties may be related to the battery, starter circuit, spark plug, fuel supply, air filter, valve clearance, or other engine components.

The best repair method is to identify the symptoms, perform basic checks, and test the relevant components before replacing parts. Use the correct service specifications for the motorcycle’s model year and version.

With proper diagnosis and regular maintenance, many common problems can be resolved before they develop into expensive repairs. Always prioritize safe working practices and consult a qualified mechanic for repairs that require specialized tools or internal engine work.
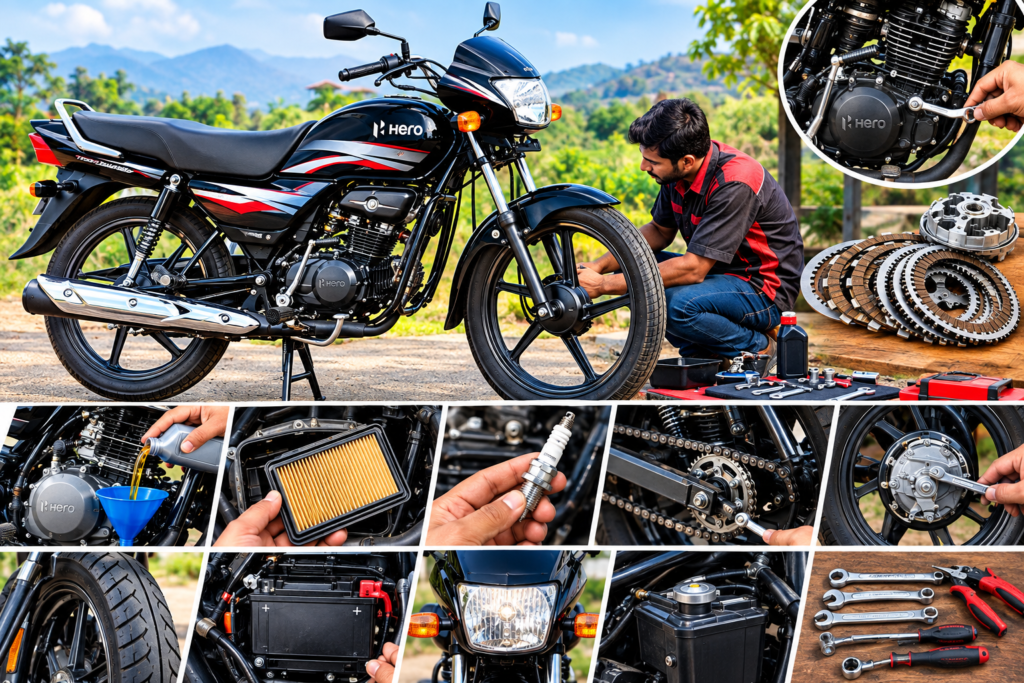
BS4 Hero CD Dawn Bike Repair Guide: Find Faults Before They Cause Breakdowns

file 0000000002ac821184b7bff8724cf48a8542971222977289789

A loose battery lead or worn tyre can turn a short ride into a roadside stop. This BS4 Hero CD Dawn bike repair guide helps you spot common faults early, avoid unnecessary part swaps, and keep unsafe problems off the road. It covers basic checks, not a replacement for a trained mechanic.

Repair steps and specifications can vary by model year and market version. Confirm your bike’s exact variant, then use its owner’s or service manual for part details, limits, and approved repair methods.

Confirm Your BS4 Hero CD Dawn Variant Before Repairs

The right part or adjustment depends on the exact motorcycle, not only its name or appearance. Check the bike’s identifying details before buying parts or starting work. A correct match also helps you use the right service instructions.

Check the model year, variant, and frame details

Compare the model year and variant on your registration papers with the details on the motorcycle. Frame and engine numbers can help confirm its identity; their locations may vary, so check the manual. If any details don’t match, ask a Hero dealer or qualified mechanic to verify the bike before ordering parts.

Gather tools and reference material

A basic tool set, suitable spanners, screwdrivers, pliers, a tyre-pressure gauge, clean cloths, and a torch can handle many visual checks. Use tools that fit well to avoid rounding fasteners. Keep the correct manual nearby for torque values, clearances, fluid types, tyre pressures, and adjustment limits. Don’t guess these figures.

Set up a safe repair area

Park on firm, level ground and support the motorcycle as the manual directs. Let the engine cool before inspecting parts near the exhaust or cylinder. Wear gloves when handling dirty parts and eye protection when debris or fluid could splash. Keep fuel away from flames, sparks, and other ignition sources.

Catch Wear and Maintenance Problems Early

A short inspection before a ride can reveal changes while they’re still easy to report or repair. Check the same areas each time, and note anything that looks or feels different. Don’t adjust a part if you’re unsure of the correct method.

Inspect engine oil and look for leaks

Check the oil using the method in the owner’s manual. The bike’s position, engine temperature, and time after shutdown can affect the reading, so follow the stated procedure. Look for fresh oil around the engine and on the ground beneath the motorcycle. A recurring leak needs diagnosis; topping up alone won’t fix its cause.

Check tyres, wheels, brakes, and controls

Inspect tyre tread and sidewalls for cuts, cracks, bulges, or embedded objects. Check pressure when the tyres are cold and compare it with the manual or tyre guidance for your bike. Look for visible wheel damage, then check that brake levers and pedals feel normal and the throttle moves and returns freely. Damaged tyres or unreliable brakes need prompt attention.

Clean and assess the drive chain

Look for rust, stiff or damaged links, unusual noise, and slack outside the range set in the manual. Clean and lubricate the chain using the method and product recommended for your model. Too much tension can strain parts, so don’t tighten the chain by eye. Seek help if links bind or the chain and sprockets show heavy wear.

Trace Starting and Running Problems Step by Step

Start with simple checks and record what happens before removing parts. A symptom can have several causes, so one clue rarely proves that a component has failed. If you can’t find a clear cause, stop before the repair grows beyond your skill or tools.

If the engine will not start, check basics first

Confirm there’s fuel in the tank, the ignition switch is in the correct position, and you’re using the starting method listed in the manual. Check for obvious loose connections only when the bike is off and safe to inspect. If the engine turns but won’t start, avoid repeated long attempts; they can drain the battery. Arrange a diagnosis if basic checks don’t help.

If the starter is weak or lights are dim

With the motorcycle off, inspect battery terminals for looseness, corrosion, or damaged wires. Don’t bridge terminals with a tool, and don’t disconnect the battery unless the manual explains the safe procedure. If the connections look sound but the starter remains weak or lights stay dim, request a battery and charging-system test.

If the engine runs poorly or stalls

Note whether the problem happens at idle, during acceleration, or after the engine warms up. Record whether it began after refuelling or recent service, and whether it happens every time. These details help a mechanic narrow the diagnosis, but they don’t identify a failed part on their own. Avoid changing several settings at once.

Handle Brakes, Chain, and Electrical Faults Without Guesswork

These systems affect safe control, so limit home repairs to checks you can perform correctly. Use the manual for model-specific procedures and limits. If a fault affects braking or returns after a basic check, leave diagnosis and repair to a qualified mechanic.

Investigate brake drag, noise, or weak stopping

Look for visible damage, unusual wear, fluid leaks, or a change in lever or pedal feel. Don’t ride the motorcycle to test brakes that feel weak, noisy, or inconsistent. A qualified mechanic should inspect the system before the bike returns to service. Avoid taking apart brake parts unless you have the right tools and training.

Correct chain problems within manual limits

Check chain condition first, then measure slack as the manual describes. Clean and lubricate it with a suitable product, and follow the model-specific method for any adjustment. Chain alignment and adjustment can vary by bike. If the chain or sprockets look badly worn, have a mechanic assess whether parts need replacement.

Check lights, horn, switches, and visible wiring

Test the lights, horn, and switches while the motorcycle is stationary. Inspect accessible bulbs, connectors, and wires for looseness, corrosion, or visible damage. Don’t fit a higher-rated fuse to stop one from blowing. A fuse that fails again, or an electrical fault that returns, needs proper diagnosis.

Verify the Repair and Know When to Call a Mechanic

Before you finish, make sure the bike is safe to inspect and all work matches the manual. Check the original symptom again without riding if it involves a safety-critical system. If the fault remains or a new one appears, stop and arrange professional help.

Recheck fasteners, fluid levels, and tool clearance

Look for loose parts, fresh leaks, trapped wires, and tools left near moving or hot components. Confirm fasteners and fluid levels using the correct service instructions. Don’t estimate torque by feel where the manual gives a value. If a part doesn’t fit as expected, pause rather than forcing it.

Confirm the fix while the motorcycle is stationary

With the bike stable, check that lights and the horn work, the throttle returns, and the brakes respond normally. Confirm any part you touched moves as intended and doesn’t rub or bind. If the original problem remains, or a new sound or warning appears, don’t ride until it’s checked.

Get help for safety-critical or complex faults

Brake failure, a fuel leak, repeated electrical faults, major engine noise, or damage to structural parts calls for professional service. Don’t ride a motorcycle with any of these problems. Tell the mechanic when the fault occurs and what checks you’ve completed; clear notes can help speed up diagnosisRead also yamaha-xsr-155-engine-specs-performance

Keep the BS4 Hero CD Dawn Ready for the Next Ride

Confirm the exact variant before buying parts or adjusting components. Use the manual for specifications, and check the tyres, brakes, chain, oil, and electrical functions on a regular schedule. Record symptoms instead of guessing at their cause, and keep the bike off the road when a safety-critical fault appears.

Small, methodical checks can make faults easier to trace, but a quick fix isn’t worth risking a breakdown or injury. Check your CD Dawn before the next ride, and book a mechanic when the repair is beyond your tools or training.

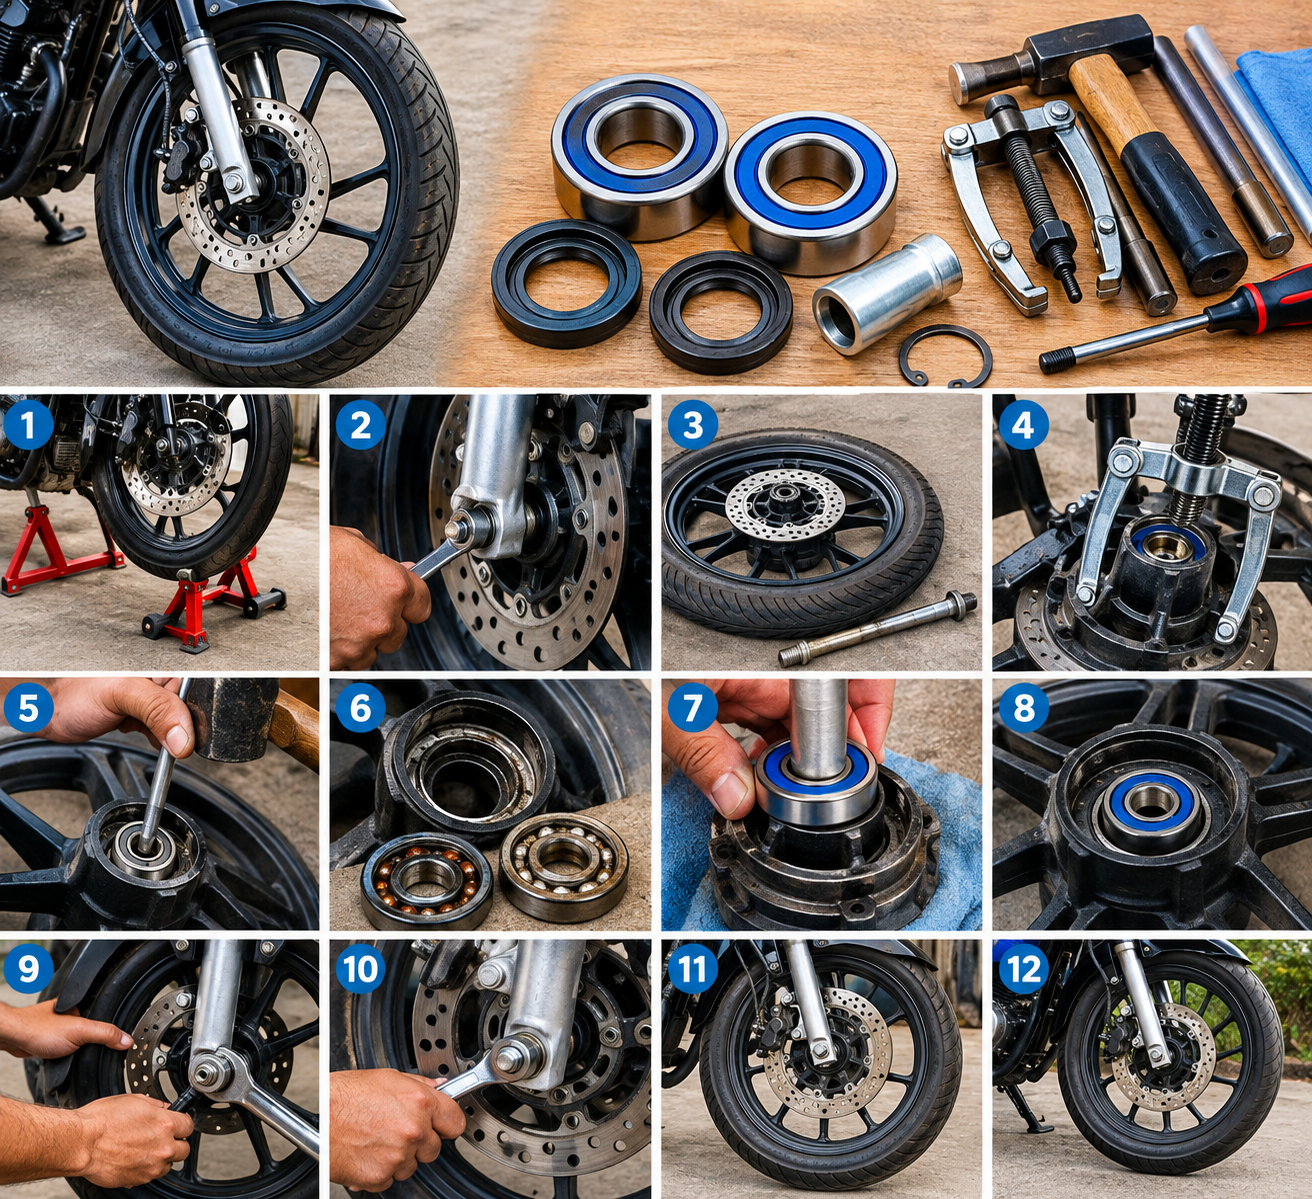
How to Change Bike Wheel Bearings: Step-by-Step Guide

file 00000000ab288208b20c34f170645b86

Today, I will explain the step-by-step method for changing wheel bearings on a motorcycle or bike. Wheel bearings are small components, but they play a very important role in the safe and smooth operation of a motorcycle. They allow the wheels to rotate freely while supporting the load of the motorcycle, rider, passenger, and road forces.

A worn or damaged wheel bearing can cause wheel play, unusual noise, rough rotation, vibration, and poor handling. If the problem becomes severe and the bearing is ignored for a long time, it can affect other wheel components as well.

The good news is that wheel-bearing replacement is a repair that an experienced mechanic can perform with the correct tools and proper procedure.

However, the exact bearing size, number of bearings, spacer arrangement, torque specifications, and wheel-removal procedure can differ between motorcycles. Therefore, always check the service information for the exact bike before beginning the repair.

In this guide, I will explain the complete general procedure, from identifying a damaged bearing to removing the wheel, replacing the bearing, checking the spacers and seals, reinstalling the wheel, and performing the final safety inspection.


What Does a Wheel Bearing Do?

A motorcycle wheel bearing allows the wheel hub to rotate smoothly around the axle.

The bearing contains precision-machined races and rolling elements that reduce friction between the rotating wheel and the stationary axle or mounting components.

A properly functioning bearing helps the wheel rotate smoothly and contributes to stable handling.

Wheel bearings are designed to withstand:

  • Motorcycle weight
  • Rider weight
  • Braking forces
  • Acceleration forces
  • Cornering forces
  • Road impacts
  • Continuous wheel rotation

Because they operate under demanding conditions, wheel bearings eventually wear out.


Signs of a Bad Wheel Bearing

Before replacing a wheel bearing, it is important to identify the symptoms correctly.

Common signs include:

Rough Wheel Rotation

When the wheel is rotated by hand, a damaged bearing may feel rough rather than smooth.

Grinding or Humming Noise

A worn bearing can produce a humming, grinding, or rumbling sound.

Excessive Wheel Play

A damaged bearing may allow abnormal movement between the wheel and axle.

Vibration

Bearing wear can sometimes contribute to unusual vibration while riding.

Uneven Wheel Movement

The wheel may not rotate smoothly if the bearing is severely damaged.

However, these symptoms can also be caused by loose axle hardware, worn brake components, damaged tires, bent wheels, or other problems. A proper inspection is therefore important.


Tools Required

The exact tools depend on the motorcycle, but a typical wheel-bearing replacement may require:

  • Motorcycle stand or suitable lifting equipment
  • Socket set
  • Spanner set
  • Torque wrench
  • Screwdrivers
  • Allen keys
  • Circlip pliers if applicable
  • Bearing puller
  • Bearing driver or suitable press tools
  • Soft-faced hammer
  • Suitable drift or installation tool
  • Cleaning materials
  • Correct replacement bearings
  • New wheel seals where required

Using the correct bearing-removal and installation tools makes the job safer and reduces the risk of damaging the wheel hub.


Step 1: Identify the Correct Bearing

Before removing the wheel, identify the exact motorcycle model.

Check:

  • Motorcycle make
  • Model
  • Year
  • Wheel type
  • Front or rear wheel
  • Original bearing number
  • Bearing dimensions

Do not purchase a bearing simply because it looks similar to the old one.

The inner diameter, outer diameter, width, bearing type, and sealing arrangement must be correct.

If possible, confirm the part number using the manufacturer’s parts information.


Step 2: Secure the Motorcycle

Before removing a wheel, the motorcycle must be properly supported.

Use a suitable motorcycle stand or approved lifting equipment.

The motorcycle should be stable and should not be able to fall while the wheel is removed.

This is especially important when removing the front or rear wheel because the motorcycle’s balance can change significantly.

Never rely on an unstable object such as a brick, loose piece of wood, or improvised support.


Step 3: Remove the Wheel

The wheel-removal procedure depends on the motorcycle.

For a front wheel, components may include:

  • Axle
  • Axle nut
  • Brake caliper
  • Wheel spacers
  • Speed sensor or speedometer drive on some models

For a rear wheel, you may need to consider:

  • Rear axle
  • Brake caliper or bracket
  • Chain or belt drive
  • Wheel spacers
  • Sprocket carrier

Before removing anything, note the position of the spacers and other components.

Taking a photograph before disassembly can be very useful during reassembly.


Step 4: Remove Brake Components Carefully

If the brake caliper needs to be removed, support it properly.

Do not allow a brake caliper to hang from its hydraulic hose.

If the caliper is removed, secure it safely using an appropriate support.

Avoid squeezing the brake lever while the wheel or brake disc is removed unless the service procedure specifically requires it.

Keep the brake disc and pads free from oil, grease, and contamination.


Step 5: Remove the Axle

Remove the axle according to the motorcycle manufacturer’s procedure.

Keep all hardware and spacers organized.

Some motorcycles use different spacers on different sides of the wheel.

Mixing them up during reassembly can cause alignment or brake problems.

Once the axle is removed, carefully remove the wheel from the motorcycle.

Place the wheel on a clean work surface.


Step 6: Remove the Wheel Seals

Wheel bearings are commonly protected by seals.

Before removing the bearing, inspect the seals.

If the seals are damaged, hardened, cracked, or leaking, they should generally be replaced.

Remove the seal carefully without damaging the wheel hub or bearing seat.

Do not use excessive force against the machined surfaces of the wheel.


Step 7: Inspect the Wheel Spacer

Inside many motorcycle wheel hubs there is an internal spacer between the bearings.

This spacer is extremely important.

Before removing the bearings, note its position.

After the bearings are removed, inspect the spacer for:

  • Damage
  • Wear
  • Deformation
  • Corrosion
  • Incorrect length

Never discard the internal spacer.

It must be installed correctly during reassembly.


Step 8: Remove the Old Bearing

The old bearing can be removed using an appropriate bearing puller, blind-bearing puller, press, or other suitable workshop method.

The removal technique depends on the wheel design.

Avoid hitting the bearing directly with an unsuitable tool.

If a drift is used, it must be positioned correctly so that the bearing can be removed without damaging the hub.

Work evenly around the bearing where appropriate.

The goal is to remove the bearing without damaging the wheel’s bearing seat.


Step 9: Clean the Bearing Housing

Once the old bearing has been removed, thoroughly clean the bearing housing.

Remove:

  • Dirt
  • Old grease
  • Corrosion
  • Metal particles
  • Seal debris

Inspect the bearing seat carefully.

Look for:

  • Cracks
  • Scoring
  • Excessive wear
  • Corrosion
  • Damage
  • Signs that the old bearing had been spinning in the hub

If the bearing seat is damaged, simply installing a new bearing may not be a reliable repair.


Step 10: Inspect the Wheel Hub

Before installing the new bearing, inspect the entire wheel hub.

Check the bearing bores, internal spacer, axle area, brake disc mounting area, and other relevant components.

Also inspect the wheel itself for cracks, bends, or other damage.

If the wheel has suffered a major impact, it should be inspected carefully before being returned to service.


Step 11: Prepare the New Bearings

Compare the new bearings with the old ones.

Confirm:

  • Correct bearing number
  • Correct dimensions
  • Correct sealing arrangement
  • Correct quantity

Keep the new bearings clean.

Do not contaminate sealed bearings with dirt or unsuitable chemicals.

If the bearing manufacturer provides specific installation instructions, follow them.


Step 12: Install the New Bearing

Bearing installation requires care.

The new bearing should be pressed or driven into the hub using an appropriate bearing driver or press.

The installation force must be applied to the correct bearing race.

When installing a bearing onto a shaft, force is generally applied to the inner race.

When installing a bearing into a housing, force is generally applied to the outer race.

Never unnecessarily transfer installation force through the rolling elements.

Improper installation can damage a brand-new bearing before the motorcycle is even ridden.


Step 13: Install the Internal Spacer

After the first bearing is installed, make sure the internal wheel spacer is correctly positioned.

The spacer sits between the wheel bearings on many motorcycle designs.

Its purpose is to maintain the correct relationship between the bearings when the axle is tightened.

Do not omit this component.

Do not replace it with an improvised spacer.

The correct spacer length and design are important for proper wheel assembly.


Step 14: Install the Second Bearing

Install the second bearing carefully.

Again, use the appropriate bearing installation method.

Do not drive the bearing deeper than the manufacturer’s intended seating position.

The bearing must be properly seated while the internal spacer remains correctly positioned.

If the spacer becomes trapped incorrectly or is forced into the wrong position, the wheel may not rotate properly after the axle is tightened.


Step 15: Install New Wheel Seals

Install the correct wheel seals after the bearings are properly seated.

The sealing lip should face the correct direction according to the manufacturer’s design.

Apply a suitable lubricant to the seal lip if specified.

Press the seal into position evenly.

Do not hammer directly against the seal lip.

A damaged seal can allow water and dirt to enter the bearing area, shortening bearing life.


Step 16: Check the Wheel by Hand

Before reinstalling the wheel, rotate it by hand.

The wheel should rotate smoothly.

Listen for:

  • Grinding
  • Clicking
  • Roughness
  • Binding

Also check for abnormal play.

If the wheel does not rotate correctly, stop and inspect the bearing installation and spacer arrangement.

Do not proceed until the problem has been identified.


Step 17: Reinstall the Wheel

Place the wheel back into position.

Install the spacers exactly as they were designed.

Insert the axle carefully.

Do not force the axle through a misaligned assembly.

If the axle does not enter easily, check wheel alignment, spacer position, and fork or swingarm alignment.


Step 18: Reinstall Brake Components

Reinstall the brake caliper or other brake components according to the manufacturer’s procedure.

Make sure:

  • Brake disc is correctly positioned
  • Caliper is correctly mounted
  • Fasteners are correctly installed
  • Brake components are free from oil and grease

Use the manufacturer’s specified torque values for critical fasteners.

A torque wrench is strongly recommended for axle and brake-related fasteners.


Step 19: Tighten the Axle Correctly

The axle and related fasteners must be tightened according to the motorcycle manufacturer’s specified sequence and torque.

Do not guess the torque value.

Incorrect axle tightening can create serious handling or bearing problems.

After tightening, verify that the wheel rotates normally.

On some motorcycles, the correct procedure includes a specific sequence for axle and pinch-bolt tightening. Follow the exact procedure for the model being serviced.


Step 20: Check Brake Operation

Before riding the motorcycle, operate the brake lever or pedal several times as appropriate.

This is particularly important if a brake caliper was removed.

Confirm that normal brake pressure and lever feel have returned.

Never ride away without confirming that the brakes are functioning correctly.


Step 21: Check Wheel Play

With the motorcycle safely supported, check for abnormal wheel movement.

The wheel should not have excessive looseness.

If abnormal play remains after installing new bearings, investigate:

  • Bearing seating
  • Internal spacer
  • Axle
  • Wheel hub
  • Axle hardware
  • Other related components

Do not assume that a new bearing automatically means the wheel is safe.


Step 22: Perform a Final Inspection

Before the first test ride, inspect everything carefully.

Check:

  • Axle
  • Axle nut
  • Pinch bolts where applicable
  • Wheel spacers
  • Brake caliper
  • Brake disc
  • Brake operation
  • Wheel rotation
  • Tire condition
  • Wheel alignment
  • Chain adjustment on rear-wheel-drive motorcycles
  • Any removed electrical sensor or speed sensor

Make sure no tools or loose components remain around the motorcycle.


Step 23: Perform a Careful Test Ride

The first test ride should be short and controlled.

Do not immediately ride at high speed.

Start at low speed in a safe area and check:

  • Steering feel
  • Wheel rotation
  • Brake operation
  • Vibration
  • Unusual noise
  • Stability

If anything feels abnormal, stop and inspect the motorcycle again.


Common Mistakes When Changing Wheel Bearings

Using the Wrong Bearing

A bearing that appears similar may have different dimensions or specifications.

Always confirm the correct part.

Hammering Directly on the Bearing

Improper impact can damage the bearing races and rolling elements.

Installing the Bearing at the Wrong Depth

The bearing must be seated according to the correct hub design.

Forgetting the Internal Spacer

The internal spacer is an important part of many motorcycle wheel assemblies.

Installing the Spacers on the Wrong Sides

Incorrect spacer placement can affect wheel alignment and brake positioning.

Reusing Damaged Seals

Old or damaged seals can allow contamination into the new bearing.

Guessing Axle Torque

Use the manufacturer’s specified torque and tightening procedure.

Contaminating the Brake Disc

Oil or grease on the brake disc can seriously reduce braking performance.

Riding Without Checking the Brakes

Always restore and verify brake operation before riding.


How to Make Wheel Bearings Last Longer

Wheel-bearing life can be improved through proper maintenance and inspection.

Avoid pressure-washing directly at wheel seals.

Keep the axle and wheel components clean during service.

Inspect bearings when unusual noise or play appears.

Replace damaged seals promptly.

Avoid ignoring water or dirt contamination.

During tire replacement or wheel service, take the opportunity to inspect the bearings.

If a motorcycle frequently operates in rain, mud, water, or dusty conditions, more frequent inspection may be appropriate.


Front and Rear Wheel Bearing Differences

The basic replacement principle is similar, but front and rear wheels can have different arrangements.

The rear wheel may include additional components such as:

  • Sprocket carrier
  • Cush-drive components
  • Multiple spacers
  • Brake disc
  • Chain-related components

The front wheel may include:

  • Brake disc
  • Speed sensor
  • Different wheel spacers
  • ABS components on equipped motorcycles

Therefore, never assume that every motorcycle wheel is assembled in exactly the same way.


ABS Motorcycle Considerations

Modern motorcycles may have ABS sensors and tone rings near the wheel.

Extra care is required when removing and reinstalling wheels.

Do not damage:

  • ABS sensor
  • Sensor wiring
  • Tone ring
  • Sensor mounting bracket

Keep the correct sensor gap according to the manufacturer’s specifications.

If an ABS warning light appears after wheel installation, the system should be diagnosed before normal riding.Read also 10-hp-diesel-engine-generator-set


Final Thoughts

Changing a motorcycle wheel bearing is an important maintenance and repair procedure, but it should never be treated as a simple parts-replacement job.

The bearing, wheel hub, internal spacer, axle, seals, brake components, and related parts all work together.

The most important steps are to identify the correct bearing, support the motorcycle safely, remove the wheel carefully, inspect the hub, install the bearing using the correct method, position the internal spacer correctly, replace damaged seals, and tighten the axle and related fasteners to the manufacturer’s specifications.

Always remember that motorcycle wheel and brake components are safety-critical. If you do not have the correct tools, lifting equipment, measurement equipment, or experience, it is safer to have the work performed by a qualified motorcycle technician.

After the repair, never skip the final inspection. Check wheel rotation, wheel play, brake operation, axle installation, and alignment before riding.

A correctly installed wheel bearing can help restore smooth wheel rotation and reliable motorcycle handling. Regular inspection can also help identify bearing wear before it becomes a more serious problem.

I hope this complete guide helps motorcycle owners, mechanics, workshop technicians, and DIY enthusiasts understand the correct general procedure for changing bike wheel bearings.

For more practical motorcycle repair guides, engine troubleshooting, maintenance tips, and professional workshop knowledge, keep visiting Rajesh Technical Gyan.