BS6 bikes (Bharat Stage VI emission norm vehicles) have transformed the two-wheeler market with advanced fuel systems and better emission control technology. While they are highly efficient, eco-friendly, and designed for smooth performance, a common issue has been noticed among many riders — rapid battery drainage. Even brand-new or well-maintained BS6 bikes often start showing signs of a weak or dead battery much earlier than expected. Whether it’s due to complex fuel injection systems, continuous sensor monitoring, or frequent short commutes, a weak battery can turn your daily ride into a stressful struggle.
This comprehensive technical guide covers all the major mechanical and electronic reasons behind BS6 bike battery problems and also provides practical, step-by-step solutions to extend your battery’s operational life. In this deep-dive analysis, we will explore Electronic Control Unit (ECU) parasitic draw, alternator charging thresholds, closed-loop sensor power demands, and how to accurately measure battery health using a digital multimeter to prevent sudden breakdowns.
Reason 2: Automatic Headlamp On (AHO)
By law, all BS6 bikes come with AHO (Automatic Headlamp On). This means the headlight switches on automatically the moment you start the bike.
Continuous headlamp usage increases battery load.
In older BS4 bikes, riders could turn the headlight off, but now that option is gone.
🔧 Solution: Replace conventional bulbs with LED headlamps. LEDs consume less power and reduce stress on the battery.
Reason 3: Lower Idle RPM
BS6 bikes are programmed with low idle RPM to minimize emissions.
At low idle speeds, the alternator produces less electricity.
As a result, the battery doesn’t charge properly in stop-and-go traffic or when used for short trips.
Example: Daily 2–3 km commutes are not enough to recharge the battery.
Reason 4: Cold Starts and ECU Load
During cold weather or rainy seasons:
Sensors take longer to stabilize.
The ECU consumes extra power to balance the fuel-air ratio.
👉 This puts additional stress on the battery, especially if it’s already weak.
Tip: Warm up your bike for 2–3 minutes before riding. Avoid hard acceleration during a cold start.
Reason 5: Smaller Battery Capacity
Most commuter BS6 bikes come with 3Ah or 4Ah batteries, which are only just enough to power the bike’s essential electronics.
With FI, AHO, ECU, and sensors, such small batteries drain faster.
If you add extra accessories like a USB charger, GPS tracker, or loud horn, the problem gets worse.
Solution: Upgrade to a higher-capacity battery (5Ah or 6Ah) after confirming with your service center.
Reason 6: Faulty Rectifier / Regulator or Weak Alternator
If your bike’s rectifier or voltage regulator is faulty:
The battery may not charge properly while riding.
In some cases, it may even overcharge and get damaged.
Warning Signs:
Headlight brightness keeps fluctuating.
Sudden failure of the self-start.
Battery overheating.
Reason 7: Loose Terminals or Poor Grounding
Sometimes the problem lies in the wiring, not the battery.
Loose terminals
Rusted connectors
Faulty grounding
These cause current leakage, leading to overnight battery drainage.
What to Do: Remove the battery cover, clean the terminals with sandpaper, tighten all nuts, and apply petroleum jelly to prevent rust.
Reason 8: Frequent Use of Self-Start and Ignition ON
If you:
Use self-start frequently instead of kick-start (where available), or
Keep the ignition in ON mode while the engine is off
Then you are wasting battery power unnecessarily.
Practice: Use the kick-starter occasionally, especially when the battery feels weak. Never leave the ignition ON while waiting.
Reason 9: Poor-Quality or Old Battery
Not all manufacturers provide high-quality batteries in BS6 bikes.
Cheap or unbranded batteries have lower charge retention.
After 2–3 years of use, even good batteries start draining faster
Check: If your battery is older than 24 months, replace it with a reliable brand like Exide, Amaron, or SF Sonic.
Practical Tips to Prevent Battery Drain in BS6 Bikes
Tip Description
🔄 Ride Regularly
Take 10–15 km rides every 2–3 days
🔌 Use LED Bulbs
Reduces electrical load
🔒 Kill-Switch Usage
Don’t leave ignition ON unnecessarily
🔧 Regular Servicing
Check charging system, terminals, and battery water level
🏍 Kick-Start Often
Especially in cold conditions or low charge situations
BS6 bikes are designed for cleaner emissions and better efficiency, but they require smarter battery management.
👉 If your BS6 bike battery drains quickly, don’t ignore it. Check your riding habits, the age of your battery, and the overall electrical health of your bike.
👉 By following simple tips like riding regularly, limiting accessories, and maintaining the charging system, you can extend the life of your battery and enjoy smooth rides.
A draining battery is not a sign that your BS6 bike is bad — it’s simply a result of modern features that demand more power. By following the right maintenance tips, checking the charging system, and using your bike regularly, you can keep your battery healthy for years. Remember, prevention is always better than cure. Treat your BS6 bike’s battery with care, and it will never let you down.
Friends, if you found this technical guide helpful, please feel free to share it with your fellow riders and car enthusiasts. Your safety on the road is what matters most.
If you have any questions regarding diagnostics, torque specs, or troubleshooting steps, please leave a comment below or send an email directly. I am always here to provide full guidance and expert support.
Stay safe, maintain your machines properly, and happy driving!
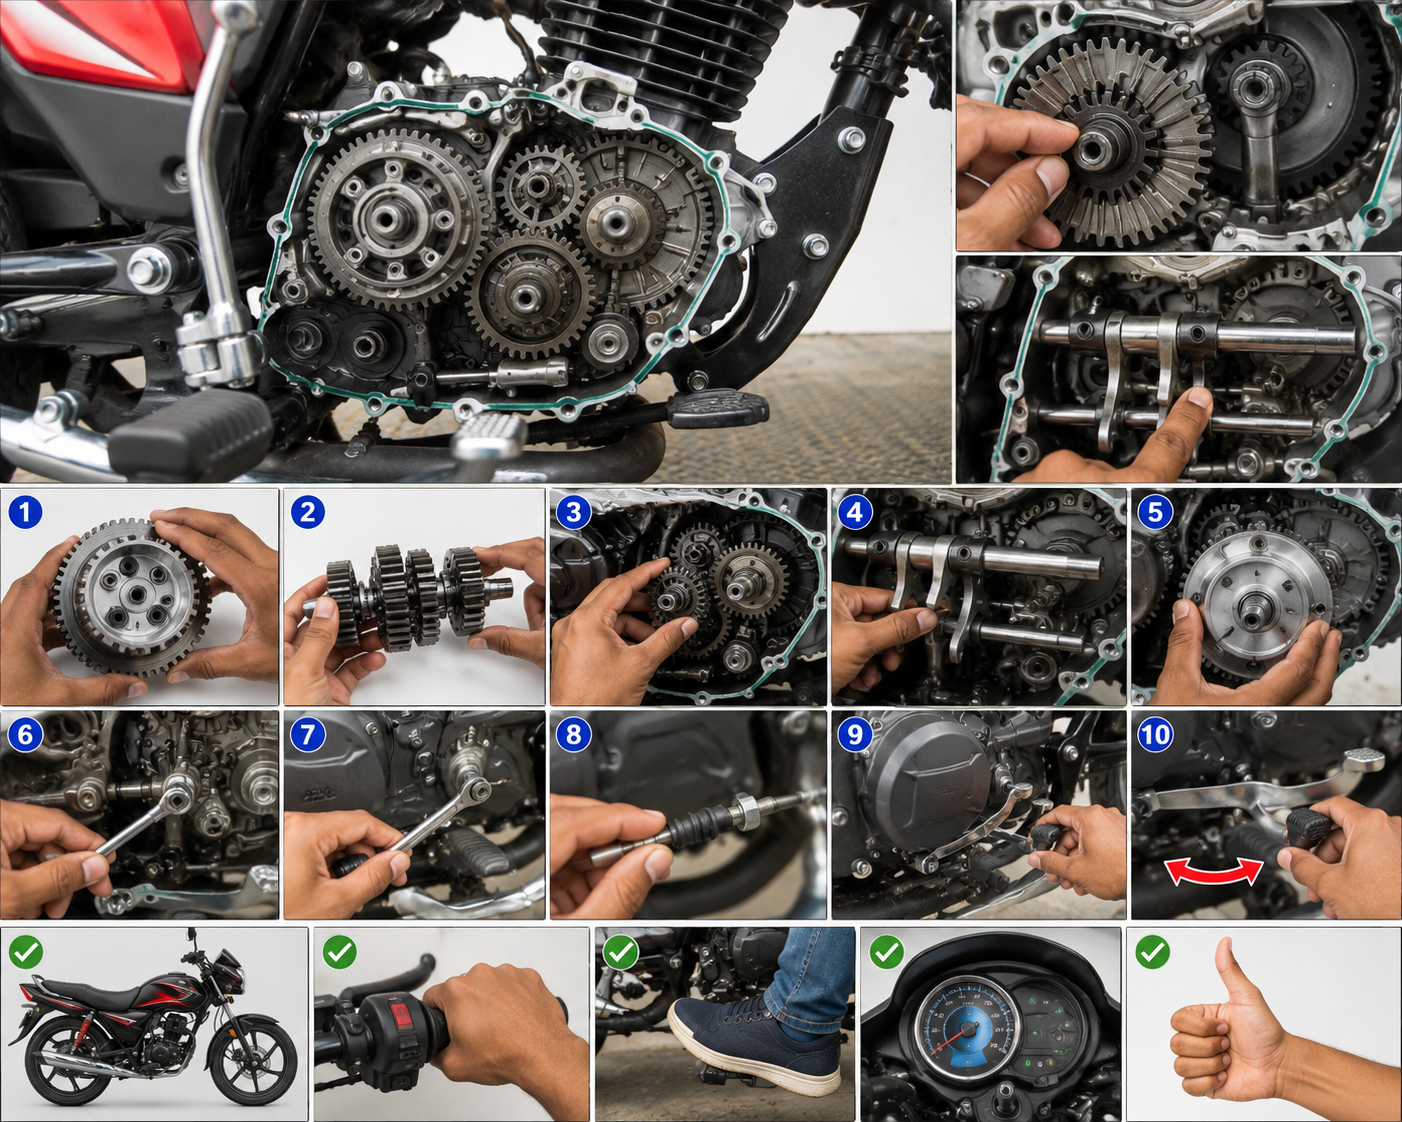
The clutch system is one of the most important components of a motorcycle, especially in TVS bikes that are known for smooth performance and daily commuting reliability. But when the clutch center or clutch plate gets damaged, riders often face unusual problems — sometimes even struggling to start the bike. While most people think starting trouble is only related to the battery or ignition, a worn-out clutch plate can also be the hidden culprit. In this post, we’ll explain how a damaged clutch plate affects the clutch center and why it can directly lead to starting issues in TVS bikes.In this detailed guide, we will understand:What the clutch system does in a TVS bikeHow the clutch center worksCommon signs of a damaged clutch plateWhy a faulty clutch center leads to starting problemsPractical solutions and maintenance tipsIn this advanced technical breakdown, we will investigate the mechanical correlation between friction plate degradation and engine cranking inefficiency. We will look closely at clutch housing grooving, pressure plate warping, starter clutch engagement slip, and how severe clutch drag prevents the transmission from fully disengaging—placing a heavy parasitic load on both your kick-starter and electric starter motor.
🔧 Understanding the Role of the Clutch System in TVS Bikes
The clutch in any motorcycle, including TVS models like Apache, Radeon, Star City, and Sport, is a mechanical link between the engine and the gearbox.
When you press the clutch lever, the clutch plate disconnects the engine power from the gearbox.
This allows you to shift gears smoothly without stalling the bike.
Once you release the clutch lever, the engine power is transmitted again to the rear wheel.
The clutch center is the part that holds the clutch plates together, ensuring proper engagement and disengagement. If this part wears out or gets damaged, the entire clutch operation is affected.
What is a Clutch Center Issue?
A clutch center issue usually means:
Loose or worn clutch center bearing
Improper alignment of clutch plates
Damaged clutch center hub teeth
Friction between clutch basket and plates
When the clutch center fails, the clutch plates don’t engage properly, which affects power transmission and bike starting.
Symptoms of a Damaged Clutch Plate in TVS Bikes
If your TVS bike has clutch-related problems, you may notice:
1. Hard Gear Shifting – Difficulty while changing gears, especially from neutral to first gear.
2. Engine Over-revving – Engine RPM increases, but bike speed doesn’t match.
3. Poor Pickup – Bike feels underpowered and acceleration reduces
4. Unusual Noises – Rattling or grinding sounds from clutch area.
5. Starting Trouble – Engine struggles to start when clutch lever is pressed.
6. Bike Jerking While Releasing Clutch – Sudden jump instead of smooth movement.
These signs clearly indicate clutch plate or clutch center issues.
How a Damaged Clutch Plate Causes Starting Problems
Many riders wonder, “Why does a faulty clutch plate stop the bike from starting?”
Here’s the technical reason:1. Improper Power Transmission
The clutch plate transfers engine power to the gearbox.
If worn out, it slips and fails to transmit sufficient torque.
Result: Engine cranks, but bike doesn’t move or stalls quickly.2. Clutch Dragging
Damaged clutch plates don’t fully disengage.
This creates resistance when starting the bike in gear.
Starter motor or kick gets overloaded.3. Clutch Center Misalignment
If the clutch center hub is damaged, plates don’t sit properly.
Causes imbalance and prevents smooth starting.4. Heat and Friction Issues
Worn plates generate excess heat.
Heat reduces friction material, leading to weak engagement.
Engine struggles to start or keep running.
Common Reasons for Clutch Plate Damage in TVS Bikes
The clutch system in TVS bikes plays a vital role in smooth gear shifting and proper starting. A damaged clutch plate or faulty clutch center can lead to hard starting, poor pickup, and even breakdowns.
To avoid these issues:
Monitor symptoms like jerks, hard shifting, or starting trouble.
Replace damaged clutch components in time.
Maintain proper lubrication and servicing schedule.
A well-maintained clutch ensures that your TVS bike delivers the performance, mileage, and reliability it is famous for.
🙏, a damaged clutch plate doesn’t just affect smooth gear shifting — it can also create engine starting problems in TVS bikes. If you notice symptoms like difficulty starting, slipping gears, or burning smell from the clutch, it’s a clear signal to check the clutch center assembly. Timely maintenance or replacing the clutch plate can save you from major engine trouble and unnecessary expenses.
Friends, if you found this technical guide helpful, please feel free to share it with your fellow riders and car enthusiasts. Your safety on the road is what matters most.
If you have any questions regarding diagnostics, torque specs, or troubleshooting steps, please leave a comment below or send an email directly. I am always here to provide full guidance and expert support.
Stay safe, maintain your machines properly, and happy driving!
Many car and bike owners face problems like engine vibration at idle, heavy engine noise, the vehicle shaking while driving, knocking sounds from the engine, vibration while accelerating, and rough engine performance. At first, these problems may look small, but if ignored for a long time, they can damage important engine parts and drastically increase repair costs.
In this complete guide, you will learn the main causes of engine vibration, symptoms, and step-by-step solutions. We will analyze the critical roles of worn engine mounts, harmonic balancers, ignition misfires, and improper valve clearances. Additionally, you will learn how to differentiate between mechanical knocks and detonation, giving you the precision required to pinpoint and eliminate harsh vibrations safely.
Key Takeaways
Identification of Core Causes: Differentiating between engine mount failure, combustion misfires, and drivetrain imbalances.
Petrol vs. Diesel Noise Dynamics: Understanding inherent diesel torque vibration versus abnormal mechanical knocking.
Diagnostic & Inspection Methods: Step-by-step visual and physical checks for spark plugs, fuel injectors, timing belts, and oil levels.
Preventive Maintenance Practices: Actionable tips to preserve dampeners, improve engine smoothness, and prevent costly internal overhauls.
1. Check Engine Mounting
Engine mounting is one of the most important components responsible for controlling engine vibration and damping chassis shock.
The engine mounting assembly contains dense vulcanized rubber or hydraulic fluid chambers that absorb vibrational harmonics and prevent mechanical shaking from transferring directly to the vehicle body.
Symptoms of Damaged Engine Mounting
Heavy vibration felt inside the cabin or handlebar
Engine bonnet or body panels shaking noticeably at idle
Physical engine displacement or movement during acceleration
Gear shifting becomes clunky or misaligned
Excessive thumping noise from the engine bay upon starting or stopping
When mounting rubber becomes worn, cracked, or completely broken, the unbuffered mechanical energy of the rotating engine transfers directly into the chassis.
Solution
Inspect engine mountings carefully for dry rot, rubber cracks, or fluid leakage.
Replace cracked or collapsed mountings immediately using proper torque specifications.
Always use genuine high-grade mounting replacement parts. Low-quality aftermarket mounts lack proper dampening capacity and deteriorate rapidly.
2. Inspect Spark Plugs (Petrol Engines)
In petrol engines, spark plugs are critical for maintaining stable flame propagation and balanced cylinder combustion.
A worn or fouled spark plug causes inconsistent cylinder firing (misfiring), which disrupts crank balance and causes severe engine shaking.
Symptoms of Bad Spark Plugs
Engine misfires and hesitation under load
Rough, erratic idle speed
Loss of throttle response and sluggish acceleration
Increased fuel consumption and unburnt fuel smell from exhaust
Severe engine vibration at low RPMs
Solution
Remove and inspect spark plugs regularly for carbon buildup, oil fouling, or eroded electrodes.
Adjust spark plug electrode gaps according to factory specifications.
Replace standard spark plugs every 10,000 km to 15,000 km.
3. Check Fuel Injectors (Diesel & Gasoline Direct Injection)
Fuel injectors control precise fuel atomization and volume delivery inside the engine combustion chamber.
If an injector tip becomes clogged, carbonized, or develops a faulty spray pattern, fuel atomization suffers, causing severe engine imbalance.
Symptoms of Faulty Injectors
White or grey smoke from the exhaust due to unburnt fuel
Heavy black smoke during sudden acceleration
Metallic engine knocking or pinging sound
Significant power loss under load
Excessive engine vibration while driving
Solution
Perform professional ultrasonic fuel injector cleaning and flow testing.
Always use high-quality, unadulterated fuel from trusted fuel stations.
Replace malfunctioning or leaking injectors promptly.
4. Check Engine Oil Level and Viscosity
Engine oil lubricates internal rotating components, reduces metal-to-metal friction, and assists in dampening hydraulic valve lifter noise.
Low or degraded engine oil increases internal friction, leading to elevated operating temperatures, mechanical clatter, and elevated vibration levels.
Symptoms of Poor Engine Oil Condition
Elevated engine running temperature
Harsh, metallic tapping or clicking sounds from the cylinder head
Increased overall engine vibration
Accelerated mechanical wear and power loss
Solution
Check engine oil level weekly using the dipstick.
Top up with the exact viscosity grade recommended by the vehicle manufacturer.
Change engine oil and oil filter at specified service intervals without delay.
5. Check Clutch Assembly & Flywheel
If vibration occurs primarily when releasing the clutch pedal/lever, the issue lies within the drivetrain coupling mechanism.
Symptoms of Clutch Issues
Violent judder or shaking during clutch engagement
Vehicle jerking when taking off from a complete stop
Burning friction material smell under hard load
Stiff gear engagement or clutch pedal vibration
Solution
Inspect the clutch disc lining depth, diaphragm spring condition, and pilot bearing.
Inspect the flywheel surface for heat spots, grooves, or warping.
Replace worn clutch sets as a complete kit.
6. Check Wheel Balancing & Alignment
Occasionally, chassis shaking is mistaken for engine-related vibration. Imbalanced tire-wheel assemblies generate severe high-speed vibrations that mimic drivetrain defects.
Symptoms
Steering wheel or handlebar oscillation at specific speed bands (e.g., 60 km/h to 90 km/h)
Vehicle pulling consistently to one side on flat roads
Rapid, uneven tire tread wear
Perform dynamic wheel balancing using precision weight distribution equipment.
Align front and rear suspension geometry to factory alignment specifications.
Solution
7. Air Filter & Fuel Filter Inspection
Restricted air or fuel flow disturbs the stoichiometric air-fuel ratio needed for smooth combustion, causing engine hesitation and rough operation.
Solution
Clean or replace the engine air filter at every service interval.
Replace fuel filters periodically to protect the fuel pump and injectors.
8. Engine Timing System Inspection
Incorrect valve or ignition timing disrupts cylinder synchronization, resulting in pre-ignition, detonation, and destructive engine vibration.
Solution
Inspect timing belt or chain tension and alignment marks according to service schedules.
Replace worn timing belts, guides, and hydraulic tensioners immediately.
Engine sound and vibration problems should never be ignored. Small issues like damaged engine mounts, dirty fuel injectors, low oil levels, or wheel imbalance can steadily escalate into major mechanullnical failures if left unaddressed.
By systematically diagnosing symptoms, applying correct repair procedures, and maintaining essential engine systems, you can eliminate unwanted noise, preserve fuel efficiency, and ensure a smooth, dependable driving experience.
Frequently Asked Questions (FAQ)
Q1. Why does my engine vibrate excessively at idle speed? Idle vibration is commonly caused by worn rubber engine mounts, fouled spark plugs, dirty fuel injectors, or a vacuum leak disrupting air-fuel mixture.
Q2. Can running on low engine oil cause engine vibration? Yes, insufficient oil increases internal metal friction, causes hydraulic lifter collapse, elevates operating temperatures, and creates harsh running conditions.
Q3. Is a certain amount of diesel engine vibration considered normal? Yes, due to high compression ignition, diesel engines inherently produce more mechanical vibration than petrol engines. However, sudden or extreme shaking indicates an underlying mechanical fault.
Q4. Can tire imbalance cause vibrations that feel like engine troubles? Yes, imbalanced wheels generate rotational vibrations that transfer through the steering wheel and body paneling, frequently mistaken for engine faults.
Q5. How often should petrol spark plugs be inspected or replaced? Standard spark plugs should be inspected every 5,000 km and replaced every 10,000 km to 15,000 km.
If you found this technical guide helpful, please feel free to share it with your fellow riders, motorists, and automotive enthusiasts. Your safety and vehicle reliability are what matter most.
If you have any questions regarding diagnostics, torque specs, or troubleshooting steps, please leave a comment below or send an email directly. I am always here to provide full technical guidance and expert support.
Stay safe, maintain your machines properly, and happy driving!
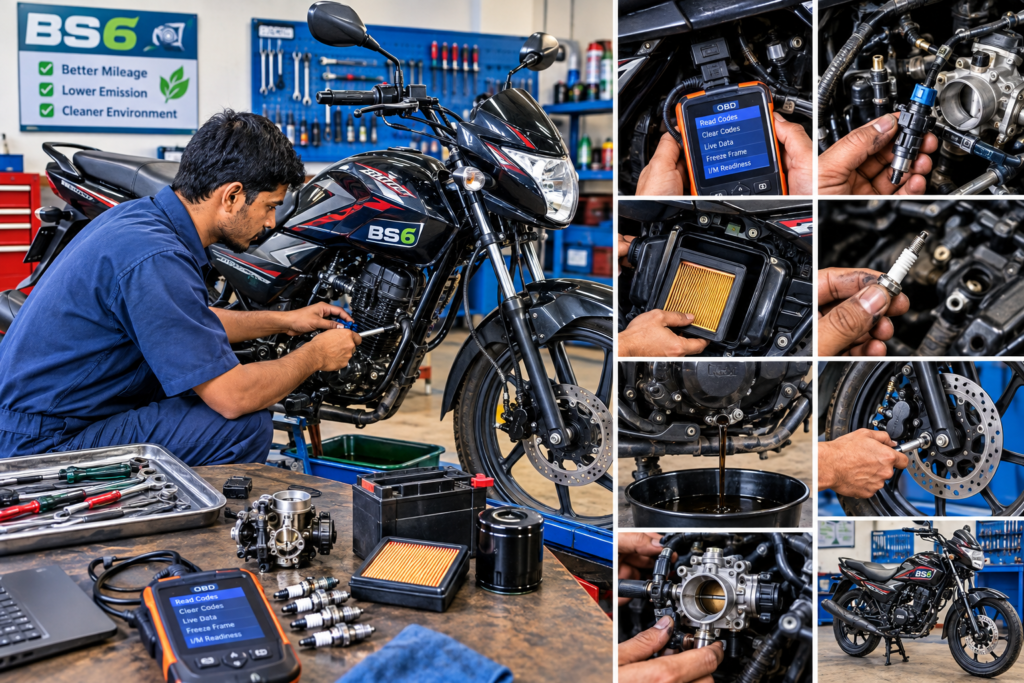
BS6 bikes are built to meet stricter emission rules, so they use fuel injection, sensors, and more electronic parts than older models. That means repairs can take a different path, especially when a rough idle, warning light, or starting issue shows up.
The good news is that most common problems still follow a clear BS6 bike repair process, even if you’re new to the work. This guide helps DIY riders and mechanics cut out guesswork, save time, and stop small faults from turning into expensive damage. Start with the basics, then move step by step into the checks that matter most.
In this advanced technical manual, we will break down the diagnostic steps for Electronic Fuel Injection (EFI) fuel pumps, testing throttle position and O2 sensors, reading OBD error codes, and troubleshooting battery-draining faults to ensure your BS6 motorcycle delivers peak performance and compliance.
Know Your BS6 Bike Before You Touch a Single Bolt
A BS6 bike can look simple on the outside and still hide a lot under the tank and side covers. Before any repair starts, you need the exact model, engine setup, and fuel system. That information shapes every test, every part order, and every adjustment you make.
This matters because BS6 bikes are not all built the same. Two bikes from the same brand can use different injectors, sensors, ECU maps, or clutch setups. If you guess wrong, you waste time and may fit the wrong part.
Find the exact model, engine type, and fuel system
Next, look at the VIN or chassis number. You can usually find it on the steering head, frame tube, or registration papers. Match that number with the bike’s paperwork, because the same name on the tank can hide different versions underneath.
If the manual, VIN, and bike label do not match, trust the VIN and the registration details first.
Also check the sticker or label on the frame, swingarm, or under the seat. Many BS6 bikes carry emission or type labels that point to the engine family and fuel system. That small label can save you from ordering the wrong gasket, sensor, or injector.
Do not assume the bike has a carburetor style system just because an older version did. BS6 bikes are usually fuel injected, and that changes how they start, idle, and respond to throttle. A carburetor bike and a fuel-injected bike may share the same body shape, but they do not share the same repair logic.
Fuel injection details matter because the system depends on pressure, sensors, and ECU control. The fuel pump, injector, throttle body, and oxygen sensor all work together. If one part is off, the bike can run poorly even when the engine itself is fine.Understand the main BS6 parts that fail most often
Once you know the exact bike, focus on the parts that fail most often. These are the first places to check when a BS6 bike starts acting up.
A few common trouble spots are easy to remember:
Spark plug: A worn or fouled plug can cause misfire, hard starting, and poor pickup.
Battery: A weak battery affects starting and can confuse electronic systems.
Air filter: A clogged filter reduces airflow and hurts throttle response.
Fuel pump and injector: These control fuel delivery, so faults here often cause stalling or rough running.
Throttle body: Dirt buildup can upset idle speed and make the bike feel jerky.
O2 sensor: A bad sensor can send the wrong signal to the ECU and throw off fuel mix.
Clutch cable or hydraulic system: Problems here make shifting and takeoff feel heavy or uneven.
Brake pads and chain: These wear items affect safety and smooth riding.
ECU-related issues: Sensor faults, wiring damage, or bad connectors can trigger odd behavior across the bike.
Start with simple checks before replacing expensive parts. A dirty air filter can look like a fuel fault, and a weak battery can look like an ECU problem. That is why BS6 repair rewards a clear order of inspection.
Spot the warning signs before a small problem becomes a big repair
BS6 bikes usually give warning signs before a full breakdown. The trick is to catch them early and treat them as clues, not random noise.
Watch for these common symptoms:
Hard starting: The engine cranks longer than usual or refuses to fire up quickly.
Rough idle: The bike shakes or hunts at stoplights.
Poor mileage: Fuel use rises without a clear reason.
Engine stall: The bike cuts out at idle, low speed, or after warming up.
Check engine light: The ECU has stored a fault and wants attention.
Smoke: Excess smoke can point to fuel, oil, or combustion problems.
Vibration: New vibration can mean misfire, chain issues, or loose parts.
Weak brakes: Longer stopping distance or a spongy feel needs immediate attention.
Unusual noise: Knocking, clicking, squealing, or grinding should never be ignored.
Small symptoms often lead to bigger faults if you wait too long. A dirty injector, failing battery, or loose connector can grow into a harder-starting engine or a damaged catalyst. Early diagnosis costs less, takes less time, and protects the engine before the problem spreads.
Start with the bike’s identity, then move to the likely weak points. That order keeps your BS6 bike repair work clean, safe, and accurate.
Use a Safe Repair Routine That Works for Most BS6 Bikes
A good BS6 bike repair routine starts with control, not speed. When you work in the right order, you protect the bike, your tools, and your time.
Most faults on BS6 motorcycles can be handled with the same basic process. Start safe, diagnose in order, fix the real fault, then test the bike before you call the job done.
Start with safety, tools, and a clean work area
Before you touch a bolt, set up the space properly. Work on a cold engine, park the bike on stable ground, and disconnect the battery when the repair involves wiring, sensors, or the starter circuit.
Keep the basics close at hand:
Spanners and a socket set for fasteners and brackets
Screwdriver set for covers, clamps, and small fittings
A multimeter for battery, continuity, and sensor checks
A gauge for tire pressure or fluid checks, depending on the job
A torque wrench for correct final tightening
A scan tool, if your bike supports one, for fault codes and live data
Keep removed parts in trays, bags, or labeled containers. That habit saves you from loose bolts, mixed-up spacers, and missing clips later. Clean surroundings matter too, because dirt around injectors, connectors, and brake parts can create a second problem while you fix the first.
If the repair needs battery power, sensors, or fuel-line work, disconnect first and reconnect only after everything is back in place.
Diagnose the problem in the right order, not by guesswork
Start with the simplest checks and move outward. On most BS6 bikes, that means fuel, air, spark, battery, sensors, electrical connections, then mechanical parts.
A steady order like this keeps you from changing random parts. A new injector will not fix a blocked air filter, and a fresh spark plug will not cure a weak battery. Guesswork costs money, but it also hides the real fault and can create new ones.
A clear check sequence looks like this:
Check fuel level, fuel quality, and fuel delivery.
Inspect the air filter and intake path.
Test the spark plug and ignition parts.
Check battery voltage and charging health.
Read sensors and fault codes if the bike has them.
Inspect connectors, fuses, grounds, and wiring.
Look at mechanical parts, such as clutch, compression, chain, and valve noise.
Start with the owner’s manual. It usually lists the model code, engine capacity, fuel system, and service intervals. If the bike came with a service book, check the first pages and stamped service records too. Those details often match the exact variant sold in your market.
Use the scan tool when available, but do not trust it alone. A fault code points you in the right direction, then physical checks confirm the cause. In other words, the code is a clue, not the whole case file.
Repair, test, and confirm the fix before riding
Once you find the fault, clean, repair, or replace the part with care. Tighten fasteners to the correct torque, refit hoses and clips properly, and reset fault codes only after the repair is complete.
Then test the bike in stages. Let it idle first, watch for smooth running, and listen for rough sounds or uneven revs. After that, take a short ride and check throttle response, clutch feel, braking, and gear changes.
Finish every repair with a full walk-around. Look for fuel, oil, or coolant leaks, check warning lights, and listen for rattles, tapping, or squealing. If something still feels off, stop and recheck it before the bike goes back on the road.
Handle the most common BS6 bike problems with confidence
Most BS6 bike faults fall into a few clear patterns. If you know the common weak points, you can move faster and avoid replacing parts that still work.
Start with the symptoms the rider can feel or hear. Then check the system behind them, one piece at a time. That approach works better than guessing, especially on bikes with fuel injection and sensors.
Fix starting trouble, weak battery issues, and charging problems
Starting trouble on a BS6 bike often points to the battery first. A weak battery can cause slow cranking, yes, but it can also trigger odd electronic faults, false warning lights, and unstable sensor readings. When voltage drops, the ECU, fuel pump, and starter relay may all act up at once.Check the battery health before anything else. Look for swollen casing, corrosion on the terminals, and loose clamps. A battery that looks fine can still fail under load, so test the voltage if the bike cranks slowly or clicks without starting.
A quick fault list helps narrow it down:
Loose terminals can interrupt power and make the bike seem dead.
Blown fuses can cut fuel pump, ignition, or ECU power.
Starter relay problems often show up as clicking with no crank.
Charging faults point to the alternator, stator, or regulator-rectifier.
If the bike starts with a jump but dies again later, the charging system needs attention. Check charging output with a multimeter, then inspect the alternator and regulator connections for heat damage, burns, or loose plugs. Bad grounding can mimic a failed part, so clean the terminals before you replace anything.
A battery that cannot hold charge can create more than starting trouble. On a BS6 bike, it can make the whole electrical system behave unpredictably.
Solve rough idle, jerking, and poor pickup
Rough idle, jerking, and weak pickup usually show up together. The bike may feel fine for a few minutes, then stumble at stoplights or surge when you open the throttle. Those are classic signs of airflow, fuel, or sensor trouble.Start with the throttle body. Dirt on the throttle plate can upset idle control and make the bike feel rough at low speed. Next, check the air filter. A blocked filter chokes airflow and makes the engine lazy under throttle.
Fuel quality matters too. Old or dirty fuel can cause hesitation, especially after long storage. Injector deposits can do the same, so listen for uneven running and watch for hard starts after refueling. Vacuum leaks around hoses or intake boots also create lean running and unstable idle
Sensor readings matter when the basics check out. If the throttle position, intake air, or oxygen sensor reads out of range, the ECU may send the wrong fuel mix. That often feels like surging, flat spots, or poor response when you roll the throttle open.
Repair brake, chain, clutch, and suspension wear before it gets worse
These parts are not comfort items, they are safety parts. A worn brake pad, stretched chain, or leaking fork can turn a normal ride into a risky one fast.Check the brake pads first. If the pad material looks thin or uneven, replace it. Also watch the brake fluid level and color. Low or dark fluid can point to wear, air, or old fluid that needs flushing.
For the chain, look at slack, dry links, and hooked sprocket teeth. Too much slack gives jerky power delivery, while tight spots can damage the gearbox and swingarm. If the sprocket teeth look sharp or curved, replace the set together.
Clutch play matters too. Too much free play can make shifting rough, while too little can cause clutch slip. Check the lever feel and cable or hydraulic action before you adjust anything.Finally, inspect the suspension.read also car-maintenancecar-safety-tipsdashboard-warning-lights
Conclusion
Repairing and maintaining a BS6 motorcycle doesn’t have to be overwhelming. While fuel injection systems, sensors, and electronic components add complexity, following a structured diagnostic process makes troubleshooting straightforward and efficient. By starting with basic safety checks, inspecting high-wear components like spark plugs and batteries, and addressing warning symptoms early, you can keep any BS6 bike running smoothly and prevent costly engine repairs.
Whether you are a beginner working in your home garage or a professional mechanic in a workshop, taking a methodical approach will always save you time and money. Stay patient, use the right tools, and double-check your work before hitting the road!
Fork oil on the tubes means a seal leak. A rear shock that bounces too long, sits low, or leaks oil needs repair or replacement. These faults affect braking, cornering, and tire grip, so they are not jobs to put off.
Hello friends! If you liked this technical guide, please be sure to share it with your friends. If you have any questions, feel free to leave a comment or send me an email—I’ll be happy to provide full guidance. Thank you!
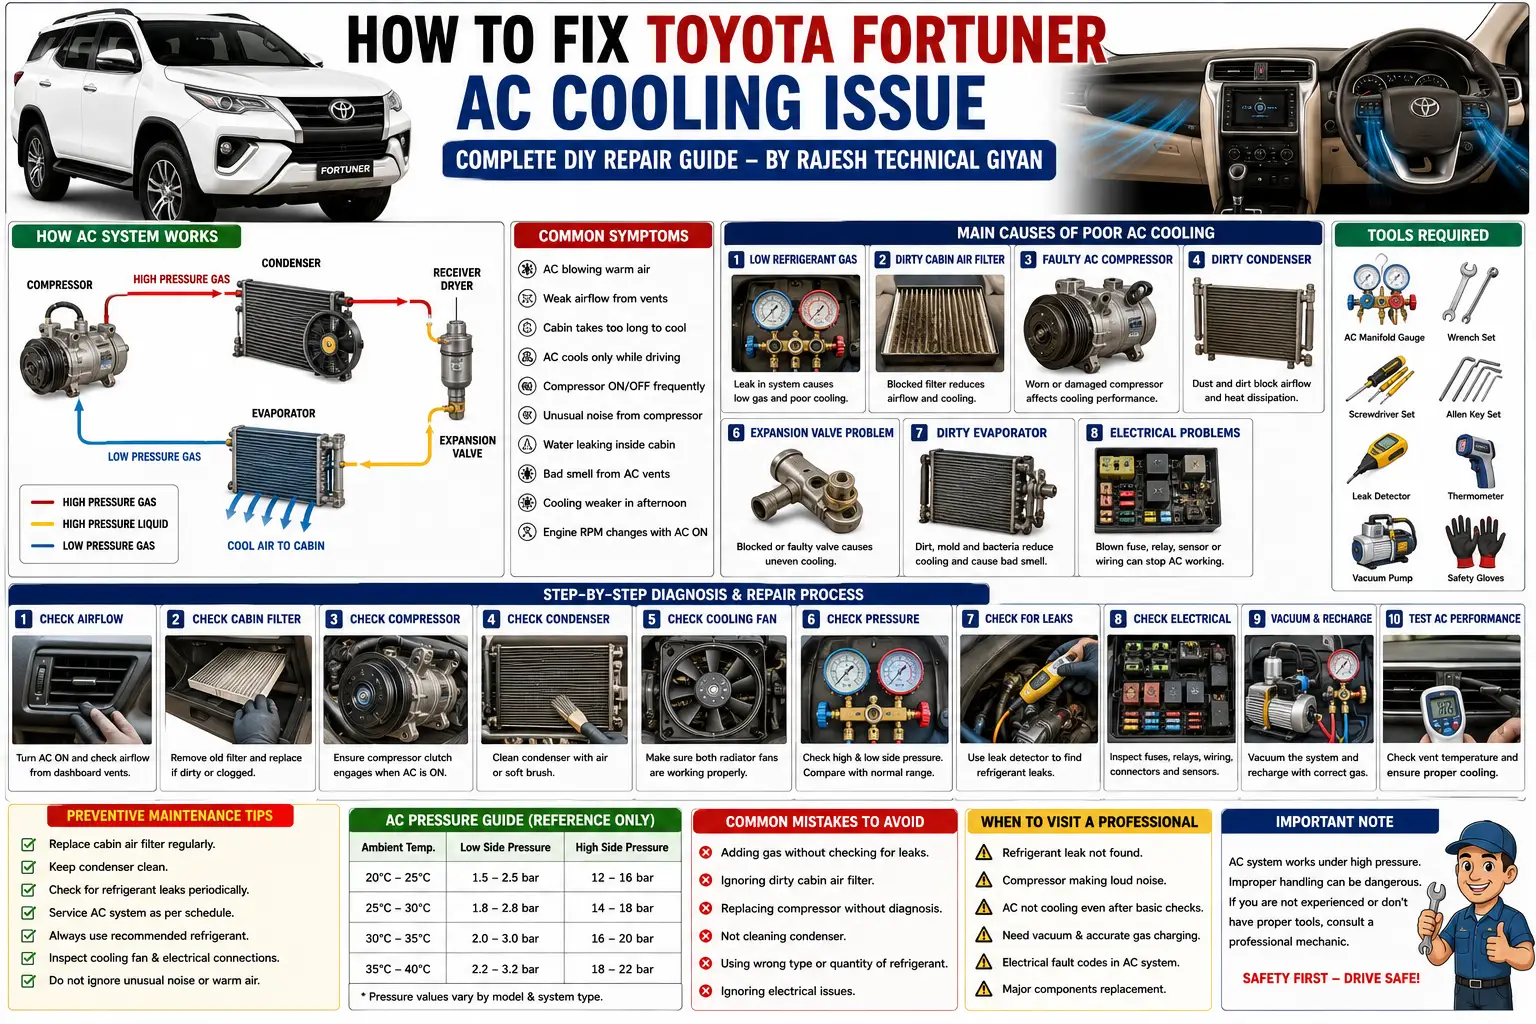
One of the most common problems in a Toyota Fortuner AC system is weak cooling or warm air blowing from the vents… If your Toyota Fortuner AC is not cooling properly, blowing warm air.
If your Toyota Fortuner AC is not cooling properly, blowing warm air, cooling only while driving, or taking too long to cool the cabin, there can be several possible causes
The problem may be as simple as a dirty cabin air filter or condenser, but it can also be related to refrigerant leakage, a cooling-fan problem, compressor failure, an expansion-valve issue, or an electrical fault..
Important: Toyota Fortuner AC systems can vary depending on the model year, engine, market, and equipment. Always use the correct service information and refrigerant specification for your particular vehicle.
Understanding the Toyota Fortuner Air Conditioning System
Before troubleshooting an AC cooling problem, it is important to understand how the system works.
The automotive air-conditioning system transfers heat from inside the cabin to the outside environment.
Major components may include:
AC compressor
Condenser
Receiver-drier or related refrigerant-storage component
Expansion valve
Evaporator
Refrigerant
Cooling fans
Cabin air filter
Pressure sensors
Temperature sensors
Blower motor
AC control system
When the AC is switched on, the compressor circulates refrigerant through the system.
The refrigerant releases heat through the condenser and then passes through the expansion device before entering the evaporator.
The evaporator absorbs heat from the cabin air, while the blower motor pushes the cooled air through the dashboard vents.
If any major component fails or refrigerant flow is interrupted, Toyota Fortuner AC cooling performance can decrease significantly.
Common Symptoms of Toyota Fortuner AC Cooling Problems
Correctly identifying the symptoms is the first step toward finding the actual fault.
Common symptoms include:
AC blowing warm air
Weak cooling from dashboard vents
Weak airflow
Cabin taking too long to cool
AC cooling properly while driving but poorly at idle
Compressor repeatedly switching on and off
Unusual compressor noise
Clicking or grinding sounds
Water or moisture inside the cabin
Bad smell from AC vents
Cooling becoming weak during hot afternoon driving
AC compressor failing to engage
AC working intermittently
Each symptom can point toward a different problem.
Why Is My Toyota Fortuner AC Not Cooling Properly?
There are several possible causes of poor AC cooling.
Let’s examine the most common ones.
1. Low Refrigerant or Refrigerant Leakage
One of the most common reasons for an AC cooling issue is insufficient refrigerant.
An automotive AC system is designed as a sealed system. Refrigerant should not normally disappear simply because of vehicle age.
If the refrigerant level is low, there may be a leak somewhere in the system.
Possible leak locations include:
Compressor seals
Condenser
Refrigerant hoses
Pipe connections
O-rings
Service ports
Evaporator
Other refrigerant-system joints
Symptoms of Low Refrigerant
You may notice:
Weak cooling
AC taking a long time to cool the cabin
Compressor cycling frequently
Cooling becoming weaker at higher temperatures
Poor cooling at idle
Important
Do not simply add refrigerant without checking the system.
A low refrigerant level can indicate a leak that needs to be located and repaired.
Also, the correct refrigerant type and charge amount must be confirmed from the vehicle-specific service information.
2. Dirty Cabin Air Filter
A dirty or clogged cabin air filter can significantly reduce airflow through the AC system.
When the filter becomes heavily blocked, the blower motor may struggle to push enough air through the evaporator.
Symptoms
A clogged cabin filter can cause:
Weak airflow
Poor cooling
Dusty cabin
Bad smell
Increased blower noise
Reduced AC performance
Solution
Inspect the cabin air filter regularly and replace it when necessary.
This is one of the simplest and least expensive maintenance procedures you can perform.
If the filter is extremely dirty, replacing it may noticeably improve airflow.
3. Faulty AC Compressor
The AC compressor is one of the most important components in the system.
It circulates refrigerant through the AC circuit.
A compressor can develop problems because of:
Internal wear
Bearing damage
Clutch problems on applicable systems
Seal failure
Insufficient lubrication
Contamination
Electrical problems
Common Symptoms
— Rajesh
A failing compressor may cause:
Poor cooling
No cooling
Unusual mechanical noise
Compressor not engaging
Intermittent cooling
Abnormal vibration
Refrigerant or oil leakage
If a compressor has suffered internal mechanical damage, metal particles can contaminate other AC components.
Therefore, replacing a compressor without diagnosing the rest of the system may result in repeated failure.
4. Dirty or Blocked AC Condenser
The condenser is responsible for releasing heat from the refrigerant.
It is normally positioned toward the front of the vehicle, where it can be exposed to:
Dust
Mud
Insects
Leaves
Road debris
A dirty condenser cannot transfer heat efficiently.
Symptoms
A restricted condenser may cause:
Weak AC cooling
Poor cooling at idle
Higher refrigerant pressure
Compressor cycling
Cooling becoming worse in heavy traffic
Solution
Inspect the condenser fins carefully.
Clean the condenser using an appropriate method without bending or damaging the delicate fins.
Do not use excessive water pressure directly against the fins.
5. Cooling Fan Not Working Properly
The AC condenser requires adequate airflow to remove heat.
If the cooling fan does not operate correctly, AC performance can become particularly poor when the vehicle is stationary.
Common Causes
Blown fuse
Faulty relay
Damaged fan motor
Wiring problem
Electrical connector problem
Control-system fault
Common Symptoms
One of the most important symptoms is:
AC cools well while driving but becomes warm at idle.
This can happen because natural airflow increases when the vehicle is moving.
At idle, the cooling fan must provide sufficient airflow through the condenser.
Always check fan operation when diagnosing this type of AC problem.
6. Expansion Valve Problem
The expansion valve or equivalent refrigerant-flow control device regulates refrigerant entering the evaporator.
If the valve becomes restricted or malfunctions, refrigerant flow can become abnormal.
Possible Symptoms
Poor cooling
Uneven cooling
Abnormal AC pipe temperatures
Ice formation in some conditions
Compressor cycling
Reduced evaporator performance
A faulty expansion valve generally requires replacement after proper diagnosis.
Do not replace it simply because cooling is poor; other AC faults can produce similar symptoms.
7. Dirty Evaporator
The evaporator is located inside the HVAC housing and absorbs heat from cabin air.
Over time, dust, dirt, moisture, and biological contamination can accumulate on the evaporator surface.
Symptoms
Weak airflow
Bad smell
Reduced cooling
Excessive moisture
Dust coming from vents
A heavily contaminated evaporator may require professional cleaning.
Regular cabin-filter replacement can help reduce contamination entering the HVAC system.
8. Electrical and Sensor Problems
Modern Toyota vehicles use electrical controls and sensors to manage AC operation.
A fault in the electrical system can prevent the compressor or cooling fan from operating correctly.
Possible problems include:
Blown fuse
Faulty relay
Pressure-sensor problem
Temperature-sensor problem
Damaged wiring
Loose connector
Control-module fault
Diagnosis
A professional diagnostic process may include:
Checking AC-related fuses.
Checking relays where applicable.
Inspecting electrical connectors.
Checking wiring.
Scanning for relevant diagnostic trouble codes.
Checking sensor data where supported.
Confirming compressor and fan operation.
Electrical diagnosis should be performed before replacing expensive components.
Step-by-Step Toyota Fortuner AC Troubleshooting
If your Fortuner AC is not cooling properly, follow a logical diagnostic sequence.
Step 1: Check the Cabin Airflow
Turn the AC on and check airflow from the vents.
If airflow is weak, inspect the:
Cabin filter
Blower motor
HVAC air passages
Evaporator
Step 2: Check AC Compressor Operation
Observe whether the compressor operates when AC cooling is requested.
Do not assume that a compressor not operating means the compressor itself is defective.
The cause could be electrical or related to system pressure.
Step 3: Inspect the Condenser
Check the condenser for dirt, leaves, mud, and damaged fins.
Clean it carefully if necessary.
Step 4: Check Cooling Fan Operation
Confirm that the required cooling fan operates correctly under the appropriate conditions.
A fan problem is particularly important when the AC works while driving but becomes weak at idle.
Step 5: Check for Refrigerant Leaks
Inspect visible AC pipes, joints, condenser areas, compressor areas, and service connections.
For an accurate diagnosis, use suitable leak-detection equipment.
Step 6: Check Refrigerant Pressure
Refrigerant pressure should be measured using appropriate AC service equipment.
Do not use pressure readings alone to determine the exact refrigerant charge without considering ambient temperature, system operating conditions, and vehicle specifications.
Step 7: Check Electrical Components
Inspect:
Fuses
Relays
Wiring
Connectors
Sensors
Compressor control circuits
Step 8: Inspect the Evaporator and HVAC System
If airflow is weak or there is a persistent bad smell, inspect the cabin filter and evaporator condition.
Toyota Fortuner AC Cooling Only While Driving
This is a particularly common complaint.
If the AC cools well when the Fortuner is moving but becomes warm while stopped, investigate:
Condenser airflow
Cooling-fan operation
Condenser cleanliness
Refrigerant-system condition
Compressor performance
Engine cooling-system condition
Do not immediately replace the compressor.
A cooling-fan problem can produce very similar symptoms.
Toyota Fortuner AC Blowing Warm Air
If the AC suddenly starts blowing warm air, check the following:
Does the compressor operate?
Is there sufficient refrigerant?
Is the condenser fan operating?
Are there any visible refrigerant leaks?
Are the AC fuses and electrical connections healthy?
Are there diagnostic trouble codes?
Is the HVAC temperature-control system operating correctly?
A proper diagnosis is necessary before replacing parts.
Preventive Maintenance Tips for Better AC Cooling
Regular maintenance can help maintain AC performance.
Replace the Cabin Air Filter
Keep the cabin filter clean and replace it according to the recommended service interval or when it becomes dirty.
Keep the Condenser Clean
Inspect the condenser periodically and remove accumulated dirt and debris carefully.
Check for Unusual Noises
If the compressor begins making unusual noises, investigate early.
Inspect AC Performance
If cooling gradually becomes weaker, have the system inspected rather than waiting until the AC stops working completely.
Keep the HVAC System Clean
A clean cabin and properly maintained filter can reduce contamination entering the HVAC system.
Avoid Unnecessary Refrigerant Top-Ups
If refrigerant is repeatedly required, investigate the system for a leak.
Common Mistakes to Avoid
Mistake 1: Adding Refrigerant Without Diagnosis
Repeated refrigerant loss should be investigated for leaks.
Mistake 2: Replacing the Compressor Immediately
Poor cooling does not automatically mean compressor failure.
Mistake 3: Ignoring the Cooling Fan
Poor cooling at idle can be strongly related to insufficient condenser airflow.
Mistake 4: Ignoring the Cabin Filter
A blocked filter can significantly reduce airflow.
Mistake 5: Using the Wrong Refrigerant
Always confirm the correct refrigerant type and specification for the exact vehicle.
Mistake 6: Ignoring Electrical Faults
A blown fuse, faulty relay, sensor, wiring issue, or connector problem can prevent AC operation.
When Should You Visit a Professional AC Technician?
Some AC repairs require specialized equipment and should not be performed without proper training.
Professional assistance is recommended when you need:
Refrigerant recovery
Vacuum evacuation
Refrigerant charging
Leak testing
Compressor replacement
Expansion-valve replacement
Evaporator replacement
High-pressure-system diagnosis
Electrical control diagnosis
Refrigerant systems operate under pressure, so improper servicing can cause injury or damage to the vehicle.
Frequently Asked Questions
Why is my Toyota Fortuner AC not cooling?
Possible causes include low refrigerant, refrigerant leakage, a dirty condenser, blocked cabin filter, cooling-fan failure, compressor problems, expansion-valve issues, evaporator contamination, or electrical faults.
Why does my Fortuner AC cool while driving but not at idle?
Possible causes include insufficient condenser airflow, a cooling-fan problem, condenser blockage, refrigerant-system problems, or compressor performance issues.
Can a dirty cabin filter cause poor AC cooling?
Yes. A severely clogged cabin filter can restrict airflow and make the AC feel weak even when the refrigeration system itself is operating normally.
Should I add AC gas if the cooling is weak?
Do not add refrigerant blindly. First determine whether the system has the correct refrigerant charge and whether there is a leak.
How often should Toyota Fortuner AC be serviced?
There is no single interval that applies to every vehicle and climate. Inspect the system during regular maintenance and service it when symptoms or the manufacturer’s maintenance schedule indicate.
Why does my Fortuner AC smell bad?
A dirty cabin filter, moisture accumulation, microbial growth, or contamination inside the HVAC system can contribute to unpleasant odors.
Professional Mechanic’s Advice
From my workshop experience at Rajesh Technical Giyan, the most important rule when repairing an automotive AC system is:
Diagnose first and replace parts second.
Many vehicle owners replace expensive compressors when the actual problem is a dirty condenser, cooling fan, electrical connection, or low refrigerant caused by a leak.
A Toyota Fortuner AC cooling issue can be caused by several different mechanical, electrical, airflow, or refrigerant-system problems.
The most common areas to inspect include:
Refrigerant level and leaks
Cabin air filter
AC compressor
Condenser
Cooling fan
Expansion valve
Evaporator
Fuses and relays
Pressure and temperature sensors
Wiring and electrical connectors
If your Toyota Fortuner AC is not cooling, start with simple inspections such as airflow, cabin-filter condition, condenser cleanliness, and cooling-fan operation.
For refrigerant charging, leak testing, compressor replacement, or other pressurized AC-system work, use the correct equipment and follow the manufacturer’s service procedures.
At Rajesh Technical Giyan, my goal is to explain automotive repair in a simple and practical way so that vehicle owners and mechanics can understand the actual cause of a problem instead of replacing parts based on guesswork.
Stay safe, maintain your vehicle properly, and keep learning automotive repair skills.
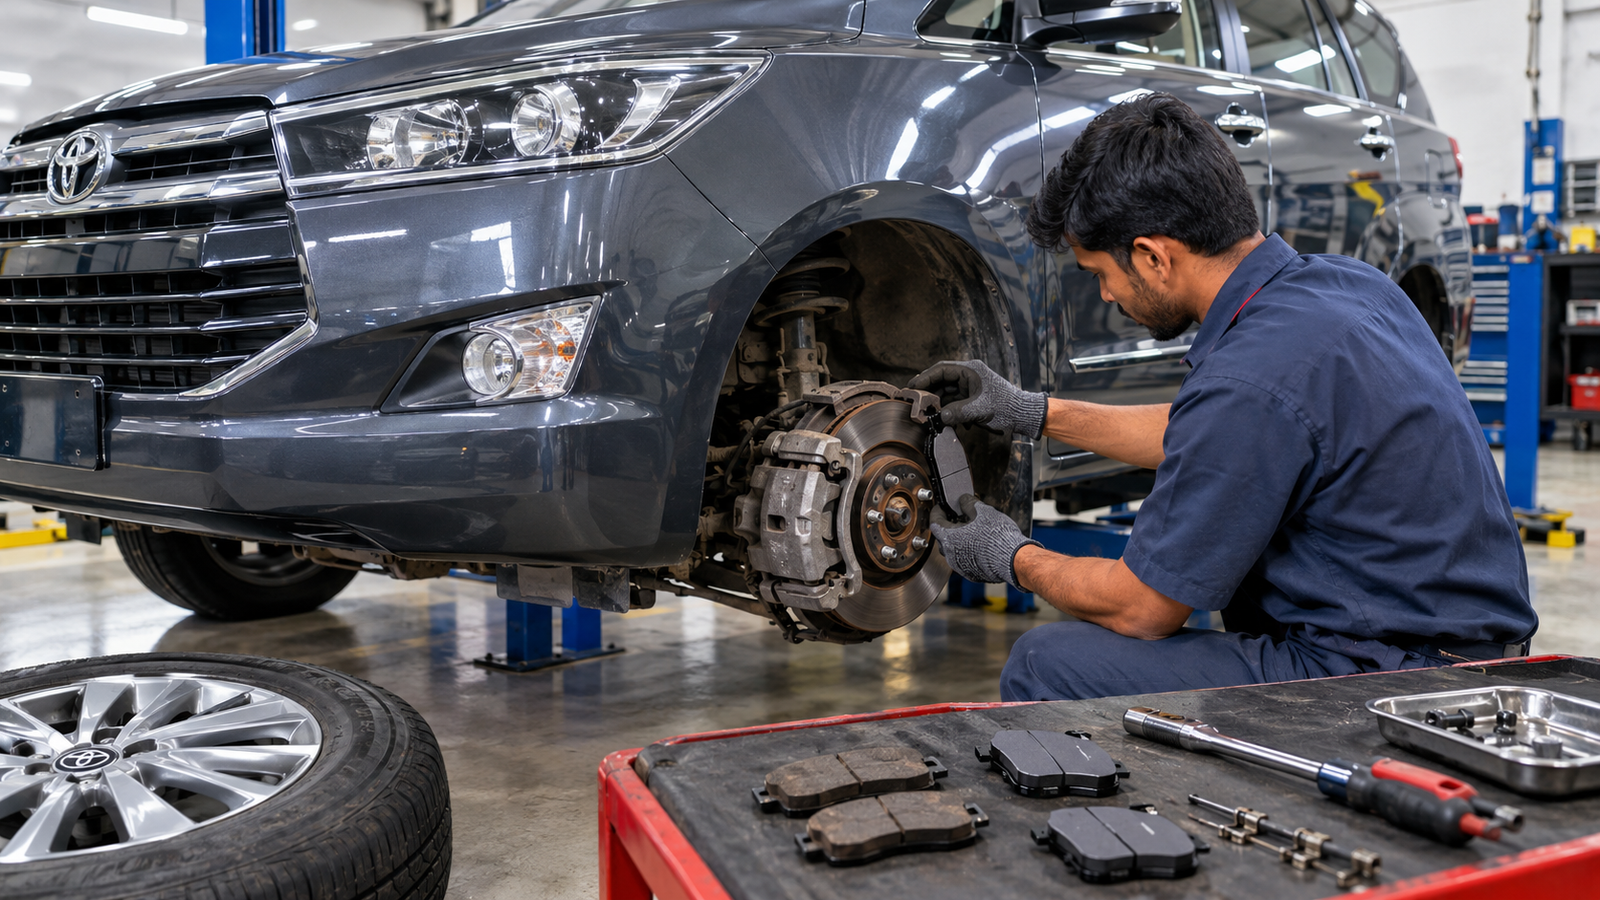
In Part 1 and Part 2 of our Toyota Innova Crysta brake-pad replacement series, we discussed the importance of brake-pad maintenance, the required tools, wheel removal, brake-caliper inspection, and the basic procedure for removing the old brake pads.
In this Part 3, we will continue from the installation stage and focus on the most important final procedures.
After removing the old brake pads, simply installing new pads is not enough. A professional brake repair also requires inspection of the brake rotor, caliper, pad clips, guide pins, brake-fluid level, piston movement, and correct pad seating.
A small installation mistake can cause:
Uneven braking
Brake noise
Vehicle pulling to one side
Brake-pad overheating
Premature pad wear
Brake-fluid problems
Reduced braking performance
Therefore, the final inspection and testing stage is just as important as removing the old brake pads.
Important: Toyota Innova Crysta variants can have different brake configurations depending on model year, engine, trim level, and market. Always use the correct brake pads and manufacturer specifications for your exact vehicle.
Step 1: Inspect the Brake Rotor Before Installing New Pads
Before installing the new brake pads, carefully inspect the brake rotor or disc.
The new brake pads must make proper contact with a suitable rotor surface.
Check for Rotor Damage
Inspect the disc for:
Deep grooves
Cracks
Excessive scoring
Blue or dark heat spots
Uneven wear
Corrosion
Excessive lip formation
Abnormal surface damage
Light surface marks can sometimes be normal, but deep grooves or severe heat damage require further inspection.
Why Rotor Condition Matters
Installing new brake pads against a badly damaged rotor can result in:
Uneven pad contact
Brake vibration
Noise
Reduced braking efficiency
Premature pad wear
If the rotor is below the manufacturer’s minimum thickness or has serious damage, it should be replaced or serviced according to the manufacturer’s procedure.
Never machine or reuse a rotor without checking its specification.
Step 2: Inspect the Brake-Caliper Piston
The brake-caliper piston pushes the brake pad against the rotor when the brake pedal is pressed.
Before fitting the new pads, inspect the piston carefully.
Check for:
Brake-fluid leakage
Corrosion
Damaged piston surface
Torn dust boot
Dirt around the piston
A leaking or damaged caliper should be repaired before completing the brake-pad replacement.
Do Not Force a Damaged Piston
If the piston does not retract smoothly, do not use excessive force.
A sticking piston can indicate a caliper problem that needs proper diagnosis.
Step 3: Retract the Brake-Caliper Piston Correctly
New brake pads are normally thicker than worn pads.
Therefore, the caliper piston may need to be pushed back to create enough space for the new pads.
Use an appropriate piston-retraction tool.
Before retracting the piston, consider the brake-fluid level in the reservoir.
As the piston moves back, brake fluid may rise in the reservoir.
If the reservoir becomes too full, fluid can overflow.
Brake fluid can damage painted surfaces, so clean any spill immediately using an appropriate method.
Never use excessive force or an unsuitable tool that can damage the piston, dust boot, or caliper.
Step 4: Inspect and Clean the Brake-Pad Hardware
Brake-pad clips, shims, and retaining hardware are important for proper brake-pad movement.
Remove dirt, rust, and brake dust from the applicable contact areas.
Inspect the hardware for:
Rust
Deformation
Cracks
Weak retaining tension
Excessive wear
If the manufacturer recommends replacing the hardware with the brake pads, install new hardware.
Do not bend or modify brake-pad clips to make them fit.
Step 5: Install the New Toyota Innova Crysta Brake Pads
Before installation, compare the new pads with the old ones.
Check:
Shape
Thickness
Mounting points
Wear-indicator position
Shim arrangement
Left/right or inner/outer configuration where applicable
The new pads should match the correct application for your vehicle.
Check Pad Orientation
Some brake-pad sets use different inner and outer pads.
Never assume that all four pads are identical.
Follow the pad markings and vehicle-specific service information.
Install each pad in its correct position.
Step 6: Apply Brake-Assembly Lubricant Correctly
Some brake-pad contact points may require a suitable brake lubricant.
However, lubricant should never be applied to the friction surface.
Never put grease or lubricant on:
Brake-pad friction material
Rotor braking surface
Any surface intended to generate friction
If lubrication is specified, apply only a small amount to the appropriate metal contact points using a brake-compatible product.
Too much lubricant can attract dust and contaminate the brake system.
Step 7: Inspect the Caliper Guide Pins
The caliper guide pins allow the caliper to move correctly.
A seized or contaminated guide pin can cause uneven brake-pad wear.
Check whether the guide pins:
Move smoothly
Are clean
Have proper lubrication where specified
Have intact rubber boots
Show no excessive corrosion
If a guide pin is stuck, do not simply force it back into place.
Remove, inspect, clean, and lubricate it according to the manufacturer’s procedure.
If damaged, replace the necessary components.
Step 8: Reinstall the Brake Caliper
After installing the new brake pads, carefully position the brake caliper back into place.
Make sure:
Pads remain correctly seated.
Hardware is correctly positioned.
Guide pins are correctly aligned.
Brake hose is not twisted.
No wiring or sensor cable is trapped.
Caliper mounting surfaces are clean.
Tighten the caliper fasteners using the correct manufacturer-specified torque.
Do not guess brake-caliper bolt torque. Always use the Toyota service specification for the exact Innova Crysta variant.
Step 9: Check the Brake Hose and ABS Wiring
Before reinstalling the wheel, inspect the brake hose and ABS wiring.
Look for:
Cracks
Cuts
Leaks
Twisting
Chafing
Loose clips
Damaged insulation
The ABS sensor wiring should be routed correctly and secured away from moving or hot components.
A damaged ABS wire can trigger an ABS warning and affect the vehicle’s electronic braking systems.
Step 10: Reinstall the Wheel
Once the brake assembly has been inspected, reinstall the wheel.
Before tightening the wheel nuts, make sure the wheel is sitting correctly against the hub.
Tighten the wheel nuts gradually in a cross pattern.
Use a calibrated torque wrench and the manufacturer’s specified wheel-nut torque.
Do not rely on an impact wrench alone for final tightening.
Step 11: Check the Brake-Fluid Reservoir
After retracting the caliper piston, check the brake-fluid reservoir.
The fluid level should be within the manufacturer’s specified range.
Do not simply add fluid without checking why the level is low.
A low brake-fluid level may indicate:
Pad wear
Leakage
Hydraulic-system problems
If the brake fluid is contaminated or due for replacement, follow the manufacturer’s service procedure.
Step 12: Pump the Brake Pedal Before Driving
This is one of the most important steps after brake-pad replacement.
Before moving the vehicle, press the brake pedal several times.
Initially, the pedal may feel softer or travel farther because the caliper piston was retracted.
Continue pumping the brake pedal until the pedal becomes firm.
Never Drive With a Soft Brake Pedal
If the pedal remains excessively soft or sinks toward the floor, stop the repair process.
Inspect for:
Brake-fluid leakage
Incorrect pad installation
Caliper problems
Hydraulic-system problems
Air in the brake system
Do not drive the vehicle until the braking system has been properly diagnosed.
Step 13: Check for Brake-Fluid Leaks
Inspect the complete brake assembly.
Look around:
Caliper
Brake hose
Brake-pipe connections
Master-cylinder area
Reservoir
Bleeder screw
There should be no visible brake-fluid leakage.
If any leak is detected, do not operate the vehicle.
Step 14: Brake Pad Bedding-In Procedure
New brake pads require proper bedding-in so that the friction surfaces can establish suitable contact with the brake rotor.
The exact bedding procedure depends on the brake-pad manufacturer.
In general:
Drive in a safe area.
Perform several moderate braking applications.
Avoid aggressive emergency-style braking during the initial bedding period unless required for safety.
Allow the brakes to cool between repeated applications when appropriate.
Avoid keeping the brake pedal continuously pressed after heavy braking when the brakes are extremely hot.
Do not perform bedding-in procedures on public roads where it would be unsafe.
Always follow the brake-pad manufacturer’s recommended bedding procedure if one is provided.
Step 15: Perform a Low-Speed Brake Test
After completing the installation, test the vehicle at low speed in a safe location.
Check:
Brake-pedal feel
Vehicle stopping response
Unusual noise
Steering pull
Brake vibration
ABS warning light
Brake warning light
The vehicle should stop smoothly and predictably.
If it pulls strongly to one side, stop and investigate.
Step 16: Listen for Abnormal Brake Noise
Some light noise can occur during the initial bedding process, but persistent or severe noise should not be ignored.
Possible causes include:
Incorrect pad installation
Loose hardware
Dry or seized guide pins
Rotor surface problems
Contaminated brake pads
Incorrect brake-pad type
Never assume that loud grinding or severe vibration is normal after installing new brake pads.
Common Mistakes During Brake-Pad Replacement
Mistake 1: Installing the Wrong Brake Pads
Always verify the correct part application before installation.
Mistake 2: Contaminating the Friction Surface
Never touch the friction surface with greasy hands or apply lubricant to it.
Mistake 3: Ignoring the Rotor
New brake pads cannot compensate for a severely damaged or worn rotor.
Mistake 4: Failing to Check Guide Pins
A seized guide pin can cause uneven pad wear and overheating.
Mistake 5: Not Pumping the Brake Pedal
Always restore proper pedal feel before moving the vehicle.
Mistake 6: Guessing Torque Specifications
Use the correct Toyota service specifications for caliper and wheel fasteners.
Mistake 7: Driving Aggressively Immediately After Installation
Allow the new pads to bed in according to the manufacturer’s instructions.
How to Know Your New Brake Pads Are Working Properly
After installation and bedding, the braking system should provide:
Consistent pedal feel
Smooth braking
No severe vibration
No abnormal grinding
No strong pulling
No brake-fluid leakage
No unexpected warning lights
A small amount of initial noise can sometimes occur, but persistent symptoms require inspection.
Toyota Innova Crysta Brake Pad Replacement Checklist
Before handing the vehicle back to the customer, I recommend checking the following:
[ ] Correct brake pads installed
[ ] Rotor inspected
[ ] Brake-pad hardware checked
[ ] Caliper piston inspected
[ ] Guide pins checked
[ ] Caliper fasteners tightened correctly
[ ] Brake hose inspected
[ ] ABS wiring checked
[ ] Wheel installed correctly
[ ] Wheel nuts torqued correctly
[ ] Brake-fluid level checked
[ ] Brake pedal pumped
[ ] No visible brake-fluid leakage
[ ] Low-speed brake test completed
[ ] Warning lights checked
[ ] Brake pads bedded in correctly
Frequently Asked Questions
How long does it take to replace Toyota Innova Crysta brake pads?
The actual time depends on the vehicle condition, mechanic experience, brake configuration, and whether additional problems such as seized guide pins or worn rotors are found.
Do I need to replace the brake rotor every time I replace the brake pads?
Not necessarily.
The rotor should be inspected and measured against the manufacturer’s specifications. If it is within specification and in good condition, replacement may not be required.
Why does my brake pedal feel soft after replacing brake pads?
The caliper piston may still be retracted, or there may be another hydraulic or installation issue.
Pump the pedal before moving the vehicle. If it does not become firm, stop and inspect the braking system.
Do new brake pads need bedding?
Yes, new pads generally benefit from an appropriate bedding procedure. Follow the brake-pad manufacturer’s instructions whenever available.
Can I apply grease to the brake pad?
Never apply grease to the friction material or rotor.
Only use a suitable brake lubricant on specified metal contact points when required.
Why does my Innova Crysta pull to one side after brake-pad replacement?
Possible causes include uneven pad contact, a sticking caliper or guide pin, contamination, rotor problems, tyre issues, or another suspension/braking fault.
The vehicle should be inspected rather than driven normally until the cause is identified.
Professional Mechanic’s Final Advice
Brake-pad replacement may look like a simple maintenance job, but brakes are one of the most important safety systems on any vehicle.
A professional repair should not stop after fitting the new pads.
The mechanic should inspect the rotor, caliper, guide pins, hardware, brake hose, ABS wiring, brake-fluid level, and pedal operation.
The final road test should also be performed carefully in a safe environment.
Replacing the brake pads on a Toyota Innova Crysta is an important maintenance procedure, but proper installation is only one part of the job.
After fitting the new pads, the rotor, caliper piston, guide pins, brake hardware, brake hose, ABS wiring, brake-fluid level, and wheel installation should all be inspected carefully.
The brake pedal must be restored to a firm and consistent condition before the vehicle is moved.
Finally, the new pads should be bedded in correctly and the vehicle should undergo a controlled low-speed brake test.
Remember:
Never compromise on brake safety.
If you are unsure about any part of the brake system, consult a qualified automotive technician and use the correct Toyota service information for your specific Innova Crysta.
Stay safe, maintain your vehicle with care, and keep learning automotive repair skills.
Introduction In this guide, I will explain a professional KTM motorcycle cylinder head fitting procedure, including surface preparation, head-gasket installation, cylinder-head tightening, TDC positioning, camshaft timing, valve-clearance checking, tensioner installation, and final inspection. Important: KTM has several engine generations and models, including 125cc, 200cc, 250cc and 390cc variants. Torque values, timing marks, valve clearances, tightening […]