
Step-by-Step DIY Car Repair Guide for Beginners (Save Money)

file 000000007f108211aae00887d066f3fa

Basic car repairs do not always require an expensive workshop visit. Many simple maintenance and repair jobs can be performed at home if you have the right tools, follow the correct procedure, and understand your vehicle.

For beginners, the most important thing is not to start with complicated engine or transmission repairs. Start with simple jobs such as checking fluids, replacing wiper blades, changing air filters, inspecting the battery, checking tyre pressure, and replacing certain bulbs.

Learning these basic skills can help you understand your car better, identify problems earlier, and potentially save money on routine maintenance.

This guide explains several beginner-friendly DIY car repair and maintenance tasks step by step.

Why Learn Basic DIY Car Repair?

Modern cars contain many electronic and mechanical systems, but not every maintenance job requires professional equipment.

Learning basic car care can help you:

  • Understand common vehicle problems
  • Perform simple maintenance at home
  • Reduce unnecessary workshop visits
  • Recognize problems before they become expensive
  • Keep important components in better condition
  • Save time on simple repairs
  • Become more confident when dealing with your vehicle

However, DIY repair should always be approached carefully. If a repair involves airbags, fuel systems, high-voltage hybrid or EV components, major suspension components, or internal engine work, professional service may be the safer choice.

Basic Tools Every Beginner Should Have

Before starting DIY car repairs, build a small collection of quality tools.

Useful beginner tools include:

  • Socket and ratchet set
  • Combination wrench set
  • Screwdriver set
  • Pliers
  • Needle-nose pliers
  • Torque wrench
  • Jack
  • Jack stands
  • Wheel chocks
  • Tyre pressure gauge
  • Flashlight or inspection light
  • Work gloves
  • Safety glasses
  • Funnel
  • Oil drain pan
  • OBD-II scanner for compatible vehicles

Do not rely on the vehicle jack alone when working underneath a car. A proper jack stand or suitable professional lifting equipment is essential for work that requires the vehicle to remain raised.

Step 1: Learn How to Safely Prepare the Car

Safety should always come before saving money.

Park the vehicle on a firm, level surface whenever possible. Engage the parking brake and switch off the engine.

If you are working near the wheels, use wheel chocks to help prevent unwanted movement.

Allow hot components such as the engine, exhaust and cooling system to cool before working around them.

Before starting any repair, read the vehicle owner’s manual. Different vehicles can use different fluids, fasteners, procedures and specifications.

Never work underneath a vehicle supported only by a hydraulic jack.

Step 2: Check the Engine Oil

Checking engine oil is one of the easiest maintenance tasks for beginners.

How to Check Engine Oil

  1. Park the vehicle on level ground.
  2. Turn off the engine.
  3. Allow the vehicle to sit for the period recommended by the manufacturer.
  4. Open the hood and locate the engine oil dipstick if your vehicle has one.
  5. Remove the dipstick.
  6. Wipe it clean with a lint-free cloth.
  7. Insert it completely again.
  8. Remove it and check the oil level.
  9. Make sure the level is within the manufacturer’s marked range.

If the oil level is low, add the correct oil specification recommended for your engine.

Do not simply choose oil based on viscosity alone. Modern engines may require specific oil standards or manufacturer approvals.

Also avoid overfilling the engine.

Why Oil Level Matters

Engine oil lubricates moving components and helps control heat and wear. Running with insufficient oil can cause serious engine damage.

If you repeatedly notice that the oil level drops quickly, investigate the reason instead of simply adding oil again and again.

Step 3: Replace the Engine Air Filter

A dirty air filter can restrict airflow to the engine.

Replacing an air filter is often one of the simplest beginner maintenance jobs.

Step-by-Step Procedure

  1. Switch off the engine.
  2. Open the hood.
  3. Locate the air filter housing.
  4. Release the clips or remove the fasteners.
  5. Open the housing carefully.
  6. Remove the old filter.
  7. Clean loose debris from the housing without allowing dirt to enter the intake.
  8. Compare the replacement filter with the old one.
  9. Install the new filter in the correct orientation.
  10. Close and secure the housing properly.

Do not operate the engine with the air intake system improperly assembled.

A filter that is not seated correctly can allow unfiltered air and dirt into the engine.

Step 4: Check and Replace Windshield Wipers

Wiper blades are simple components, but they are extremely important for visibility.

Inspect them if they leave:

  • Streaks
  • Unwiped areas
  • Water smears
  • Chattering sounds
  • Cracked rubber

How to Replace Wiper Blades

  1. Lift the wiper arm carefully.
  2. Locate the locking mechanism.
  3. Release the old blade.
  4. Compare the replacement blade with the old one.
  5. Attach the new blade securely.
  6. Gently lower the arm onto the windshield.

Do not allow a bare metal wiper arm to fall against the glass because it can damage the windshield.

Step 5: Check Tyre Pressure

Incorrect tyre pressure can affect handling, braking, tyre wear and fuel economy.

Check tyre pressure when the tyres are cold and use the pressure specified by the vehicle manufacturer.

The correct pressure can usually be found on the vehicle’s tyre-information placard or in the owner’s manual.

Basic Tyre Inspection

While checking pressure, look for:

  • Uneven tread wear
  • Cuts
  • Cracks
  • Bulges
  • Embedded objects
  • Excessively worn tread

Do not depend only on visual inspection to determine tyre pressure.

If a tyre repeatedly loses pressure, find the cause. It could be a puncture, damaged valve, wheel problem or another issue.

Step 6: Inspect the Battery

A car battery is another component that beginners can inspect without complicated equipment.

Look for:

  • Loose battery terminals
  • Corrosion
  • Damaged cables
  • Swollen battery casing
  • Leakage
  • Poor connections

Before disconnecting a battery, check the owner’s manual because some vehicles have special battery-management procedures.

Never allow tools to create a short circuit between battery terminals.

If the battery repeatedly goes flat, replacing it immediately may not solve the real problem. A charging-system or electrical fault could be responsible.

Step 7: Replace a Simple Vehicle Bulb

Some vehicles allow owners to replace certain exterior or interior bulbs easily, although modern cars may use sealed LED assemblies.

General Procedure

  1. Turn off the vehicle and lights.
  2. Identify the bulb or access cover.
  3. Remove the cover if necessary.
  4. Disconnect the electrical connector.
  5. Remove the old bulb.
  6. Install the correct replacement.
  7. Reconnect the wiring.
  8. Test the light before closing everything.

Never force a bulb into the wrong socket.

For LED assemblies or complicated lighting systems, follow the manufacturer’s procedure rather than trying to disassemble sealed components.

Step 8: Replace the Cabin Air Filter

The cabin air filter helps clean the air entering the passenger compartment.

Depending on the vehicle, it may be located behind the glove box or in another HVAC-access area.

Basic Replacement Procedure

  1. Open the access panel or glove box.
  2. Locate the filter housing.
  3. Remove the cover.
  4. Pull out the old filter.
  5. Check the airflow-direction marking.
  6. Install the new filter in the correct direction.
  7. Reinstall the cover and access panel.

A heavily dirty cabin filter can reduce airflow from the vents.

Step 9: Learn Basic OBD-II Diagnostics

An OBD-II scanner can help beginners understand why the check-engine light is illuminated on compatible vehicles.

The scanner connects to the vehicle’s diagnostic port and may display diagnostic trouble codes.

However, a trouble code is not automatically a confirmation that a particular component needs replacement.

For example, a sensor-related code may sometimes be caused by wiring, connectors, air leaks or another underlying problem.

Basic Diagnostic Process

  1. Park the vehicle safely.
  2. Locate the diagnostic connector.
  3. Connect the compatible scanner.
  4. Follow the scanner instructions.
  5. Record any stored codes.
  6. Research the code using reliable repair information.
  7. Inspect the relevant system.
  8. Repair the actual cause.
  9. Clear codes only when appropriate.
  10. Test the vehicle and confirm whether the problem returns.

Avoid replacing expensive parts simply because a code mentions that component.

Step 10: Learn How to Inspect Brake Components

Brake maintenance is extremely important, but beginners should understand their limits.

You may be able to visually inspect brake components through the wheel or during a wheel removal procedure if you have the correct equipment and experience.

Look for obvious signs such as:

  • Extremely thin brake pads
  • Damaged brake components
  • Fluid leakage
  • Uneven wear
  • Unusual rotor condition

If the brake pedal feels soft, braking performance changes significantly, brake fluid is leaking, or you are unsure about the condition of the braking system, professional inspection is appropriate.

Brakes are not an area where beginners should take unnecessary risks.

Step 11: Check Engine Coolant

Never open a hot cooling-system cap.

A cooling system can remain pressurized after the engine is switched off, and hot coolant can cause severe burns.

After the engine has completely cooled, inspect the coolant reservoir and compare the level with the markings.

Use only the coolant type and specification recommended for the vehicle.

If coolant repeatedly disappears, do not treat it as normal. Look for leaks or have the cooling system professionally inspected.

Step 12: Replace a Fuse

A blown fuse can sometimes cause an electrical accessory to stop working.

The owner’s manual normally identifies fuse locations and circuits.

Basic Fuse Replacement

  1. Switch off the vehicle.
  2. Locate the appropriate fuse box.
  3. Identify the affected circuit.
  4. Remove the suspected fuse.
  5. Inspect it carefully.
  6. Replace it only with the correct type and rating.
  7. Test the affected system.

Never install a higher-rated fuse to prevent it from blowing again.

A fuse protects an electrical circuit. If the replacement fuse blows again, there may be an electrical fault that requires diagnosis.

Step 13: Inspect Belts and Hoses

With the engine switched off and cool, visually inspect accessible belts and hoses.

Look for:

  • Cracks
  • Fraying
  • Severe wear
  • Bulges
  • Leaks
  • Loose connections

Do not place your hands near moving belts while the engine is running.

If a belt shows significant damage, have it replaced before failure causes additional problems.

Step 14: Learn How to Find Fluid Leaks

Fluid leaks can provide useful clues about vehicle problems.

When the vehicle is parked safely, look for fresh fluid underneath it.

Different fluids can have different colors, smells and locations, but color alone should not be used to identify a fluid with certainty.

If you find a leak, first determine which system is affected.

Possible sources include:

  • Engine oil
  • Coolant
  • Transmission fluid
  • Brake fluid
  • Power steering fluid on vehicles equipped with hydraulic systems
  • Washer fluid

Brake-fluid leaks require immediate attention because they can affect braking performance.

Step 15: Keep a DIY Maintenance Record

One of the easiest ways to become better at car maintenance is to keep a record.

Record:

  • Date of repair
  • Vehicle mileage
  • Work performed
  • Parts replaced
  • Fluid used
  • Symptoms noticed
  • Diagnostic codes
  • Next inspection date

A maintenance record helps you understand recurring problems and prevents important maintenance from being forgotten.

Repairs Beginners Should Avoid Without Proper Training

DIY does not mean every repair should be performed at home.

Beginners should be especially cautious with:

  • Airbag systems
  • Fuel-system repairs
  • High-voltage hybrid systems
  • EV battery systems
  • Major suspension work
  • Steering-system repairs
  • Internal engine repairs
  • Transmission rebuilding
  • Advanced electrical diagnostics
  • Major brake-system repairs
  • Repairs requiring vehicle lifting beyond available equipment

These systems can involve serious safety risks or require specialized tools and procedures.

How DIY Repair Can Save Money

DIY maintenance can reduce labor costs for simple jobs, but saving money should not be the only objective.

The real benefit comes from understanding what your vehicle needs.

For example, checking tyre pressure regularly may help prevent premature tyre wear. Replacing a dirty filter at the appropriate time can maintain proper airflow. Inspecting fluid levels can help you identify leaks before they become larger problems.

However, using cheap or incorrect parts can create additional costs later.

Always choose parts and fluids that meet the vehicle manufacturer’s requirements.

Common DIY Car Repair Mistakes

Beginners often make a few avoidable mistakes.

Using the Wrong Part

A part that looks similar may not be compatible with your vehicle.

Skipping the Owner’s Manual

The manual can contain important specifications, capacities and procedures.

Overtightening Fasteners

More force does not always mean better repair. Some components require a specific torque.

Ignoring Warning Signs

A warning light or unusual noise should not simply be ignored.

Working Without Proper Support

Never work underneath a vehicle that is supported only by a jack.

Guessing at Problems

Replacing parts randomly can become more expensive than proper diagnosis.

A Simple Beginner DIY Maintenance Routine

You do not need to repair everything at once.

A simple routine can include:

Weekly or Before Long Trips

  • Check tyres visually
  • Check for obvious fluid leaks
  • Confirm lights are working
  • Look for warning lights

Monthly

  • Check tyre pressure
  • Inspect wipers
  • Inspect accessible hoses and belts
  • Check engine oil according to the vehicle’s procedure

During Scheduled Maintenance

  • Replace filters when required
  • Inspect brakes
  • Check battery condition
  • Inspect suspension and steering components
  • Follow the manufacturer’s maintenance schedule

The exact maintenance Read also 2026-harley-davidson-cvo-road-glide-st-reviewintervals vary by vehicle, engine, driving conditions and manufacturer recommendations.

Final Thoughts

Learning basic DIY car repair is a practical skill that can make vehicle ownership easier and more affordable.

Start with simple jobs such as checking fluids, tyre pressure, filters, wipers, battery condition and basic diagnostics. As your experience grows, you can gradually learn more advanced maintenance procedures.

The most important rule is to know your limits. Saving money is useful, but safety should always come first.

Use the owner’s manual for vehicle-specific specifications, use the correct parts and tools, and never take shortcuts with critical systems such as brakes, steering, airbags, fuel systems or high-voltage components.

With patience, proper tools and careful procedures, beginners can learn many useful vehicle-maintenance skills and become more confident in taking care of their cars.

How to Fix Toyota Fortuner AC Cooling Issue: Complete DIY Repair Guide

file 00000000966881faaef24303d33aae00

One of the most common problems in a Toyota Fortuner AC system is weak cooling or warm air blowing from the vents…
If your Toyota Fortuner AC is not cooling properly, blowing warm air.

If your Toyota Fortuner AC is not cooling properly, blowing warm air, cooling only while driving, or taking too long to cool the cabin, there can be several possible causes

The problem may be as simple as a dirty cabin air filter or condenser, but it can also be related to refrigerant leakage, a cooling-fan problem, compressor failure, an expansion-valve issue, or an electrical fault..

Important: Toyota Fortuner AC systems can vary depending on the model year, engine, market, and equipment. Always use the correct service information and refrigerant specification for your particular vehicle.


Understanding the Toyota Fortuner Air Conditioning System

Before troubleshooting an AC cooling problem, it is important to understand how the system works.

The automotive air-conditioning system transfers heat from inside the cabin to the outside environment.

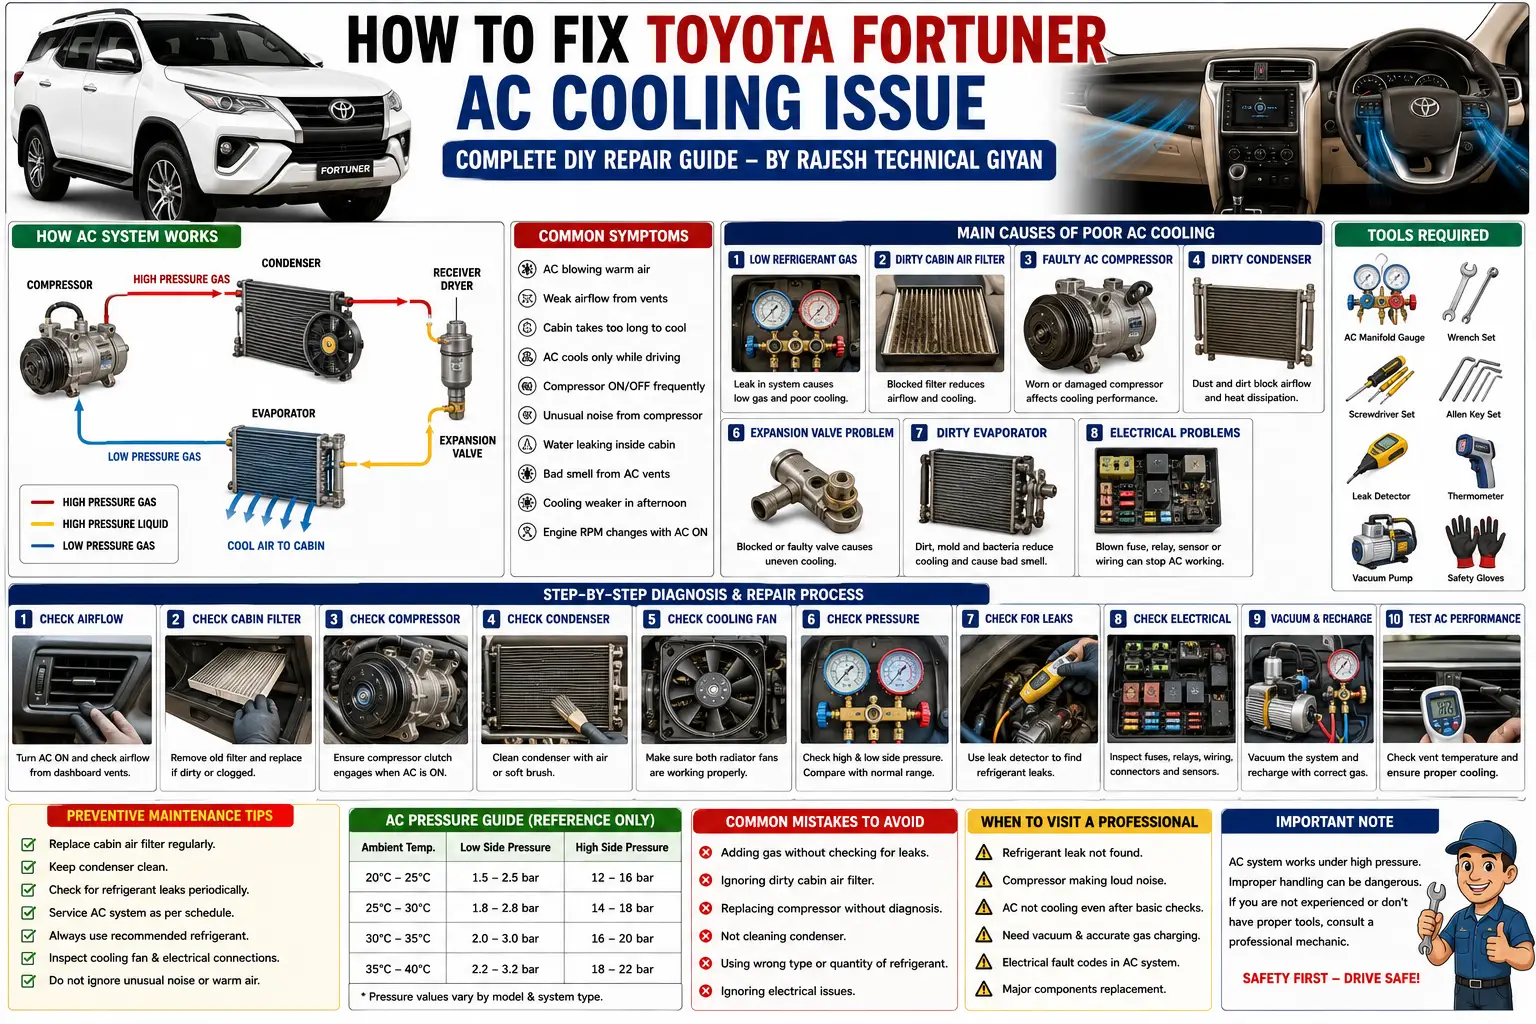
Major components may include:

  • AC compressor
  • Condenser
  • Receiver-drier or related refrigerant-storage component
  • Expansion valve
  • Evaporator
  • Refrigerant
  • Cooling fans
  • Cabin air filter
  • Pressure sensors
  • Temperature sensors
  • Blower motor
  • AC control system

When the AC is switched on, the compressor circulates refrigerant through the system.

The refrigerant releases heat through the condenser and then passes through the expansion device before entering the evaporator.

The evaporator absorbs heat from the cabin air, while the blower motor pushes the cooled air through the dashboard vents.

If any major component fails or refrigerant flow is interrupted, Toyota Fortuner AC cooling performance can decrease significantly.


Common Symptoms of Toyota Fortuner AC Cooling Problems

Correctly identifying the symptoms is the first step toward finding the actual fault.

Common symptoms include:

  • AC blowing warm air
  • Weak cooling from dashboard vents
  • Weak airflow
  • Cabin taking too long to cool
  • AC cooling properly while driving but poorly at idle
  • Compressor repeatedly switching on and off
  • Unusual compressor noise
  • Clicking or grinding sounds
  • Water or moisture inside the cabin
  • Bad smell from AC vents
  • Cooling becoming weak during hot afternoon driving
  • AC compressor failing to engage
  • AC working intermittently

Each symptom can point toward a different problem.


Why Is My Toyota Fortuner AC Not Cooling Properly?

There are several possible causes of poor AC cooling.

Let’s examine the most common ones.


1. Low Refrigerant or Refrigerant Leakage

One of the most common reasons for an AC cooling issue is insufficient refrigerant.

An automotive AC system is designed as a sealed system. Refrigerant should not normally disappear simply because of vehicle age.

If the refrigerant level is low, there may be a leak somewhere in the system.

Possible leak locations include:

  • Compressor seals
  • Condenser
  • Refrigerant hoses
  • Pipe connections
  • O-rings
  • Service ports
  • Evaporator
  • Other refrigerant-system joints

Symptoms of Low Refrigerant

You may notice:

  • Weak cooling
  • AC taking a long time to cool the cabin
  • Compressor cycling frequently
  • Cooling becoming weaker at higher temperatures
  • Poor cooling at idle

Important

Do not simply add refrigerant without checking the system.

A low refrigerant level can indicate a leak that needs to be located and repaired.

Also, the correct refrigerant type and charge amount must be confirmed from the vehicle-specific service information.


2. Dirty Cabin Air Filter

A dirty or clogged cabin air filter can significantly reduce airflow through the AC system.

When the filter becomes heavily blocked, the blower motor may struggle to push enough air through the evaporator.

Symptoms

A clogged cabin filter can cause:

  • Weak airflow
  • Poor cooling
  • Dusty cabin
  • Bad smell
  • Increased blower noise
  • Reduced AC performance

Solution

Inspect the cabin air filter regularly and replace it when necessary.

This is one of the simplest and least expensive maintenance procedures you can perform.

If the filter is extremely dirty, replacing it may noticeably improve airflow.


3. Faulty AC Compressor

The AC compressor is one of the most important components in the system.

It circulates refrigerant through the AC circuit.

A compressor can develop problems because of:

  • Internal wear
  • Bearing damage
  • Clutch problems on applicable systems
  • Seal failure
  • Insufficient lubrication
  • Contamination
  • Electrical problems

Common Symptoms

— Rajesh

A failing compressor may cause:

  • Poor cooling
  • No cooling
  • Unusual mechanical noise
  • Compressor not engaging
  • Intermittent cooling
  • Abnormal vibration
  • Refrigerant or oil leakage

If a compressor has suffered internal mechanical damage, metal particles can contaminate other AC components.

Therefore, replacing a compressor without diagnosing the rest of the system may result in repeated failure.


4. Dirty or Blocked AC Condenser

The condenser is responsible for releasing heat from the refrigerant.

It is normally positioned toward the front of the vehicle, where it can be exposed to:

  • Dust
  • Mud
  • Insects
  • Leaves
  • Road debris

A dirty condenser cannot transfer heat efficiently.

Symptoms

A restricted condenser may cause:

  • Weak AC cooling
  • Poor cooling at idle
  • Higher refrigerant pressure
  • Compressor cycling
  • Cooling becoming worse in heavy traffic

Solution

Inspect the condenser fins carefully.

Clean the condenser using an appropriate method without bending or damaging the delicate fins.

Do not use excessive water pressure directly against the fins.


5. Cooling Fan Not Working Properly

The AC condenser requires adequate airflow to remove heat.

If the cooling fan does not operate correctly, AC performance can become particularly poor when the vehicle is stationary.

Common Causes

  • Blown fuse
  • Faulty relay
  • Damaged fan motor
  • Wiring problem
  • Electrical connector problem
  • Control-system fault

Common Symptoms

One of the most important symptoms is:

AC cools well while driving but becomes warm at idle.

This can happen because natural airflow increases when the vehicle is moving.

At idle, the cooling fan must provide sufficient airflow through the condenser.

Always check fan operation when diagnosing this type of AC problem.


6. Expansion Valve Problem

The expansion valve or equivalent refrigerant-flow control device regulates refrigerant entering the evaporator.

If the valve becomes restricted or malfunctions, refrigerant flow can become abnormal.

Possible Symptoms

  • Poor cooling
  • Uneven cooling
  • Abnormal AC pipe temperatures
  • Ice formation in some conditions
  • Compressor cycling
  • Reduced evaporator performance

A faulty expansion valve generally requires replacement after proper diagnosis.

Do not replace it simply because cooling is poor; other AC faults can produce similar symptoms.


7. Dirty Evaporator

The evaporator is located inside the HVAC housing and absorbs heat from cabin air.

Over time, dust, dirt, moisture, and biological contamination can accumulate on the evaporator surface.

Symptoms

  • Weak airflow
  • Bad smell
  • Reduced cooling
  • Excessive moisture
  • Dust coming from vents

A heavily contaminated evaporator may require professional cleaning.

Regular cabin-filter replacement can help reduce contamination entering the HVAC system.


8. Electrical and Sensor Problems

Modern Toyota vehicles use electrical controls and sensors to manage AC operation.

A fault in the electrical system can prevent the compressor or cooling fan from operating correctly.

Possible problems include:

  • Blown fuse
  • Faulty relay
  • Pressure-sensor problem
  • Temperature-sensor problem
  • Damaged wiring
  • Loose connector
  • Control-module fault

Diagnosis

A professional diagnostic process may include:

  1. Checking AC-related fuses.
  2. Checking relays where applicable.
  3. Inspecting electrical connectors.
  4. Checking wiring.
  5. Scanning for relevant diagnostic trouble codes.
  6. Checking sensor data where supported.
  7. Confirming compressor and fan operation.

Electrical diagnosis should be performed before replacing expensive components.


Step-by-Step Toyota Fortuner AC Troubleshooting

If your Fortuner AC is not cooling properly, follow a logical diagnostic sequence.

Step 1: Check the Cabin Airflow

Turn the AC on and check airflow from the vents.

If airflow is weak, inspect the:

  • Cabin filter
  • Blower motor
  • HVAC air passages
  • Evaporator

Step 2: Check AC Compressor Operation

Observe whether the compressor operates when AC cooling is requested.

Do not assume that a compressor not operating means the compressor itself is defective.

The cause could be electrical or related to system pressure.

Step 3: Inspect the Condenser

Check the condenser for dirt, leaves, mud, and damaged fins.

Clean it carefully if necessary.

Step 4: Check Cooling Fan Operation

Confirm that the required cooling fan operates correctly under the appropriate conditions.

A fan problem is particularly important when the AC works while driving but becomes weak at idle.

Step 5: Check for Refrigerant Leaks

Inspect visible AC pipes, joints, condenser areas, compressor areas, and service connections.

For an accurate diagnosis, use suitable leak-detection equipment.

Step 6: Check Refrigerant Pressure

Refrigerant pressure should be measured using appropriate AC service equipment.

Do not use pressure readings alone to determine the exact refrigerant charge without considering ambient temperature, system operating conditions, and vehicle specifications.

Step 7: Check Electrical Components

Inspect:

  • Fuses
  • Relays
  • Wiring
  • Connectors
  • Sensors
  • Compressor control circuits

Step 8: Inspect the Evaporator and HVAC System

If airflow is weak or there is a persistent bad smell, inspect the cabin filter and evaporator condition.


Toyota Fortuner AC Cooling Only While Driving

This is a particularly common complaint.

If the AC cools well when the Fortuner is moving but becomes warm while stopped, investigate:

  • Condenser airflow
  • Cooling-fan operation
  • Condenser cleanliness
  • Refrigerant-system condition
  • Compressor performance
  • Engine cooling-system condition

Do not immediately replace the compressor.

A cooling-fan problem can produce very similar symptoms.


Toyota Fortuner AC Blowing Warm Air

If the AC suddenly starts blowing warm air, check the following:

  1. Does the compressor operate?
  2. Is there sufficient refrigerant?
  3. Is the condenser fan operating?
  4. Are there any visible refrigerant leaks?
  5. Are the AC fuses and electrical connections healthy?
  6. Are there diagnostic trouble codes?
  7. Is the HVAC temperature-control system operating correctly?

A proper diagnosis is necessary before replacing parts.


Preventive Maintenance Tips for Better AC Cooling

Regular maintenance can help maintain AC performance.

Replace the Cabin Air Filter

Keep the cabin filter clean and replace it according to the recommended service interval or when it becomes dirty.

Keep the Condenser Clean

Inspect the condenser periodically and remove accumulated dirt and debris carefully.

Check for Unusual Noises

If the compressor begins making unusual noises, investigate early.

Inspect AC Performance

If cooling gradually becomes weaker, have the system inspected rather than waiting until the AC stops working completely.

Keep the HVAC System Clean

A clean cabin and properly maintained filter can reduce contamination entering the HVAC system.

Avoid Unnecessary Refrigerant Top-Ups

If refrigerant is repeatedly required, investigate the system for a leak.


Common Mistakes to Avoid

Mistake 1: Adding Refrigerant Without Diagnosis

Repeated refrigerant loss should be investigated for leaks.

Mistake 2: Replacing the Compressor Immediately

Poor cooling does not automatically mean compressor failure.

Mistake 3: Ignoring the Cooling Fan

Poor cooling at idle can be strongly related to insufficient condenser airflow.

Mistake 4: Ignoring the Cabin Filter

A blocked filter can significantly reduce airflow.

Mistake 5: Using the Wrong Refrigerant

Always confirm the correct refrigerant type and specification for the exact vehicle.

Mistake 6: Ignoring Electrical Faults

A blown fuse, faulty relay, sensor, wiring issue, or connector problem can prevent AC operation.


When Should You Visit a Professional AC Technician?

Some AC repairs require specialized equipment and should not be performed without proper training.

Professional assistance is recommended when you need:

  • Refrigerant recovery
  • Vacuum evacuation
  • Refrigerant charging
  • Leak testing
  • Compressor replacement
  • Expansion-valve replacement
  • Evaporator replacement
  • High-pressure-system diagnosis
  • Electrical control diagnosis

Refrigerant systems operate under pressure, so improper servicing can cause injury or damage to the vehicle.


Frequently Asked Questions

Why is my Toyota Fortuner AC not cooling?

Possible causes include low refrigerant, refrigerant leakage, a dirty condenser, blocked cabin filter, cooling-fan failure, compressor problems, expansion-valve issues, evaporator contamination, or electrical faults.

Why does my Fortuner AC cool while driving but not at idle?

Possible causes include insufficient condenser airflow, a cooling-fan problem, condenser blockage, refrigerant-system problems, or compressor performance issues.

Can a dirty cabin filter cause poor AC cooling?

Yes. A severely clogged cabin filter can restrict airflow and make the AC feel weak even when the refrigeration system itself is operating normally.

Should I add AC gas if the cooling is weak?

Do not add refrigerant blindly. First determine whether the system has the correct refrigerant charge and whether there is a leak.

How often should Toyota Fortuner AC be serviced?

There is no single interval that applies to every vehicle and climate. Inspect the system during regular maintenance and service it when symptoms or the manufacturer’s maintenance schedule indicate.

Why does my Fortuner AC smell bad?

A dirty cabin filter, moisture accumulation, microbial growth, or contamination inside the HVAC system can contribute to unpleasant odors.


Professional Mechanic’s Advice

From my workshop experience at Rajesh Technical Giyan, the most important rule when repairing an automotive AC system is:

Diagnose first and replace parts second.

Many vehicle owners replace expensive compressors when the actual problem is a dirty condenser, cooling fan, electrical connection, or low refrigerant caused by a leak.

A professional diagnosis should examine the complete AC system instead of focusing on only one component.Read also toyota-innova-crysta-brake-pad-replacement


Conclusion

A Toyota Fortuner AC cooling issue can be caused by several different mechanical, electrical, airflow, or refrigerant-system problems.

The most common areas to inspect include:

  • Refrigerant level and leaks
  • Cabin air filter
  • AC compressor
  • Condenser
  • Cooling fan
  • Expansion valve
  • Evaporator
  • Fuses and relays
  • Pressure and temperature sensors
  • Wiring and electrical connectors

If your Toyota Fortuner AC is not cooling, start with simple inspections such as airflow, cabin-filter condition, condenser cleanliness, and cooling-fan operation.

For refrigerant charging, leak testing, compressor replacement, or other pressurized AC-system work, use the correct equipment and follow the manufacturer’s service procedures.

At Rajesh Technical Giyan, my goal is to explain automotive repair in a simple and practical way so that vehicle owners and mechanics can understand the actual cause of a problem instead of replacing parts based on guesswork.

Stay safe, maintain your vehicle properly, and keep learning automotive repair skills.