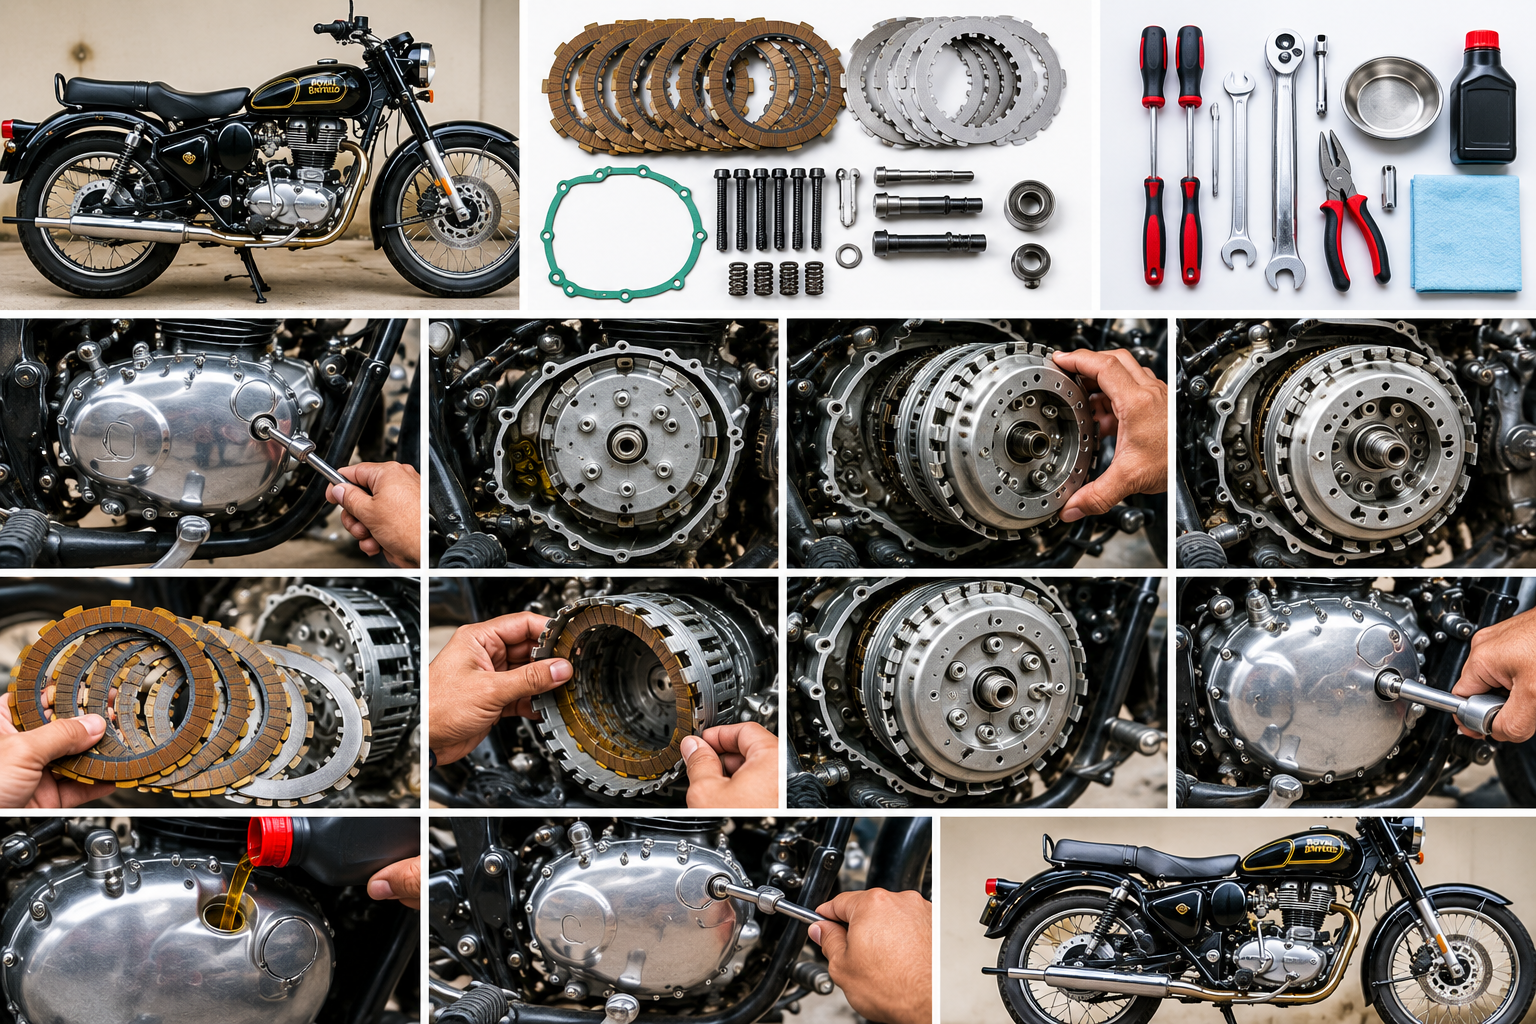
Installing clutch plates correctly is essential for smooth gear changes, proper clutch engagement, and reliable power transfer in a Royal Enfield motorcycle. A clutch that is assembled incorrectly can cause symptoms such as clutch slipping, dragging, difficult gear shifting, abnormal noise, or difficulty finding neutral.
The important point is that clutch plate installation is not simply a matter of removing the old plates and putting new ones in the same place. The friction plates, steel plates, clutch hub, pressure plate, springs, and related components must be inspected and assembled in the correct sequence.
This guide explains a practical, factory-standard approach to Royal Enfield clutch plate installation.
Why Correct Clutch Plate Installation Matters
The motorcycle clutch transfers engine power to the gearbox while also allowing the rider to disconnect the engine from the transmission during gear changes.
The clutch pack normally contains alternating friction and steel plates. When the clutch is engaged, the plates are pressed together. When the clutch is disengaged, the plates separate enough to interrupt power transmission.
Incorrect assembly can lead to:
- Clutch slipping under acceleration
- Clutch dragging when the lever is pulled
- Difficult gear shifting
- Difficulty finding neutral
- Abnormal clutch noise
- Poor clutch lever feel
- Premature clutch wear
- Inconsistent clutch engagement
For this reason, careful inspection and correct assembly are more important than simply replacing worn plates.
Tools and Preparation
Before starting the job, prepare the correct tools for the particular Royal Enfield model.
Typical requirements include:
- Metric socket and spanner set
- Torque wrench
- Screwdrivers or suitable clutch-cover tools
- Clutch holding tool where required
- Clean drain container
- Clean lint-free cloth
- Suitable engine oil
- Replacement clutch plates
- New gasket or sealing component if required
- Service manual for the exact motorcycle model
Keep the work area clean. Dirt or metal particles entering the clutch assembly can create problems after installation.
Important Safety Step
Place the motorcycle securely on a stable stand and allow the engine and oil to cool before beginning the repair.
Never work underneath or around a motorcycle that can fall unexpectedly.
Step 1: Confirm the Correct Clutch Plate Set
Before opening the clutch, confirm that the replacement clutch plates are designed for the exact Royal Enfield model and variant.
Royal Enfield motorcycles have been produced with different engine and clutch configurations over different generations.
Do not assume that clutch plates from one model will have the same:
- Plate dimensions
- Number of plates
- Friction material
- Steel plate design
- Plate thickness
- Installation sequence
Compare the replacement parts with the original components and the manufacturer’s service information.
Step 2: Drain the Engine Oil if Required
If the clutch cover or engine design requires oil removal, drain the engine oil into a suitable clean container.
Allow sufficient time for the oil to drain.
Inspect the drained oil for unusual metal particles or contamination. Excessive metallic debris may indicate a deeper mechanical problem that should be investigated before simply installing new clutch plates.
Replace the drain sealing washer if the service procedure calls for a new one.
Step 3: Remove the Clutch Cover Carefully
Remove the components required to access the clutch assembly.
Keep fasteners organized according to their location. Different bolts may have different lengths, and installing a bolt in the wrong location can damage components.
Separate the clutch cover carefully without damaging the sealing surfaces.
If a gasket is used, remove the old gasket material completely without scratching the mating surfaces.
Step 4: Inspect the Existing Clutch Assembly
Before removing the clutch pack, inspect the assembly carefully.
Look for:
- Burn marks
- Excessive friction material wear
- Discolored steel plates
- Grooves or notches in the clutch hub
- Damage to the pressure plate
- Weak or damaged springs
- Excessive contamination
- Abnormal wear on the clutch basket
Do not replace only the friction plates if another component is visibly damaged.
A worn clutch basket or hub can cause clutch engagement problems even after installing new plates.
Step 5: Remove the Clutch Springs and Pressure Plate
Remove the clutch spring fasteners gradually and evenly.
Do not completely loosen one spring while the other springs remain heavily loaded. Follow a cross-pattern or gradual-release method where applicable.
Remove the pressure plate carefully.
Before separating components, observe their orientation. If the pressure plate or related parts have a specific installation direction, that orientation must be maintained during reassembly.
Step 6: Remove the Old Clutch Plates
Remove the friction and steel plates one by one.
Keep the plates in order during removal if you need to compare the original arrangement with the manufacturer’s specified arrangement.
Some clutch assemblies can have specific plate arrangements or special plates, so never assume that every plate is identical.
Once removed, inspect the clutch hub and basket before installing the new components.
Step 7: Check the Steel Plates
The steel plates are just as important as the friction plates.
Inspect each steel plate for:
- Warping
- Blue or dark heat marks
- Deep grooves
- Excessive wear
- Surface damage
- Corrosion
A severely overheated or warped steel plate can prevent the clutch pack from operating correctly.
If the service manual specifies a flatness or thickness limit, measure the plate with appropriate tools and compare the result with the manufacturer’s limit.
Step 8: Prepare the New Friction Plates
Do not install dry friction plates unless the manufacturer’s procedure specifically permits it.
Before installation, pre-soak the new friction plates in the correct engine oil when required by the clutch manufacturer’s or Royal Enfield’s service procedure.
Use clean oil and allow the plates to become properly saturated.
This helps the friction material operate correctly during initial clutch engagement.
Avoid contaminating the friction surfaces with dirt, grease, or unsuitable lubricants.
Step 9: Install the Clutch Plates in the Correct Sequence
This is one of the most important steps.
Install the clutch plates exactly according to the service manual for the specific Royal Enfield model.
In a conventional clutch pack, friction and steel plates alternate. However, the exact number, order, and orientation can vary.
A typical arrangement may follow a pattern such as:
Friction plate → Steel plate → Friction plate → Steel plate
Continue the sequence until the specified clutch pack is complete.
However, do not use this pattern as a substitute for the model-specific service manual.
Some assemblies may include a special plate, different friction plate, or specific orientation.
Check the Plate Tabs
Make sure the friction plate tabs properly engage with the clutch basket.
The steel plates must correctly engage with the corresponding clutch hub or assembly surfaces.
Do not force a plate into position.
If a plate does not fit correctly, stop and identify the reason before continuing.
Step 10: Check Clutch Plate Movement
After installing the complete clutch pack, rotate the assembly by hand where practical and check that the plates are seated correctly.
The plates should sit evenly without being forced or tilted.
Check that:
- The friction plates are properly seated
- The steel plates are correctly positioned
- No plate is trapped incorrectly
- The clutch pack is aligned
- The pressure plate can be installed correctly
If the clutch pack does not sit at the expected height, do not compensate by tightening the springs excessively.
Recheck the plate count and sequence.
Step 11: Install the Pressure Plate
Position the pressure plate correctly.
If the pressure plate has alignment marks, locating features, or a specified orientation, align it according to the service information.
Insert the clutch springs and fasteners.
Tighten the fasteners gradually and evenly.
Do not tighten one spring completely before installing or tightening the others.
Step 12: Tighten Fasteners to the Correct Torque
Correct torque is critical during clutch assembly.
Use a calibrated torque wrench and follow the Royal Enfield service specification for the exact model and component.
Do not guess torque values from another Royal Enfield model.
Over-tightening can damage threads or components, while insufficient tightening can allow fasteners to loosen during operation.
Where several clutch spring fasteners are used, tighten them evenly in the specified sequence.
Step 13: Reinstall the Clutch Cover
Clean the mating surfaces before reinstalling the clutch cover.
Install a new gasket or sealing component when specified.
Position the cover carefully and install the bolts in their correct locations.
Tighten the cover fasteners according to the manufacturer’s specified sequence and torque.
Avoid overtightening the cover bolts.
Step 14: Refill the Correct Engine Oil
Refill the engine with the correct oil and quantity specified for the particular Royal Enfield model.
Do not rely on a generic oil quantity because specifications can differ between models and engine generations.
Check the oil level using the manufacturer’s recommended procedure.
An incorrect oil level can affect engine and clutch operation.
Step 15: Adjust the Clutch Control
After assembly, inspect the clutch cable or hydraulic clutch system, depending on the motorcycle.
For a cable-operated clutch, check the manufacturer’s recommended free play at the clutch lever.
The lever should have the correct amount of free movement before the clutch mechanism begins to operate.
Too little free play can cause the clutch to remain partially disengaged and may contribute to slipping.
Too much free play can prevent complete clutch disengagement and may contribute to clutch drag.
Make the adjustment according to the exact Royal Enfield model specification.
Step 16: Perform a Static Check
Before riding the motorcycle, operate the clutch lever several times.
Check:
- Lever movement
- Clutch engagement feel
- Abnormal noise
- Oil leakage
- Cable or hydraulic operation
- Proper return of the lever
Start the engine and allow it to run for a short period.
Check the clutch operation again.
If there is unusual noise, significant vibration, oil leakage, or abnormal clutch behavior, stop the engine and inspect the assembly.
Step 17: Test the Clutch Carefully
After confirming that everything is functioning normally, perform a controlled test ride in a safe location.
Check whether:
- The motorcycle moves smoothly from a stop
- Gear changes are smooth
- Neutral can be selected normally
- The clutch fully disengages
- The engine does not flare excessively during acceleration
- There is no clutch slipping
- There is no unusual clutch noise
Avoid aggressive acceleration during the initial test.
Give the new clutch components time to operate normally according to the manufacturer’s recommended procedure.
Common Mistakes to Avoid
Installing Plates in the Wrong Order
One of the most common mistakes is installing every plate without checking the specified sequence.
Always verify the exact arrangement for the model.
Installing Dry Friction Plates
If the manufacturer’s procedure requires oil pre-soaking, follow that procedure before installation.
Mixing Old and New Plates
Mixing worn friction plates with new components can produce inconsistent clutch performance.
Follow the manufacturer’s recommended replacement procedure.
Reusing Damaged Steel Plates
New friction plates cannot correct a severely warped or heat-damaged steel plate.
Inspect the complete clutch pack.
Over-Tightening Spring Bolts
Excessive torque can damage threads or clutch components.
Always use the specified torque.
Ignoring Clutch Free Play
Even a correctly assembled clutch can behave poorly if the control adjustment is incorrect.
Check clutch free play after assembly.
Using the Wrong Engine Oil
Motorcycle wet clutches depend on the correct oil specification.
Use the oil recommended for the exact Royal Enfield engine and service conditions.
Symptoms After Installation and What They May Indicate
Clutch Slipping
Possible causes include incorrect assembly, insufficient clutch spring pressure, contaminated friction plates, incorrect adjustment, or worn related components.
Clutch Dragging
Possible causes include incorrect plate arrangement, excessive clutch lever free play, warped steel plates, or a problem within the clutch release mechanism.
Difficult Gear Shifting
Check clutch adjustment, clutch release operation, oil specification, and correct plate installation.
Abnormal Noise
Recheck the clutch basket, hub, pressure plate, springs, and fasteners.
Do not continue riding if the noise suggests a serious mechanical fault.
Final Inspection Checklist
Before returning the motorcycle to regular use, verify:
- Correct clutch plates were installed
- Plate count is correct
- Plate sequence is correct
- Special plates are installed in the correct position
- Friction plates were prepared according to the manufacturer’s procedure
- Steel plates were inspected
- Clutch springs are correctly installed
- Fasteners were tightened to specification
- Clutch cover is correctly sealed
- Engine oil level is correct
- Clutch free play is correctly adjusted
- There are no oil leaks
- Clutch operation is smooth
- Gear selection works correctlyRead also/glamour-bike-full-engine-repairing-guide
Final Thoughts
Correct Royal Enfield clutch plate installation requires attention to the complete clutch assembly rather than just replacing the friction plates.
The most important principles are correct plate sequence, proper inspection, correct component orientation, even tightening, accurate torque, correct oil, and proper clutch adjustment.
Because Royal Enfield has produced multiple models and generations with different clutch configurations, always use the service information for the exact motorcycle when confirming plate count, installation orientation, torque values, oil specification, and clutch free play.
A careful installation procedure can help restore smooth clutch operation and reduce the possibility of premature clutch problems.
Rajesh Technical Giyan