Bike brakes are one of the most important safety systems in any motorcycle. No matter how powerful the engine is or how expensive the bike looks, weak brakes can make riding extremely dangerous. A ⅞quickly become a major accident if ignored for too long. Many riders continue using motorcycles even after noticing brake noise, weak braking power, vibration, or loose brake levers. This is a very risky habit because brake failure can happen suddenly, especially during emergency stopping situations.
The good news is that basic bike brake repair and maintenance is not very difficult. With the correct tools, proper safety precautions, and step-by-step guidance, beginners can understand how motorcycle braking systems work and how to repair common brake problems safely.
In this complete guide, you will learn:
How drum brakes work
How disc brakes work
Step-by-step brake repair process
Common brake problems
Safety precautions
Maintenance tips for long brake life
In this advanced technical breakdown, we will explore hydraulic fluid master cylinders, brake pad friction coefficients, drum brake cam engagements, and precise brake bleeding procedures to eliminate air pockets and ensure your motorcycle delivers maximum stopping power when it matters most.
Why Brake Maintenance Is Important
Brake maintenance is not only about stopping the bike. It is directly connected to rider safety, road control, and riding confidence.
A properly maintained braking system helps:
- Reduce stopping distance
- Improve emergency braking performance
- Prevent skidding
- Increase rider confidence
- Protect expensive components
- Improve overall bike safety
Ignoring brake maintenance can create serious issues such as:
- Brake failure
- Rotor damage
- Brake shoe wear
- Loss of control during rain
- Tire skidding
- Accidents at high speed
Many riders spend money on engine performance upgrades but ignore brake servicing. However, good brakes are more important than high speed because safety should always come first.
Understanding How Motorcycle Brakes Work
Before starting repairs, it is important to understand the basic working principle of bike brakes.
Motorcycle brakes work by creating friction between moving parts.
Drum Brake Working Principle
In a drum brake system:
- Brake shoes press against the inner drum surface
- Friction slows down wheel rotation
- The bike gradually stops
Drum brakes are simple, durable, and commonly used in rear wheels.
Disc Brake Working Principle
In disc brakes:
- Brake pads press against the rotating disc rotor
- Hydraulic pressure creates braking force
- The wheel slows down quickly
Disc brakes provide:
- Better stopping power
- Faster response
- Improved high-speed safety
- Better heat control
This is why most modern motorcycles use front disc brakes.
Types of Bike Brakes
Most motorcycles use two main braking systems.
1. Drum Brakes
Drum brakes are commonly found in:
- Rear wheels
- Small commuter motorcycles
- Budget bikes
Advantages:
- Low maintenance cost
- Long-lasting parts
- Simple repair process
Disadvantages:
- Less stopping power
- Heat buildup during long rides
- Reduced performance in rain
2. Disc Brakes
Disc brakes are mostly used in:
- Front wheels
- Sports bikes
- Modern motorcycles
Advantages:
- Strong braking performance
- Better heat dissipation
- Quick response
- Improved emergency braking
Disadvantages:
- Slightly expensive maintenance
- Brake pads wear faster
Many motorcycles now use:
- Front disc brake
- Rear drum brake
This combination balances performance and affordability.
Tools Required for Brake Repair
Before starting any brake repair work, prepare the proper tools.
Essential Tools
- Spanner set
- Ring spanner
- Screwdriver set
- Brake cleaner spray
- Cleaning cloth
- Pliers
- C-clamp
- Lubricant spray
- New brake pads or brake shoes
Safety Equipment
- Hand gloves
- Safety glasses
- Clean working area
Using the correct tools helps prevent damage to brake components.
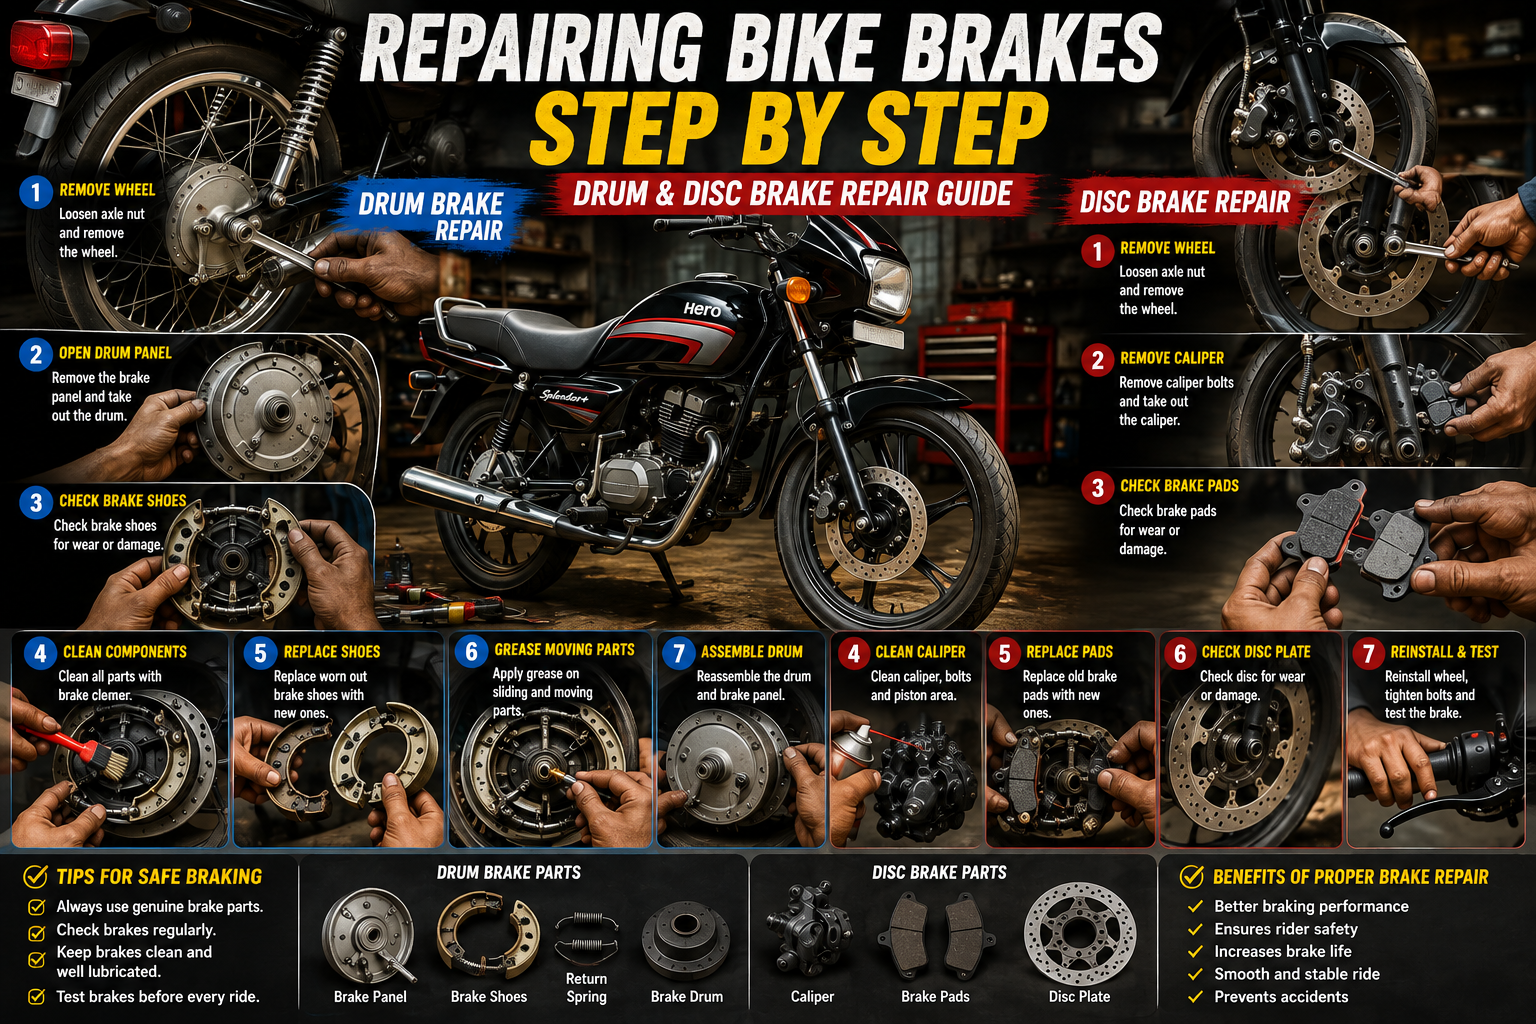
How To Repair Drum Brake (Step By Step)
Step 1 – Place the Bike Safely
Park the motorcycle on the center stand.
Make sure:
- The bike is stable
- The surface is flat
- The rear wheel rotates freely
Safety is very important while repairing brakes.
Step 2 – Remove the Rear Wheel
- Loosen the axle nut carefully
- Disconnect the brake cable
- Remove chain adjustment if required
- Slide out the rear wheel slowly
Keep all washers and nuts safely because missing spacers can create alignment problems later.
Step 3 – Open the Drum Brake Assembly
Remove the drum plate carefully.
Now inspect:
- Brake shoes
- Springs
- Brake cam
- Dust buildup
If brake shoes are thin or cracked, replace them immediately.
Step 4 – Clean the Drum Brake Properly
Brake dust reduces braking performance.
Use:
- Brake cleaner spray
- Dry cloth
- Soft brush
Never use oily grease inside drum brakes because it reduces friction and weakens braking power.
Step 5 – Check Brake Cam Movement
Rotate the brake cam manually.
If movement feels tight:
- Clean rust carefully
- Apply light lubricant externally only
A jammed brake cam can cause:
- Hard brake lever
- Weak braking
- Uneven brake performance
Step 6 – Install New Brake Shoes
- Fit the brake shoes correctly
- Install springs carefully
- Ensure proper alignment
Improper installation may create:
- Brake noise
- Wheel locking
- Uneven braking
Step 7 – Reassemble the Wheel
- Install the drum plate
- Refit the wheel
- Tighten axle nut properly
- Connect brake cable
After assembly:
- Rotate wheel manually
- Check brake free play
How To Repair Disc Brake (Step By Step)
Step 1 – Inspect the Disc Rotor
Before opening anything:
- Check rotor condition
- Look for deep scratches
- Inspect bending or warping
A damaged rotor can cause vibration during braking.
Step 2 – Remove the Brake Caliper
Use the correct spanner to remove caliper bolts.
Carefully remove the caliper without damaging:
- Brake hose
- Hydraulic line
- Brake sensor wire
Never hang the caliper by the brake hose.
Step 3 – Remove Old Brake Pads
- Remove retaining pin
- Take out old brake pads
- Inspect pad wear condition
Uneven pad wear may indicate:
- Stuck piston
- Caliper alignment issue
Step 4 – Clean the Caliper
Dust and dirt collect around the piston area.
Use:
- Brake cleaner spray
- Soft cloth
- Air pressure if available
Cleaning improves piston movement and braking efficiency.
Step 5 – Push Back the Piston
Use a C-clamp carefully.
Push the piston slowly back into position to create space for new brake pads.
Do not force the piston aggressively because:
- Seals may get damaged
- Brake fluid leakage can occur
Step 6 – Install New Brake Pads
- Insert new brake pads
- Secure retaining pin
- Refit caliper correctly
- Tighten bolts carefully
Always use genuine or high-quality brake pads for better safety.
Step 7 – Test the Brake Lever
Press the brake lever multiple times.
This helps:
- Build hydraulic pressure
- Adjust piston position
- Seat the new brake pads properly
Never ride immediately without testing brake pressure.
Common Signs Your Bike Brakes Need Repair
Many motorcycles show warning signs before brake failure.
Watch for these symptoms:
1. Squeaking Noise
Brake pads or shoes may be worn out.
2. Grinding Sound
Metal-to-metal contact may damage the rotor or drum.
3. Soft Brake Lever
Air inside brake line or fluid leakage may be present.
4. Brake Vibration
Warped disc rotor or uneven brake surface can cause vibration.
5. Bike Pulling to One Side
Uneven brake pressure may exist.
6. Longer Stopping Distance
Brake performance has reduced and requires immediate inspection.
Ignoring these signs can become dangerous.
Common Brake Problems and Solutions
ProblemPossible CauseSolutionWeak brakingWorn brake padsReplace padsBrake noiseDust buildupClean componentsHard brake leverJammed mechanismLubricate moving partsBrake vibrationBent rotorReplace or repair rotorRear wheel lockingTight adjustmentAdjust free play
Important Safety Tips During Brake Repair
Always follow proper safety rules.
- Never touch hot brake components
- Use proper tools only
- Tighten bolts correctly
- Avoid oil contamination
- Test brakes at low speed first
- Wear gloves during repair
Brakes are directly related to rider life and safety.
Common Mistakes Beginners Make
Many beginners damage brake systems because of simple mistakes.
Mistake 1 – Over Tightening Bolts
This can damage threads and brake parts.
Mistake 2 – Touching Brake Pads With Oily Hands
Oil reduces braking efficiency.
Mistake 3 – Ignoring Brake Fluid
Low brake fluid causes weak braking.
Mistake 4 – Improper Pad Installation
Wrong fitting creates uneven braking.
Mistake 5 – Skipping Brake Testing
Always test before normal riding.
Maintenance Tips For Long Brake Life
Proper maintenance saves money and improves safety.
Useful Brake Maintenance Tips
- Clean brakes regularly
- Check brake fluid monthly
- Replace worn pads early
- Avoid aggressive braking
- Inspect rotor condition
- Check cable adjustment
- Use quality spare parts
Regular inspection prevents expensive repairs later.
When Should You Visit a Professional Mechanic?
Some brake problems require expert attention.
Visit a mechanic if:
- Brake fluid leaks
- ABS warning light appears
- Rotor is severely damaged
- Brake piston gets stuck
- Hydraulic system fails
Do not take risks with serious brake problems.read also suzuki-bike-clutch-plate-changing-process
Conclusion
Repairing motorcycle brakes is an important skill for every rider. Whether your bike uses drum brakes or disc brakes, understanding the repair process helps improve safety and riding confidence.
Proper brake maintenance prevents accidents, improves stopping performance, and increases the life of brake components. Small issues like brake noise, weak braking, or vibration should never be ignored because they can become dangerous later.
By following the correct repair steps, using quality parts, and performing regular maintenance, you can keep your motorcycle braking system smooth, reliable, and safe for daily riding.
Always remember: A powerful engine is useless without strong and reliable brakes.
Ride safely, maintain your bike properly, and never ignore brake problems.
Frequently Asked Questions (FAQ)
Q1. How often should motorcycle brakes be checked?
Motorcycle brakes should be inspected every few weeks or before long rides.
Q2. How long do brake pads last?
Brake pad life depends on riding style, road conditions, and brake quality.
Q3. Can beginners repair bike brakes?
Yes, basic brake repair can be done by beginners with proper tools and safety precautions.
Q4. Why do bike brakes make noise?
Brake noise is usually caused by dust, worn pads, or improper fitting.
Q5. Is riding with weak brakes dangerous?
Yes, weak brakes can increase stopping distance and accident risk.
Friends, if you found this technical guide helpful, please feel free to share it with your fellow riders and car enthusiasts. Your safety on the road is what matters most.
If you have any questions regarding diagnostics, torque specs, or troubleshooting steps, please leave a comment below or send an email directly. I am always here to provide full guidance and expert support.
Stay safe, maintain your machines properly, and happy driving!
— Rajesh (Rajesh Technical Giyan
1 thought on “Repairing Bike Brakes Step By Step Drum & Disc Brake Repair Guide”