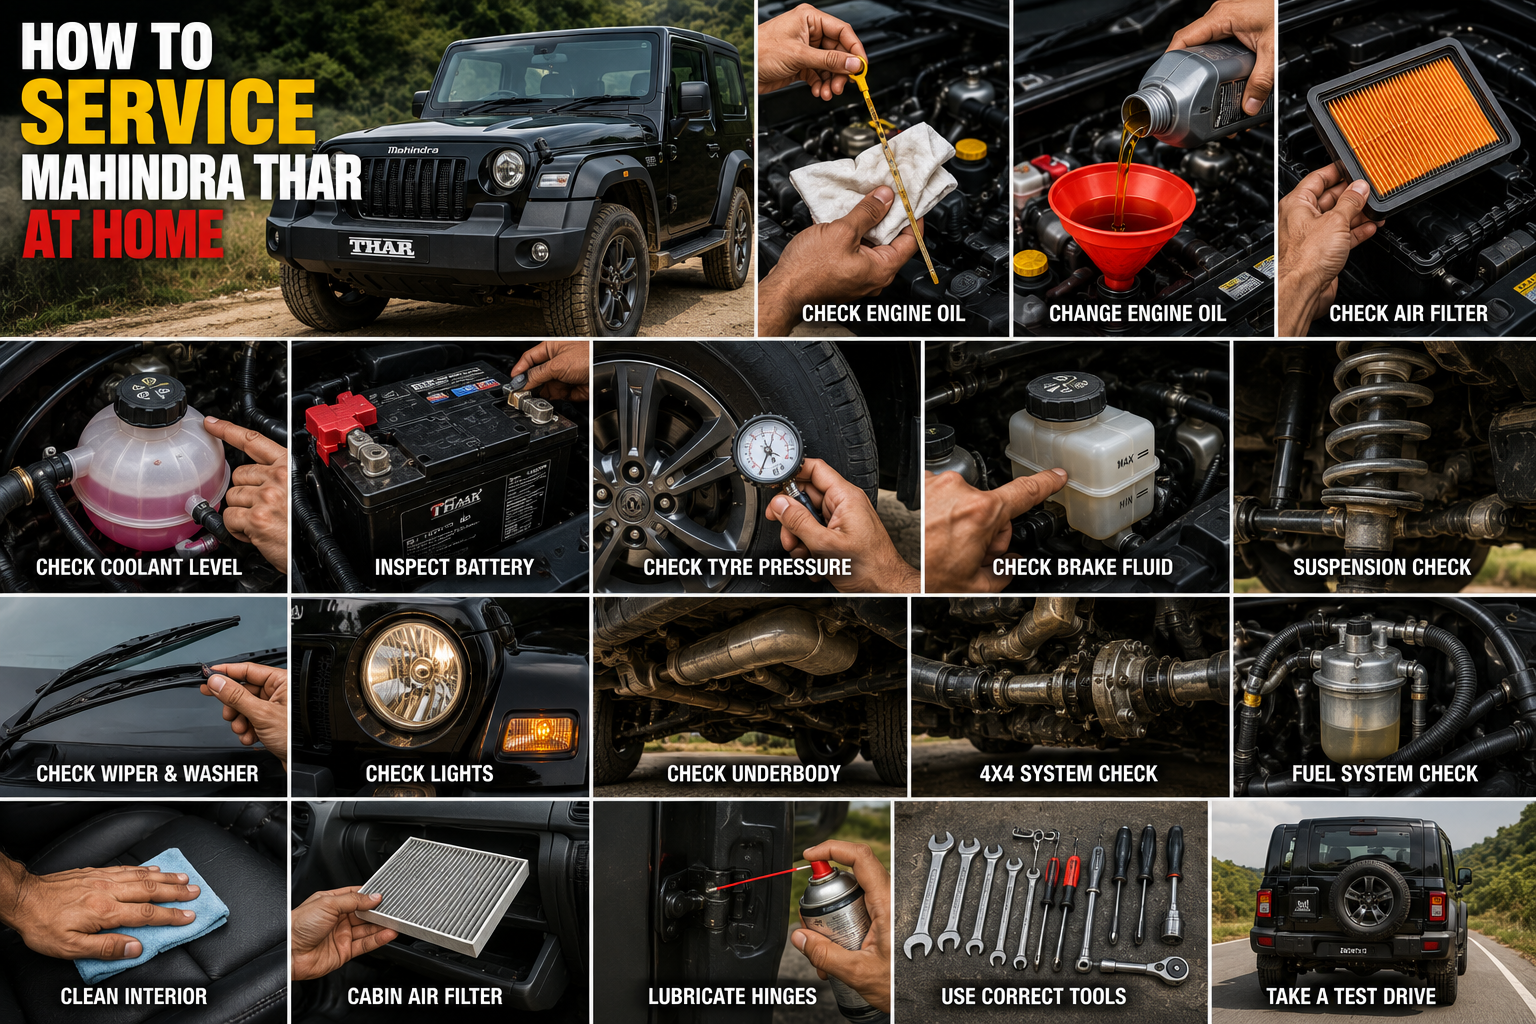
The Mahindra Thar is designed for both everyday driving and demanding road conditions. Depending on the version, it can be used on highways, city roads, rough roads, and off-road terrain. Because of this, regular maintenance is especially important.
Home servicing does not mean replacing every component yourself. Some maintenance jobs are relatively simple, such as checking fluid levels, inspecting tyres, cleaning certain components, checking the battery, inspecting the engine bay, and looking for leaks. Other jobs, such as major brake repairs, transmission work, suspension repairs, electronic diagnosis, or engine internal repairs, may require specialized tools and professional knowledge.
The exact engine oil specification, fluid quantity, filter type, tyre pressure, service interval, and tightening torque can vary between different Mahindra Thar generations and engine variants. Therefore, always use the owner’s manual or manufacturer-approved service information for your exact vehicle.
1. Prepare the Thar Before Starting
Before beginning any maintenance work, park the Thar on a firm, level surface.
Switch off the engine and engage the parking brake.
Allow hot components such as the engine, exhaust, and cooling system to cool sufficiently before working around them.
Keep the vehicle stable and prevent accidental movement.
Prepare a clean work area and keep all removed parts and fasteners organized.
Basic tools may include:
- Socket and spanner set
- Screwdrivers
- Pliers
- Funnel
- Drain pan
- Gloves
- Cleaning cloths
- Tyre-pressure gauge
- Multimeter
- Suitable oil-filter tool
- Torque wrench where required
For work underneath the vehicle, use properly rated lifting equipment and axle stands on suitable support points. Never rely on a jack alone to support a vehicle while working underneath it.
2. Check the Engine Oil
Engine oil is one of the most important maintenance items.
Before checking the oil, follow the checking procedure specified for your particular Thar.
Park the vehicle on level ground and allow the oil to settle as required by the manufacturer’s procedure.
Check the oil level using the appropriate method for your engine.
The oil should be within the specified range.
If the oil level is below the recommended level, investigate why it is low rather than repeatedly adding oil without finding the cause.
Look around the engine and underneath the vehicle for signs of oil leakage.
3. Change the Engine Oil
If an oil change is due and you have the correct tools and replacement materials, it can be performed carefully at home.
A general procedure is:
- Warm the engine according to the manufacturer’s instructions.
- Switch off the engine.
- Secure the vehicle safely.
- Position a suitable drain pan.
- Remove the oil-drain plug using the correct tool.
- Allow the old oil to drain completely.
- Inspect the drain plug and sealing washer.
- Replace the oil filter if required.
- Reinstall the drain plug using the specified procedure and torque.
- Add the correct engine oil.
- Check the oil level using the manufacturer’s procedure.
- Start the engine briefly and inspect for leaks.
- Recheck the oil level as required.
Never guess the oil quantity.
Different Thar engines can have different oil requirements, so always use the specification and quantity applicable to your exact vehicle.
Dispose of used engine oil responsibly. Never pour used oil onto the ground or into a drain.
4. Replace the Oil Filter
The oil filter removes contaminants from the engine oil.
When replacing it, make sure the old filter gasket has been removed if applicable.
Before installing the new filter, inspect the sealing surface.
Apply the appropriate amount of clean engine oil to the filter seal if the manufacturer’s procedure calls for it.
Do not overtighten the filter.
Follow the manufacturer’s installation instructions.
After starting the engine, check carefully around the filter for leakage.
5. Inspect the Air Filter
The engine needs clean air for proper combustion.
Open the air-filter housing according to the correct procedure and inspect the filter.
A dirty or damaged filter can affect engine performance and air flow.
If the filter is due for replacement, install the correct replacement part.
Do not use an unsuitable filter simply because it appears to fit.
If the Thar is regularly driven in dusty or off-road conditions, inspect the air-intake system more frequently.
Also check for loose clamps, damaged intake pipes, or dust entering areas where it should not.
6. Check the Battery
The battery is essential for starting and electrical operation.
Inspect the battery and surrounding area for:
- Loose connections
- Corrosion
- Physical damage
- Leakage
- Poor terminal contact
Make sure the terminals are secure.
If you have a multimeter, you can check battery voltage, but voltage alone does not always prove that a battery is healthy under load.
If the vehicle is repeatedly difficult to start, the battery and charging system should be tested properly.
Do not create short circuits across battery terminals.
7. Inspect the Coolant Level
The cooling system protects the engine from excessive temperature.
Check the coolant reservoir when the engine is cold and follow the markings and procedure specified for your vehicle.
Do not open a hot pressurized cooling system.
Inspect the reservoir, hoses, radiator area, and visible connections for leaks.
If the coolant level repeatedly falls, do not simply keep topping it up. Find the cause of the loss.
Possible causes can include an external leak or another cooling-system problem requiring professional diagnosis.
8. Inspect the Brake System
Brakes are more important than any mileage-saving or performance modification.
Check the brake-fluid reservoir and inspect the visible brake components.
Look for:
- Low brake-fluid level
- Fluid leakage
- Worn brake pads
- Damaged hoses
- Unusual disc wear
- Abnormal noises
If the brake pedal feels unusually soft, sinks excessively, or braking performance changes suddenly, do not continue normal driving until the system has been inspected.
Brake hydraulic repairs and bleeding should be performed using the correct procedure and equipment.
9. Check Tyre Pressure
Tyre pressure has a direct effect on handling, braking, tyre wear, and fuel economy.
Check all four tyres when they are appropriately cool and use the pressure specified for your particular Thar and driving conditions.
Do not simply use a pressure number printed on the tyre sidewall as the vehicle’s recommended operating pressure.
Also inspect the spare tyre.
Look for:
- Cuts
- Cracks
- Punctures
- Uneven wear
- Bulges
- Foreign objects
- Excessive tread wear
If the Thar is used for off-road driving, inspect the tyres carefully after returning to normal roads.
10. Inspect the Suspension
The Thar may encounter rough roads and off-road conditions, so suspension inspection is important.
Look underneath the vehicle for visible damage or leakage.
Inspect the shock absorbers, suspension components, bushes, and related mounting areas for obvious problems.
Pay attention to:
- Excessive bouncing
- Abnormal noises
- Uneven ride height
- Oil leakage
- Steering changes
- Unusual tyre wear
If you discover a damaged suspension component, do not attempt an improvised repair.
11. Check the Steering System
Turn the steering wheel carefully and observe whether it operates smoothly.
Look for unusual noises, excessive free play, vibration, or changes in steering feel.
If the vehicle pulls strongly to one side or the steering wheel is significantly off-center, the vehicle may require alignment or suspension inspection.
After a major pothole or off-road impact, inspect the steering and suspension system carefully.
12. Inspect the Drive Belts and Hoses
Open the engine compartment and visually inspect accessible belts and hoses.
Look for:
- Cracks
- Fraying
- Loose connections
- Swelling
- Oil contamination
- Coolant stains
- Physical damage
Do not touch moving belts while the engine is running.
If a belt or hose appears damaged, replace it according to the manufacturer’s procedure rather than trying to repair it temporarily.
13. Check the Fuel System for Leaks
Fuel leaks are a serious safety issue.
With the engine switched off and the vehicle in a safe, ventilated area, inspect visible fuel-system components for signs of leakage or fuel smell.
Never work around fuel with cigarettes, flames, sparks, or other ignition sources nearby.
If you find a fuel leak, avoid driving the vehicle until it has been repaired safely.
Do not attempt an improvised fuel-line repair.
14. Inspect the Engine Bay
A clean engine bay makes it easier to identify leaks and damaged components.
You can visually inspect:
- Wiring
- Connectors
- Hoses
- Fluid reservoirs
- Battery
- Air-intake components
- Visible fasteners
- Signs of oil or coolant leakage
Avoid spraying high-pressure water directly onto electrical connectors, sensors, alternators, fuse boxes, or other sensitive components.
15. Check the Wipers and Washer Fluid
Small maintenance items also affect safe driving.
Inspect the windshield wiper blades for cracks or poor wiping performance.
Check the washer-fluid reservoir and refill it with suitable washer fluid.
Do not use unsuitable chemicals that may damage the washer system or leave residue on the windshield.
Good visibility is essential, especially during monsoon driving.
16. Inspect Exterior Lights
Check all important lights:
- Headlights
- Parking lights
- Brake lights
- Turn indicators
- Reverse lights
- Hazard lights
- Number-plate illumination where applicable
A failed light should be repaired promptly.
If a bulb is repeatedly failing, investigate the electrical system instead of simply replacing bulbs repeatedly.
17. Check the Underbody
This is particularly important for a vehicle that is used off-road.
Inspect the underside for:
- Mud accumulation
- Oil leaks
- Damaged covers
- Loose components
- Scraped parts
- Damaged wiring
- Exhaust damage
- Fluid leaks
After crossing deep mud or water, clean the underbody appropriately and inspect the vehicle.
Do not assume that a vehicle is undamaged simply because it continues to drive normally after an off-road trip.
18. Inspect the Clutch and Transmission Operation
During a road test, pay attention to gear selection and clutch operation.
Look for:
- Difficulty selecting gears
- Abnormal noises
- Clutch slipping
- Unusual vibration
- Changes in clutch pedal feel
If the clutch suddenly starts slipping or gear engagement becomes difficult, professional diagnosis may be necessary.
Do not continue driving aggressively with a serious transmission or clutch symptom.
19. Check the Four-Wheel-Drive System
For a Thar equipped with four-wheel drive, the 4WD system should be operated according to the instructions in the vehicle’s owner’s manual.
Do not randomly switch between drive modes without understanding the correct operating conditions.
If you notice unusual noises, warning lights, difficulty engaging a mode, or abnormal drivetrain behavior, have the system inspected.
Because 4WD systems differ between vehicles and generations, the exact procedure should always come from the specific vehicle documentation.
20. Inspect the Exhaust System
Look underneath the vehicle for visible exhaust damage.
Check for:
- Loose exhaust components
- Damaged sections
- Unusual black soot
- Abnormal exhaust noise
- Exhaust leaks
If you hear a sudden change in exhaust sound, inspect the system before continuing long-distance driving.
Never work on a hot exhaust system.
21. Resetting the Service Reminder
Some modern vehicles may display maintenance reminders or service information on the instrument cluster.
If a service reminder needs resetting, use the procedure specified for the exact Thar model.
Do not reset a maintenance reminder simply to remove the warning without actually completing the required service.
A reminder is useful only when it accurately represents the vehicle’s maintenance status.
22. Perform a Diagnostic Scan When Necessary
Modern Thar variants may contain multiple electronic control modules.
If the vehicle displays a warning light, unusual electronic behavior, or a persistent performance problem, a compatible diagnostic scanner may be useful.
A diagnostic trouble code should not automatically be treated as proof that a particular sensor or component needs replacement.
Proper diagnosis includes checking:
- Power supply
- Ground
- Wiring
- Connectors
- Sensor signals
- Related mechanical systems
For complex electronic faults, professional diagnostic equipment and technical information may be required.
Simple Mahindra Thar Home-Service Checklist
Before Starting
- Park on a level surface
- Secure the vehicle
- Allow hot components to cool
- Gather the correct tools
- Keep the workspace clean
Under the Bonnet
- Engine oil
- Coolant
- Brake fluid
- Battery
- Air filter
- Belts
- Hoses
- Wiring
- Visible leaks
Around the Vehicle
- Tyre pressure
- Tyre condition
- Spare tyre
- Lights
- Wipers
- Washer fluid
- Brake condition
- Visible suspension problems
Underneath
- Oil leaks
- Coolant leaks
- Exhaust
- Underbody damage
- Loose components
- Drive-system components
When You Should Not Service the Thar Yourself
Home maintenance is useful, but there are jobs that should generally be left to an appropriately trained technician unless you have the correct equipment and experience.
These may include:
- Major engine disassembly
- Internal transmission repair
- Advanced electrical diagnosis
- Airbag-system repairs
- Major brake hydraulic repairs
- Steering-system repairs
- Complex suspension repairs
- Fuel-system repairs involving high-pressure systems
- Major 4WD drivetrain repairs
Safety should always come before saving money.
Final Road Test
After completing maintenance, perform a careful final inspection before driving.
Make sure:
- All tools have been removed
- Engine oil is at the correct level
- Fluid caps are properly installed
- There are no visible leaks
- Battery connections are secure
- The bonnet is properly closed
- Tyres are correctly inflated
- Brakes operate normally
- Lights work correctly
- No new warning lights appear
Start the vehicle and allow it to operate normally.
Listen for unusual noises and inspect for leaks.
If everything is normal, perform a short, controlled road test rather than immediately taking the vehicle on a long journey.Read also ducati-superbike-maintenance-guide
Final Thoughts
Servicing a Mahindra Thar at home can be a useful way to understand your vehicle and take care of basic maintenance. However, the most important part of DIY servicing is knowing the difference between a simple inspection and a repair that requires specialized tools or professional expertise.
Start with basic checks such as engine oil, coolant, battery, air filter, tyres, brakes, lights, belts, hoses, and visible leaks. Keep the vehicle clean and pay particular attention to the underbody if you regularly drive on rough roads or off-road terrain.
Most importantly, never guess critical specifications. Use the correct owner’s manual or service information for your particular Thar model, engine, transmission, and model year.
A well-maintained Thar is not only more reliable but also safer and more enjoyable to drive. Regular inspection can help identify small problems before they become expensive repairs.
I hope this How to Service Mahindra Thar at Home guide helps vehicle owners understand the basic maintenance process and perform appropriate checks safely.
For more practical car repair guides, motorcycle troubleshooting, engine maintenance tips, and workshop knowledge, keep visiting Rajesh Technical Gyan.
1 thought on “Mahindra Thar DIY Service: Step-by-Step Home Maintenance”