- “With over 10 years of hands-on automotive repair experience at Rajesh Technical Giyan, this guide breaks down the step-by-step procedure…”
In Part 1 and Part 2 of our Toyota Innova Crysta brake-pad replacement series, we discussed the importance of brake-pad maintenance, the required tools, wheel removal, brake-caliper inspection, and the basic procedure for removing the old brake pads.
In this Part 3, we will continue from the installation stage and focus on the most important final procedures.
After removing the old brake pads, simply installing new pads is not enough. A professional brake repair also requires inspection of the brake rotor, caliper, pad clips, guide pins, brake-fluid level, piston movement, and correct pad seating.
A small installation mistake can cause:
- Uneven braking
- Brake noise
- Vehicle pulling to one side
- Brake-pad overheating
- Premature pad wear
- Brake-fluid problems
- Reduced braking performance
Therefore, the final inspection and testing stage is just as important as removing the old brake pads.
Important: Toyota Innova Crysta variants can have different brake configurations depending on model year, engine, trim level, and market. Always use the correct brake pads and manufacturer specifications for your exact vehicle.
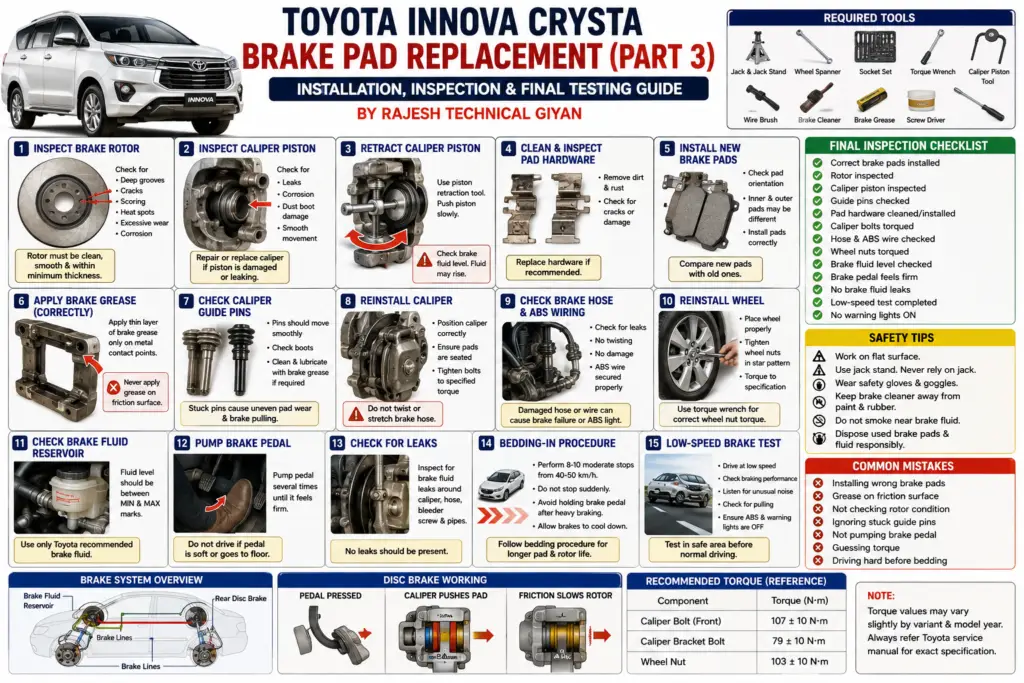
Step 1: Inspect the Brake Rotor Before Installing New Pads
Before installing the new brake pads, carefully inspect the brake rotor or disc.
The new brake pads must make proper contact with a suitable rotor surface.
Check for Rotor Damage
Inspect the disc for:
- Deep grooves
- Cracks
- Excessive scoring
- Blue or dark heat spots
- Uneven wear
- Corrosion
- Excessive lip formation
- Abnormal surface damage
Light surface marks can sometimes be normal, but deep grooves or severe heat damage require further inspection.
Why Rotor Condition Matters
Installing new brake pads against a badly damaged rotor can result in:
- Uneven pad contact
- Brake vibration
- Noise
- Reduced braking efficiency
- Premature pad wear
If the rotor is below the manufacturer’s minimum thickness or has serious damage, it should be replaced or serviced according to the manufacturer’s procedure.
Never machine or reuse a rotor without checking its specification.
Step 2: Inspect the Brake-Caliper Piston
The brake-caliper piston pushes the brake pad against the rotor when the brake pedal is pressed.
Before fitting the new pads, inspect the piston carefully.
Check for:
- Brake-fluid leakage
- Corrosion
- Damaged piston surface
- Torn dust boot
- Dirt around the piston
A leaking or damaged caliper should be repaired before completing the brake-pad replacement.
Do Not Force a Damaged Piston
If the piston does not retract smoothly, do not use excessive force.
A sticking piston can indicate a caliper problem that needs proper diagnosis.
Step 3: Retract the Brake-Caliper Piston Correctly
New brake pads are normally thicker than worn pads.
Therefore, the caliper piston may need to be pushed back to create enough space for the new pads.
Use an appropriate piston-retraction tool.
Before retracting the piston, consider the brake-fluid level in the reservoir.
As the piston moves back, brake fluid may rise in the reservoir.
If the reservoir becomes too full, fluid can overflow.
Brake fluid can damage painted surfaces, so clean any spill immediately using an appropriate method.
Never use excessive force or an unsuitable tool that can damage the piston, dust boot, or caliper.
Step 4: Inspect and Clean the Brake-Pad Hardware
Brake-pad clips, shims, and retaining hardware are important for proper brake-pad movement.
Remove dirt, rust, and brake dust from the applicable contact areas.
Inspect the hardware for:
- Rust
- Deformation
- Cracks
- Weak retaining tension
- Excessive wear
If the manufacturer recommends replacing the hardware with the brake pads, install new hardware.
Do not bend or modify brake-pad clips to make them fit.
Step 5: Install the New Toyota Innova Crysta Brake Pads
Before installation, compare the new pads with the old ones.
Check:
- Shape
- Thickness
- Mounting points
- Wear-indicator position
- Shim arrangement
- Left/right or inner/outer configuration where applicable
The new pads should match the correct application for your vehicle.
Check Pad Orientation
Some brake-pad sets use different inner and outer pads.
Never assume that all four pads are identical.
Follow the pad markings and vehicle-specific service information.
Install each pad in its correct position.
Step 6: Apply Brake-Assembly Lubricant Correctly
Some brake-pad contact points may require a suitable brake lubricant.
However, lubricant should never be applied to the friction surface.
Never put grease or lubricant on:
- Brake-pad friction material
- Rotor braking surface
- Any surface intended to generate friction
If lubrication is specified, apply only a small amount to the appropriate metal contact points using a brake-compatible product.
Too much lubricant can attract dust and contaminate the brake system.
Step 7: Inspect the Caliper Guide Pins
The caliper guide pins allow the caliper to move correctly.
A seized or contaminated guide pin can cause uneven brake-pad wear.
Check whether the guide pins:
- Move smoothly
- Are clean
- Have proper lubrication where specified
- Have intact rubber boots
- Show no excessive corrosion
If a guide pin is stuck, do not simply force it back into place.
Remove, inspect, clean, and lubricate it according to the manufacturer’s procedure.
If damaged, replace the necessary components.
Step 8: Reinstall the Brake Caliper
After installing the new brake pads, carefully position the brake caliper back into place.
Make sure:
- Pads remain correctly seated.
- Hardware is correctly positioned.
- Guide pins are correctly aligned.
- Brake hose is not twisted.
- No wiring or sensor cable is trapped.
- Caliper mounting surfaces are clean.
Tighten the caliper fasteners using the correct manufacturer-specified torque.
Do not guess brake-caliper bolt torque. Always use the Toyota service specification for the exact Innova Crysta variant.
Step 9: Check the Brake Hose and ABS Wiring
Before reinstalling the wheel, inspect the brake hose and ABS wiring.
Look for:
- Cracks
- Cuts
- Leaks
- Twisting
- Chafing
- Loose clips
- Damaged insulation
The ABS sensor wiring should be routed correctly and secured away from moving or hot components.
A damaged ABS wire can trigger an ABS warning and affect the vehicle’s electronic braking systems.
Step 10: Reinstall the Wheel
Once the brake assembly has been inspected, reinstall the wheel.
Before tightening the wheel nuts, make sure the wheel is sitting correctly against the hub.
Tighten the wheel nuts gradually in a cross pattern.
Use a calibrated torque wrench and the manufacturer’s specified wheel-nut torque.
Do not rely on an impact wrench alone for final tightening.
Step 11: Check the Brake-Fluid Reservoir
After retracting the caliper piston, check the brake-fluid reservoir.
The fluid level should be within the manufacturer’s specified range.
Do not simply add fluid without checking why the level is low.
A low brake-fluid level may indicate:
- Pad wear
- Leakage
- Hydraulic-system problems
If the brake fluid is contaminated or due for replacement, follow the manufacturer’s service procedure.
Step 12: Pump the Brake Pedal Before Driving
This is one of the most important steps after brake-pad replacement.
Before moving the vehicle, press the brake pedal several times.
Initially, the pedal may feel softer or travel farther because the caliper piston was retracted.
Continue pumping the brake pedal until the pedal becomes firm.
Never Drive With a Soft Brake Pedal
If the pedal remains excessively soft or sinks toward the floor, stop the repair process.
Inspect for:
- Brake-fluid leakage
- Incorrect pad installation
- Caliper problems
- Hydraulic-system problems
- Air in the brake system
Do not drive the vehicle until the braking system has been properly diagnosed.
Step 13: Check for Brake-Fluid Leaks
Inspect the complete brake assembly.
Look around:
- Caliper
- Brake hose
- Brake-pipe connections
- Master-cylinder area
- Reservoir
- Bleeder screw
There should be no visible brake-fluid leakage.
If any leak is detected, do not operate the vehicle.
Step 14: Brake Pad Bedding-In Procedure
New brake pads require proper bedding-in so that the friction surfaces can establish suitable contact with the brake rotor.
The exact bedding procedure depends on the brake-pad manufacturer.
In general:
- Drive in a safe area.
- Perform several moderate braking applications.
- Avoid aggressive emergency-style braking during the initial bedding period unless required for safety.
- Allow the brakes to cool between repeated applications when appropriate.
- Avoid keeping the brake pedal continuously pressed after heavy braking when the brakes are extremely hot.
Do not perform bedding-in procedures on public roads where it would be unsafe.
Always follow the brake-pad manufacturer’s recommended bedding procedure if one is provided.
Step 15: Perform a Low-Speed Brake Test
After completing the installation, test the vehicle at low speed in a safe location.
Check:
- Brake-pedal feel
- Vehicle stopping response
- Unusual noise
- Steering pull
- Brake vibration
- ABS warning light
- Brake warning light
The vehicle should stop smoothly and predictably.
If it pulls strongly to one side, stop and investigate.
Step 16: Listen for Abnormal Brake Noise
Some light noise can occur during the initial bedding process, but persistent or severe noise should not be ignored.
Possible causes include:
- Incorrect pad installation
- Loose hardware
- Dry or seized guide pins
- Rotor surface problems
- Contaminated brake pads
- Incorrect brake-pad type
Never assume that loud grinding or severe vibration is normal after installing new brake pads.
Common Mistakes During Brake-Pad Replacement
Mistake 1: Installing the Wrong Brake Pads
Always verify the correct part application before installation.
Mistake 2: Contaminating the Friction Surface
Never touch the friction surface with greasy hands or apply lubricant to it.
Mistake 3: Ignoring the Rotor
New brake pads cannot compensate for a severely damaged or worn rotor.
Mistake 4: Failing to Check Guide Pins
A seized guide pin can cause uneven pad wear and overheating.
Mistake 5: Not Pumping the Brake Pedal
Always restore proper pedal feel before moving the vehicle.
Mistake 6: Guessing Torque Specifications
Use the correct Toyota service specifications for caliper and wheel fasteners.
Mistake 7: Driving Aggressively Immediately After Installation
Allow the new pads to bed in according to the manufacturer’s instructions.
How to Know Your New Brake Pads Are Working Properly
After installation and bedding, the braking system should provide:
- Consistent pedal feel
- Smooth braking
- No severe vibration
- No abnormal grinding
- No strong pulling
- No brake-fluid leakage
- No unexpected warning lights
A small amount of initial noise can sometimes occur, but persistent symptoms require inspection.
Toyota Innova Crysta Brake Pad Replacement Checklist
Before handing the vehicle back to the customer, I recommend checking the following:
- [ ] Correct brake pads installed
- [ ] Rotor inspected
- [ ] Brake-pad hardware checked
- [ ] Caliper piston inspected
- [ ] Guide pins checked
- [ ] Caliper fasteners tightened correctly
- [ ] Brake hose inspected
- [ ] ABS wiring checked
- [ ] Wheel installed correctly
- [ ] Wheel nuts torqued correctly
- [ ] Brake-fluid level checked
- [ ] Brake pedal pumped
- [ ] No visible brake-fluid leakage
- [ ] Low-speed brake test completed
- [ ] Warning lights checked
- [ ] Brake pads bedded in correctly
Frequently Asked Questions
How long does it take to replace Toyota Innova Crysta brake pads?
The actual time depends on the vehicle condition, mechanic experience, brake configuration, and whether additional problems such as seized guide pins or worn rotors are found.
Do I need to replace the brake rotor every time I replace the brake pads?
Not necessarily.
The rotor should be inspected and measured against the manufacturer’s specifications. If it is within specification and in good condition, replacement may not be required.
Why does my brake pedal feel soft after replacing brake pads?
The caliper piston may still be retracted, or there may be another hydraulic or installation issue.
Pump the pedal before moving the vehicle. If it does not become firm, stop and inspect the braking system.
Do new brake pads need bedding?
Yes, new pads generally benefit from an appropriate bedding procedure. Follow the brake-pad manufacturer’s instructions whenever available.
Can I apply grease to the brake pad?
Never apply grease to the friction material or rotor.
Only use a suitable brake lubricant on specified metal contact points when required.
Why does my Innova Crysta pull to one side after brake-pad replacement?
Possible causes include uneven pad contact, a sticking caliper or guide pin, contamination, rotor problems, tyre issues, or another suspension/braking fault.
The vehicle should be inspected rather than driven normally until the cause is identified.
Professional Mechanic’s Final Advice
Brake-pad replacement may look like a simple maintenance job, but brakes are one of the most important safety systems on any vehicle.
A professional repair should not stop after fitting the new pads.
The mechanic should inspect the rotor, caliper, guide pins, hardware, brake hose, ABS wiring, brake-fluid level, and pedal operation.
The final road test should also be performed carefully in a safe environment.
At Rajesh Technical Giyan, my approach is simple:
Inspect → Replace → Torque → Check → Test
Never rush a brake repair.
Correct installation, proper inspection, and careful testing can help ensure reliable braking performance and safer drivingktm-bike-cylinder-head-fitting-procedure-a-complete-mechanics-step-by-step-guide
Conclusion
Replacing the brake pads on a Toyota Innova Crysta is an important maintenance procedure, but proper installation is only one part of the job.
After fitting the new pads, the rotor, caliper piston, guide pins, brake hardware, brake hose, ABS wiring, brake-fluid level, and wheel installation should all be inspected carefully.
The brake pedal must be restored to a firm and consistent condition before the vehicle is moved.
Finally, the new pads should be bedded in correctly and the vehicle should undergo a controlled low-speed brake test.
Remember:
Never compromise on brake safety.
If you are unsure about any part of the brake system, consult a qualified automotive technician and use the correct Toyota service information for your specific Innova Crysta.
Stay safe, maintain your vehicle with care, and keep learning automotive repair skills.
— Rajesh
Rajesh Technical Giyan